

The Sunlu Terminator 3 (T3) is an ambitious 3D printer that promises five times faster print speed than most of its contenders. Priced for only $199.99, it comes with 250mm/s high-speed printing, a metal double-gear extruder, and a 16 points auto-leveling system. Our review covers unboxing, assembling, first impressions, and usage recommendations.
We have to admit that most of the budget 3D printers on the market are more or less either a Prusa clone or a Creality clone, the Sunlu T3 not making an exception from this. From the first look, it is evident that it’s an Ender 3 replica on nitro boost. They share the same compact size and 220×220×250 mm build volume. The Sunlu T3 uses a 0.4mm nozzle with a maximum temperature of 260℃ and a maximum bed temp of 100℃.
Sunlu T3: Key features
- [High-speed printing] Save your time to print more. In Fast Print mode, the T3 works at 250mm/s, five times faster than most consumer 3D printers.
- [Easy To Assemble, Easy to Use] The new machine can be assembled in 3 simple steps.
- [Metal Double Gear Extruder] Output filament with more stable, robust filament transfer for fast printing.
- [X-Axis, Y-Axis Belt Adjuster] Adjust the belt’s tension to avoid the noise caused by the loose belt of the printer after long use. Keep the printing accuracy of the printer in the factory state.
- [Auto-Leveling 16 Detection Points] Accurate software + hardware compensation. Quick leveling, one key in place, saving debugging time before printing.
- [Magnetic Build Plate] The magnetic platform with excellent thermal makes its conductivity faster. Quick heating into the printing process. Material adhesion is multiplied to avoid non-sticking the baseplate. The model is easy to stick to and easy to take without deformation.
- [Self-developed Clog Detection] Pauses printing and returns to standby when a clogged nozzle is detected. After unclogging the nozzle, continue the printing process to complete the model printing. Avoid failures caused by nozzle clogged.
- [Resume Printing After Power Failure or Filament Outage] Built-in-power failure detection module and memory module, real-time tracking of the printing process. In the event of unexpected situations such as sudden power failure or material outage, record the printing status of the model in time and continue the printing process.
- [Full Silent Printing Noise Lower than 45db] Equipped with 32-bit high-performance silent motherboard + XYZE-axis silent driver, printing noise as low as 45 decibels.
Sunlu T3: Is it really that fast?
Disclosure: I received this 3D printer as part of a product review collaboration with SUNLU. Product specs and quality may vary according to the manufacturer’s reliability, so I cannot guarantee that you will get products that perform the same as seen in my article.
The brand name “SUNLU” is inspired by the word “sunshine” -the thing that is among the most treasured in our world, bringing vitality and vigor to all beings. The company was founded in 2013 by Jack, a man with a broad vision and a hardcore enthusiasm for 3D printing. One year later, they offered perfectly calibrated filaments with only 0.02mm tolerance for the first time. In 2018, SUNLU claimed to have the most sales of 3D printing consumables worldwide. In addition to printing materials (filaments and resins), they also have four FDM 3D printing machines: S9+, S8 Pro, S8, and the T3 shown in this review.

The T3 printer comes in a relatively small box with all the accessories and tools you need to use the product. After assembling it, I discovered that some spare parts were included. Unlike other brands that provide only a few meters of test filament packed in a nylon bag, SUNLU includes a 250-gram high-quality PLA filament spool. The micro SD card includes the Cura v15.04.6 slicing software (2016 edition) and two .stl test models. Disappointing, but the demo files were not prepared for their machine in GCode format.

At a glance
Unpacking and assembling the Sunlu Terminator 3 is a straightforward process, owing to the 99% partially assembled state in which the printer ships. Like most FDM printers, the T3 has two main parts: the Z-axis gantry and the base unit. All the wires (motors, sensors, extruder, and hot end) were already connected. Only four bolts through the base are needed to complete the printer’s assembly, with three additional screws holding the material rack (spool holder) to the top of the printer. The last step is to install the power source and plug in the XT60 DC cable. The power unit has a red 110V/220V switch, double check its position before connecting the AC cord. I like that the Sunlu T3 has a compact size and a small footprint. It does not occupy half of your desk like other machines. It has an overall footprint of 44x40x47 cm.
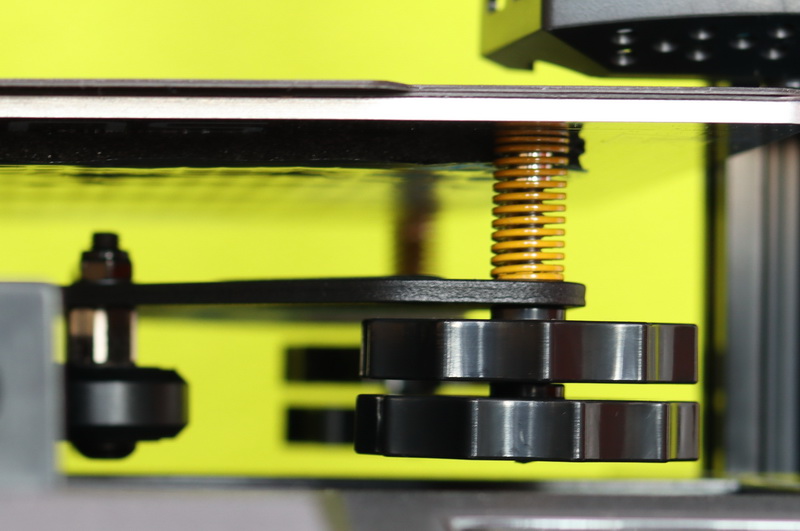
Under the 220x220mm heated print bed, there are four leveling knobs. It uses double nuts to prevent self-loosening during use. SUNLU opted for a single Z-axis threaded rod, which, unfortunately, does not provide the best stability. There are tensioner knobs for X and Y axes.

The Sunlu Terminator 3 uses a removable flexible magnetic build platform with excellent adhesion. The black removable sheet has a scaled green grid printed, making it look very technical. A distinct color would be a wiser choice. When I printed using black filament, it wasn’t easy to check the integrity and quality of the first layer.
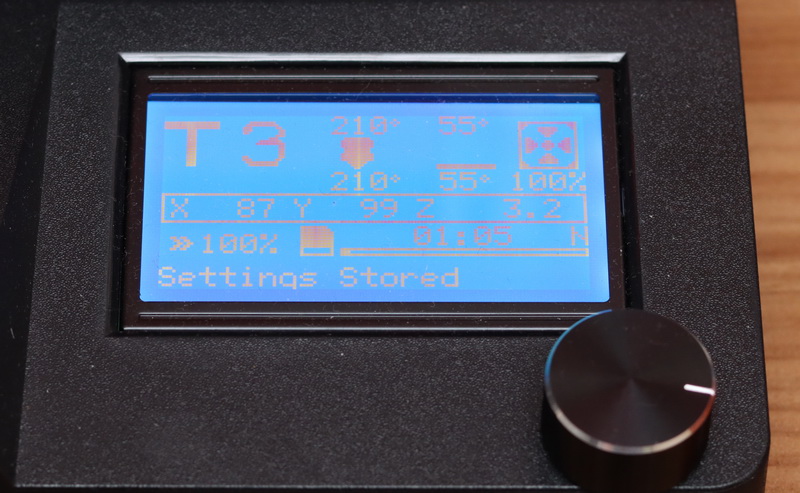
A USB-B port and micro SD slot for the print files are in the front. The control panel has a small monochrome LCD with a click-wheel which feels super-outdated compared to my existing 3D printer’s big color touchscreen display. The LCD is positioned in the right corner and faces upwards. During work, it is frequently inaccessible as the build platform will sit directly over it.
Sunlu T3: Extruder and Hotend
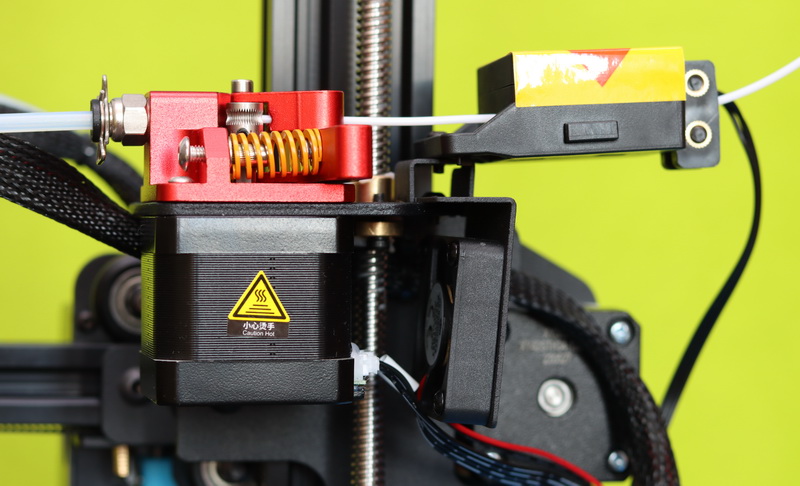
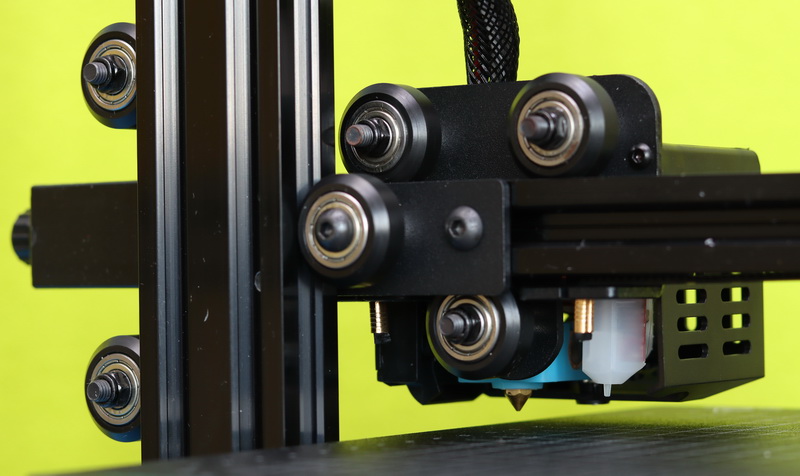
The Sunlu T3 uses a remote extruder, which means that there is a tube between the metal dual-gear filament feeder and the hot end. Unfortunately, flexible materials are not efficiently pushed through the tube in a Bowden system, making using filaments such as TPU/TPE very challenging. The extruder has a dedicated cooling fan for good heat dissipation during fast printing. Its filament run-out sensor has two metal rollers on the input side and a pressure switch that must be depressed when loading the filament.
One of the bolts that installed the print head was rusty, giving me the impression of an obsolete product. There are two cooling fans inside: one for the hot end and one for ventilating the part as it is printed. Next to the 0.4mm nozzle, there is a white LED and a BLTouch-style leveling probe for automatic bed leveling. For a better visibility, the auxiliary light should be behind and not in front of the nozzle.
Pricing and availability
The Terminator T3 can be ordered from SUNLU’s online store for $199.99 (discounted from $279.99) or from their official Amazon store. For an additional $9.99, you can order a set of spare magnetic sheets (2A + 1B).
Slicing software and printer profile
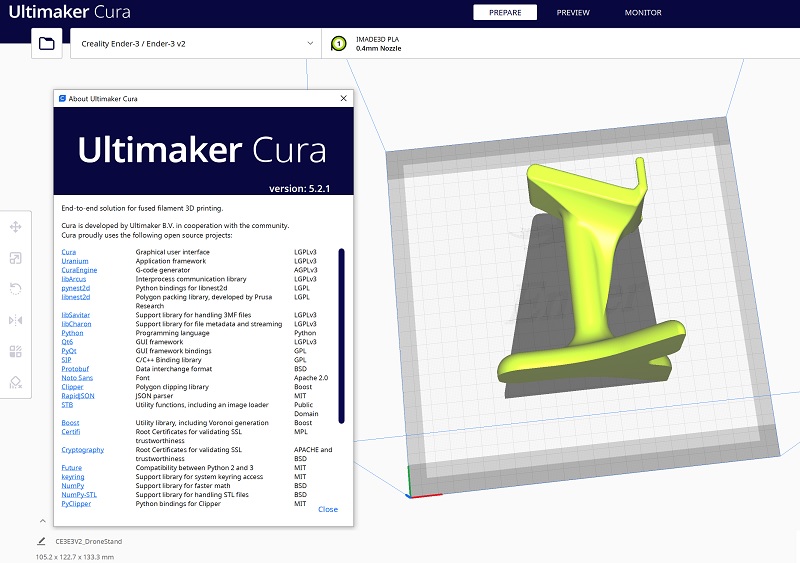
Instead of using the included six-year-old software, I downloaded the latest Ultimaker Cura 5.2.1. Sunlu does not include a printer profile, just some basic machine settings: such as nozzle size (0.4mm) and axis dimensions (x=230mm, y=230mm, and z=250mm). There is no additional Start or End g-code required. After some research, I found out that the T3 is perfectly compatible with the built-in Creality Ender-3 / Ender-3 V2 profile.

Manual + Auto bed leveling
The Sunlu T3 combines manual corner leveling with an automatic leveling system. The probe touches down at 16 points across the building platform to automatically compensate for any unevenness. Probe Z-offset needs to be set using a piece of A4 paper. Perfect leveling defines the first layer’s quality which has a massive role in a print’s success, so taking your time for this step is essential.
Sunlu T3: Fast printing mode
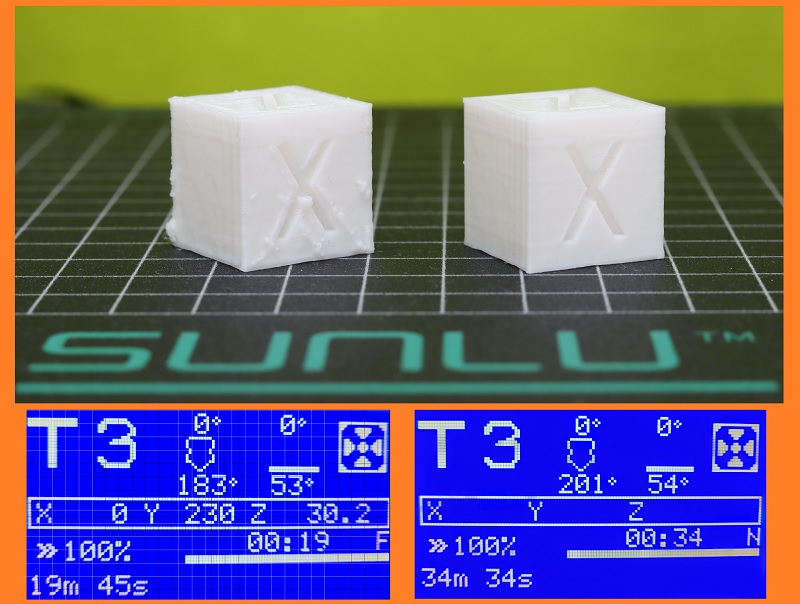
The five times faster printing speed sounds excellent, but it has some huge disadvantages. When activated, the print quality is dramatically degraded -it suffers from incomplete layers, visibility misaligned extrusions in the Z axis, and a general lack of consistency throughout. Complex models are even impossible to print without failing. Also, the machine is much noisier in fast mode and trembles so much that I expect it to fall into pieces. At least it is nice that you can toggle on and off fast print mode (F/N) whenever you want, even during print. Another fact you should consider is that some filaments, such as flexible TPUs, require low printing speed (20 – 70 mm/s).
As the starting-up time (pre-heating and ABL) takes roughly 5 minutes, when you print small models, there is not much difference in the total time. In normal mode (50mm/s), the 20x20mm XYZ-calibration cube was finished in 34 minutes, and in fast mode (250mm/s), the same model was in 19 minutes. If you look at the comparison picture below, I don’t know if it’s worth the 15 minutes you won.
User experience
The 3D printer is easy to assemble, and although it requires manual calibration–the enlarged bed leveling knobs make the process convenient. If the filament is not perfectly straight, it is hard to load it through the run-out sensor, so I disabled it. The T3’s bed size is 220x220mm and has a built height of 250mm, making the Sunlu Terminator well-suited to print most of the things you want.
After spending a couple of days tweaking and printing, I finished the first job which turned out as it should. In the beginning, I had lots of print failures and other problems. It worked well only after disabling all the “selling point” features (Fast Print, Power Loss Recover, and Sensor run-out sensor). The flexible magnetic plastic bed allows easy model removal but is less durable than PEI sheets. During the leveling process, it was scratched by the nozzle, and I had to replace it.

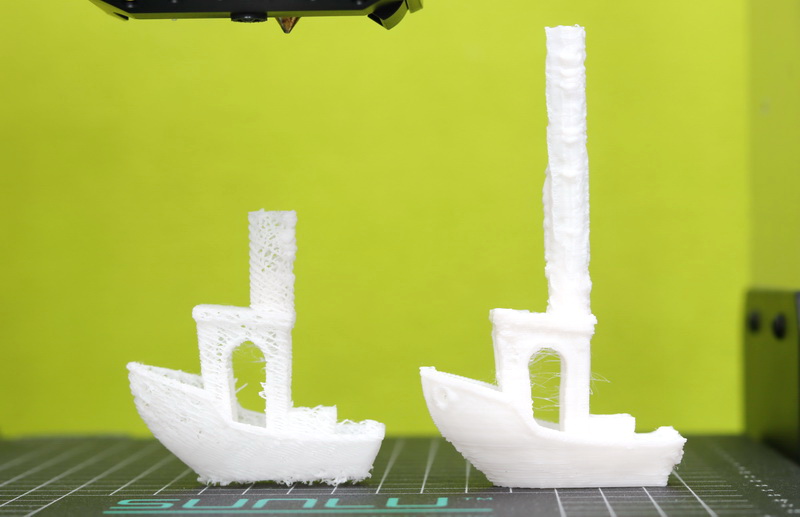
The vase on the left was printed using the included white demo PLA filament, and for the FPV drone stand on the right, I used the SUNLU PLA CF filament. At standard speed with 0.2mm resolution, Terminator 3 did well in rendering details. It is my quietest FDM printer, but I still can’t sleep in the same room while working.
Technical specifications
| Build volume | 220x220x250mm |
| Printing speed | 20-250mm/s |
| Printing accuracy | ± 0.1 mm |
| Filament diameter | 1.75mm |
| Material compatibility | PLA Meta, PLA & PLA+, Carbon fiber, ABS(low temp, PETG, HIPS, WOOD, PCL, and TPU |
| Max Nozzle temperature | 500 °F / 260 °C |
| Max bed temperature | 212 °F / 100 °C |
| Operating noise | ≤ 45 dB |
| Dimensions | 440×400×470 mm |


My Sunlu T3 printer has about 500 working hours, when is it time to replace the nozzle on this 3d printer?
Your reviews are very detailed. Thank you so much for doing these testes!
Just got this Sunlu T3 and looking for best slicing software. What else I can use than Ultimate Cura. Thanks
I had three other 3D printers before this Sunlu T3, but this last one is the best! I’m very pleased with this purchase.
This SUNLU T3 is good, like any Creality, in its price tag!
Pros:
– excellent value for money. Other much more expensive 3D printers have a much lower quality
– Simple to assemble, all the screws are contained in labeled sachets. Step-by-step video guide
– the plate heats well and has good adherence without having to use any glue
– metal extruder
– the possibility of using many filaments of different materials (PLA, PLA+, ABS, Wood, PETG, etc.)
Against:
– it’s not working well at high speed
Get an Ender-5 S1 if you want a reliable, fast 3D printer!
250mm/sec is a fairy tell!
NO Cartesian-type 3D machine will print well at this speed. You will need to pay 1500$ for a CoreXY 3D printer for that speed.