

Today I will review the Walkera Rodeo 110, a micro-scale brushless FPV quadcopter. Compared to larger FPV drones, the Rodeo 110 is suitable for outdoor as well as for indoor flights.
While doing some research for my Walkera Rodeo 110 review, I read somewhere that its camera is capable of recording HD videos, which is a big lie. To keep the latency as low as possible, FPV cameras do not offer DVR features. Frankly, I’m tired by these fake reviews, they should be illegal! FirstQuadcopter.com guarantees the publication of only truly hands-on drone reviews.
The Rodeo 110 is not just Walkera’s smallest FPV drone but also one of their latest model. It follows the great success of its bigger brothers, the Rodeo 150 and F210.

Walkera Rodeo 110 drone highlights
- High-strength carbon fiber frame;
- Easy to maintain modular design;
- SPF3 flight controller with a proprietary BetaFlight firmware;
- Built-in PPM receiver and optional SBUS receiver;
- Powerful 1102 brush-less motors (WK-WS-13-002);
- Individual ESC for each motor (probably 6A with up to 10A peeks);
- 600 TVL camera with angle adjustment;
- Available with TX5836 (FCC – 200 mW) or TX5837 (CE – 25mW) video transmitters (5.8G VTX);
- On-board buzzer and headlight;
- About 7 ~ 8 minutes flight time.
Walkera Rodeo 110 mini FPV quadcopter in-dept review
Disclosure: I received this mini racing drone as part of a product review collaboration with RCMoment. Although the product was offered as a gift, all the opinions in this review remain my own. They started to bug me about 1 year ago with cheap drones but, only now when they offered me the Rodeo 110, we came to an agreement.
Rodeo 110 review – At a glance
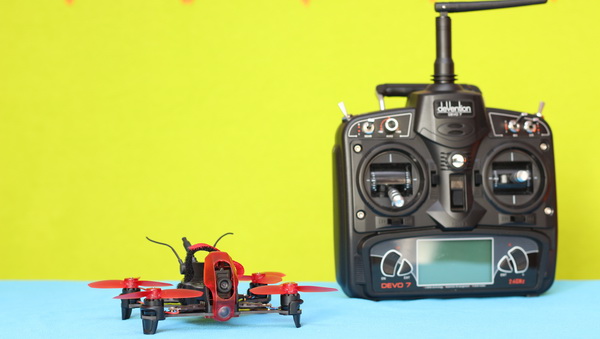
As I already own a Devo 7 remote controller, I requested BNF (Bind & Fly) package of the Walkera 110 Rodeo, this way reducing the shipping costs and eventually custom duties.
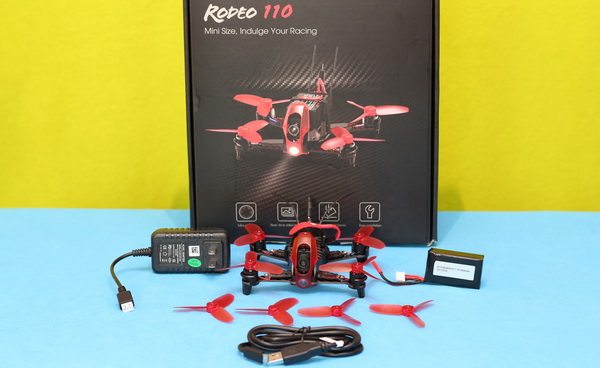
The quadcopter arrived in the RTF box (without RC, as I requested), which is suitable for storing and carrying the drone to the flight field. Anyway, I will probably use my Think Thank FPV backpack because it fits in it not just the aircraft and the Devo 7 transmitter but also my FPV Goggle, as well as a couple of spare batteries.
Inside the box, besides the aircraft, I found the following: flight battery, balance battery charger, EU power adapter, micro USB upgrade cable, two pairs of spare propellers (all red) and Rodeo 110 user guide.
Walkera Rodeo 110 review: Design and build quality
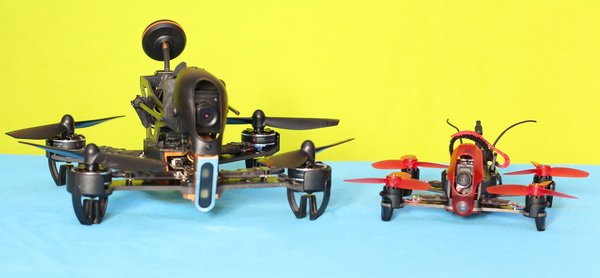
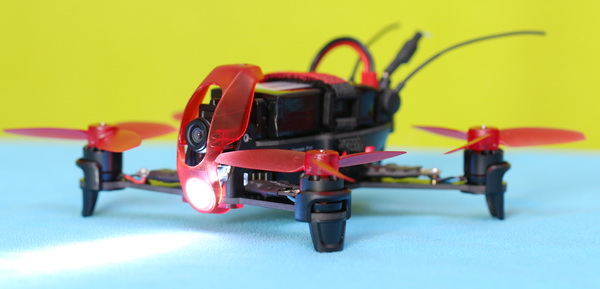
At first impression, I like both the design and build quality. Despite the fact that it doesn’t have the beautifully aggressive look of its bigger brother, the Walkera F210, it still inspires a fast-flying machine.
The frame is mostly made of high-quality 2 mm carbon fiber with small amounts of non-structural plastic parts which makes the aircraft very sturdy and able to survive many crashes. The fuselage measures about 101 x 117 x 55 mm and weighs 101 grams.
The battery is mounted on top of the aircraft between two plates (front and back). According to the specs, the 2s, 850mAh Li-Po allows about 6 ~ 7 minutes of flight autonomy. BTW, the size and capacity of the battery is identical to the one that the larger Rodeo 150 has (find more in my review: https://www.firstquadcopter.com/reviews/walkera-rodeo-150-review/). Only difference is that it has JST connector instead of EC2 one.
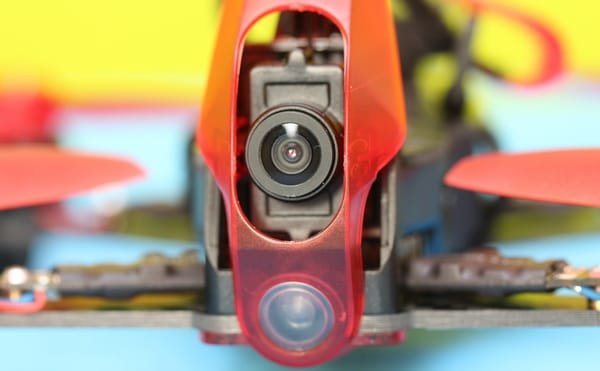
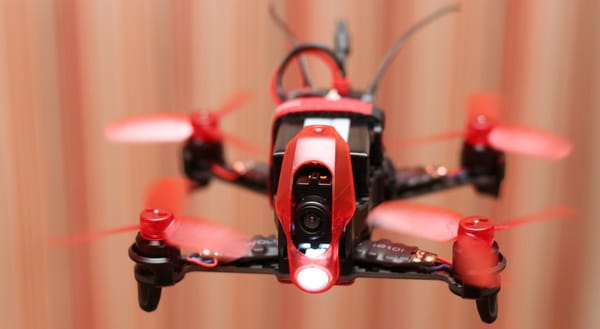
In the front part of the aircraft is located the 600TVL CMOS camera, right above the frontal LED lighs. Tilt angle of the camera is easily adjustable (-10º to + 45º). Camera is protected by a red semitransparent piece of plastic.
The 5.8G linear antenna is located on the rear of the drone and a piece of black heat-shrink tube protects it. Taking apart the Walkera 110, I found out that the FPV antenna is connected to the VTX through uFL/IPX connector, so cloverleaf upgrade is possible.
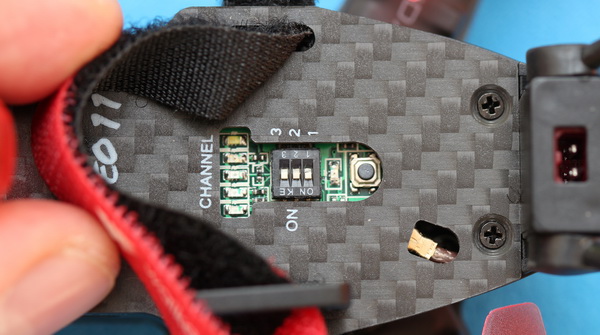
Under the belly of the drone you can find a 3-pin connector that allows to connect an external SBUS radio receiver and a hole where the SBUS/PPM switch should be. The built-in Walkera receiver is plugged with PPM connection.
Walkera Rodeo 110 review: Camera and FPV
As I previously mentioned, the angle of the camera can be manually adjusted according to your flight style. The camera is paired with the TX5836 (US version) or TX5837 (Europe version) 5.8G wireless video transmitter.
By default, EU version has only 25mW broadcast power but, if you need a longer range, you can switch to 200mW by long pressing (30 seconds) the button located on top of the Rodeo 110 (near the micro DIP switches).
Unfortunately, the camera could offer better image quality. The live video seems to be blurred and the light sensitivity is also poor. In the future I think I will replace the stock FPV camera with a better one in order to make FPV flights more enjoyable.
Walkera 110 binding with Devo 7 transmitter
The binding process is very simple, it takes just few minutes. First of all be sure that FixedID is set to “none” – this can be done by pressing the “Fixed ID clearance” button.
Now, you can turn ON the transmitter then connect the battery to the drone. When binding is successful, the buzzer will stop sending that annoying “BB” noise.
If you are trying to bind a DeviationTX transmitter with the Rodeo 110, don’t forget to set TX protocol to “DEVO”.
Walkera Rodeo 110 review: Flight preparation and test flight
Like most of the racing drones, the Rodeo 110 also features 3 types of flight mode:
- “STABILIZE” aka Angle (Fully stabilized. Does not allow flip and rolls);
- “INTERMEDIATE” aka Horizon (Partially stabilized. It allow flips and rolls);
- “ADVANCED” aka Rate or Acro (Without any stabilization).
In case of DEVO 7, you can toggle between flight modes using the “Mix” switch. If your are a first-time pilot do not switch to Advanced mode!!!.
The motors can be arming by moving the throttle stick (left one in mode2) to the lowest left position. By moving the same stick to the lowest right right position you can lock the motors.
Angle mode works like a charm. The drone is very stable and responsive but not too fast. Punch-outs are temperated by the only 2s Li-Po. On intermediate mode you can roll in all directions, but be careful, it works differently, like in the case of toy quads.
You can have around 7 minutes of playtime with a freshly charged battery. When the battery is near empty, the built-in buzzer will emit. From this moment, you have about one minute to land safely.
Pricing and availability
Using the “WR110” coupon code, you can have the Rodeo 110 with 10% off (there is EU and US option!). For longer fun, I suggest adding at least one spare battery to your chart.


Nice work!
Did you test the Walkera 110 with 3s Li-Po battery? It should be much faster!