One of the biggest challenges, if you want to build a micro FPV quadcopter is to find a proper camera. There are only a few FPV cameras like this Eachine MC02, which are lightweight enough and support 1s LI-POs.
Recently, I reviewed the Eachine E010 quad, which theoretically can be converted into a Tiny Whoop by installing an FPV camera. This way, you can obtain the cheapest 5.8G FPV quadcopter, spending around $15 for the quad and $33 for the Eachine MC02 camera. I said theoretically because, unfortunately, the flight time will be reduced dramatically.
Unlike its predecessor, this MC02 camera has adjustable TX power (25 mW or 200 mW). OK, but why should we reduce the transmission power? For example, if you fly only indoors, the 25 mW will be far enough, and this way the camera’s power consumption will be reduced by about 50%.
Not late after the MC02 AIO camera was announced, Eachine came up with two new, even lighter AIO FPV cameras, the TX01 and TX02, which are exclusively dedicated to drones powered by 1s Li-Po batteries (3.3 – 5v).
Eachine MC02 FPV camera review

Immediately after I published my MC01 review, I was contacted by Jacky from Banggood if I was interested to also testing the newer Eachine MC02. Of course, I said yes :)
The tiny camera comes in a nice cardboard box. A piece of foam protects very well the camera and its antenna from damage during shipping. Probably in order to limit the overall weight of the MC02 camera, Eachine decided not to include a housing (outer case). The manufacturer included in the box a very generous accessory pack: lens cap, boost module, two servo cables, 5 battery connectors (2s – 6s), and user guide.
If you want to power this camera with 1s Li-Po batteries, you will need to use the included voltage booster module. The wiring can be done easily but unfortunately, it requires soldering.
The Eachine MC02 camera weighs about 9 grams and measures 23 x 20 x 12.8mm without antenna. The nickel-plated 4-leaf antenna is directly soldered on the top of the camera’s main board and also serves as heat sink.
In order to display telemetry values (OSD), you can interlink the FC between the two yellow wires (AV In/Out).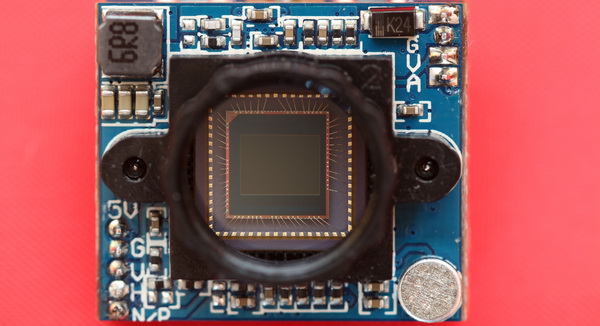

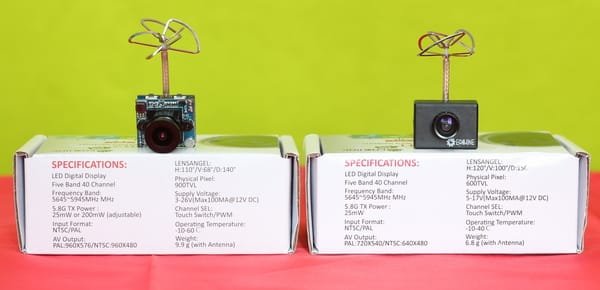
Eachine MC02 features and specs
- Resolution of 900 TVL;
- 1/3 “CMOS image sensor;
- Compatible with PAL and NTSC video standards;
- Video In/Out;
- Can display OSD values;
- 110-degree FOV horizontal view angle;
- 140 degree diagonal perspective;
- Switchable TX Power (25mW or 200mW);
- 5 bands, 40 channels including raceband;
- Nickel-plated 4-leaf antenna (RHCP circular polarization);
- Wide input voltage range, DC 4.8V to 26V (can work with 1s Li-Po using the included voltage booster);
- Can be switched between horizontal and vertical views;
- Built-in microphone.
Eachine MC02 control buttons and switches
On the rear part of the camera, there is located a 7-segment LED display and a 4-bit DIP switch module, which allows to set the following: 1- Microphone ON/OFF, 2- Pal/NTSC, 3- Flip and 4- Mirror (the switch works different as the user manual says).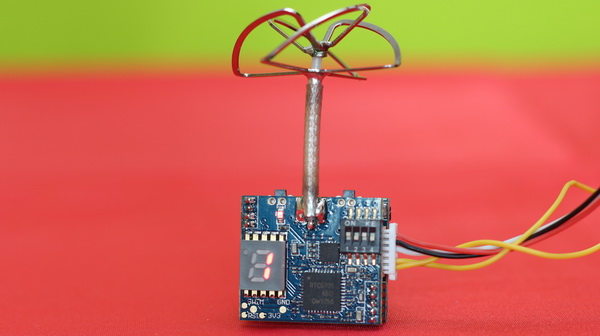

Two micro push buttons on top of the camera allow configuring the TX module. By pressing the one above the display for 2 seconds you can turn ON/OFF the TX module. By pressing the same button for 5 seconds, you can toggle between 25mW and 200mW TX power. Press the other top button for 1 second to select the desired channel and for 2 seconds to set the proper band.
According to the manufacturer’s specs, the TX channel can also be set remotely using PWM signals.
Eachine MC02 frequency table
- Band A: 5865, 5845, 5825, 5805, 5785, 5765, 5745, 5725
- Band B: 5733, 5752, 5771, 5790, 5809, 5828, 5847, 5866
- Band E: 5705, 5685, 5665, 5645, 5885, 5905, 5925, 5945
- Band F: 5740, 5760, 5780, 5800, 5820, 5840, 5860, 5880
- Race B: 5658, 5695, 5732, 5769, 5806, 5843, 5880, 5917
Thanks to the integrated microphone, the Eachine MC02 FPV camera can transmit real-time video with audio, which allows an even more realistic sensation.
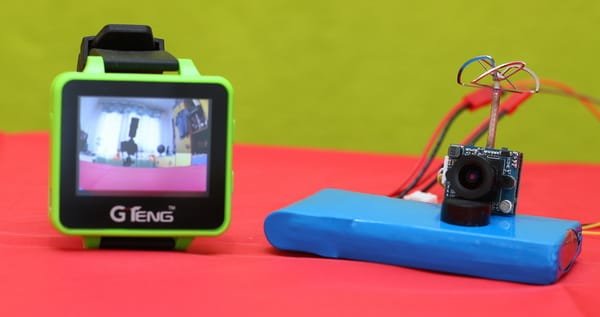
Eachine MC02 FPV camera test
To test the camera, I used a 2s Li-Po and my Eachine LCD5802 FPV monitor. Using auto-search, I found the MC02’s real-time video feed quickly. Surprisingly, the image was totally out of focus. By rotating the lens, I managed to fix this issue.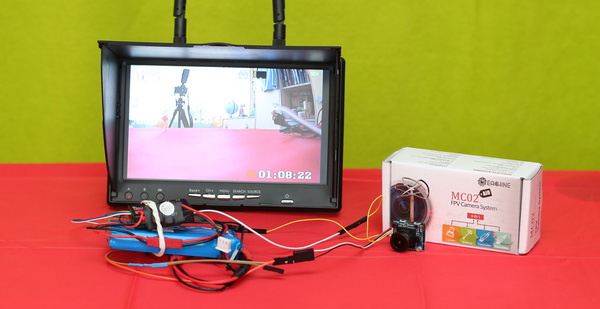

In my opinion, the camera offers pretty good quality indoors. It has a slightly slower reaction to light changes than my RunCam Swift and much lower light sensitivity compared to the RunCam Owl Plus.
Thanks to the video In/Out, I managed to interlink my mini FPV DVR, which allowed me to record directly from the camera module, eliminating the RF noise of the TX module.
It is tough to attach the camera to your quadcopter because no mounting accessories are included, not even an outer case. I opted to use two pieces of rubber bands, but hot glue will do the job as well.
As you can see in the test video below, the colors are pretty good (sky is blue, and the grass is green). The only problem I observed is that sometimes the ground becomes very dark, making it harder to fly exclusively in FPV mode.

Pricing and availability
For those interested in building their own micro FPV quad, this AIO FPV camera can be ordered from here for 32.99, including free shipping. If you need an even lighter camera that works on low voltage (3.3V – 5V), you can look for the Eachine TX01 (25mW TX power) or the Eachine TX02 (200mW).