

Few months ago I was contacted by Kevin from HobbyMate in order to provide some information regarding the best configuration for their upcoming 5″ Comet FPV drone. I gladly sent them my suggestions regarding the frame type and other essential parts. The COMET VX220’s idea is to deliver a lighter and most powerful racing quad possible in under $200 price range.
In case that you don’t like pre-build things, most of the parts can be individually purchased as well. For example, the HOBBYMATE 5″ frame KIT is sold for $49.90. Anyway, if you sum up the price of all components (frame, motors, FC, ESC, VTX, camera, radio receiver), the COMET VX220 RTF package has more than a fair price.
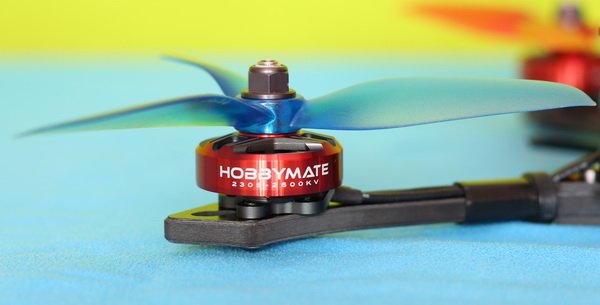
The Comet uses standard LIPOs with XT60 connectors, which is great because they are very easy to find and relatively inexpensive batteries. While most of the electronics can be powered from 3 to 6s batteries, for best results, the LIPOs need to be matched with the motor type. For 1800KV version is suggested to use up to 6s and for 2500KV up to 5s. BTW, HOBBYMATE 2305 motors are available in red and silver colors.

HobbyMate Comet VX220 highlights
- Low-deck, stretched-X design;
- 220mm sized carbon fiber frame (thickness 5mm);
- Airbot F4 V6 flight controller;
- Typhoon 4-in-1 35A ESC;
- HOBBYMATE 2305 FPV racing motors (2500KV or 1800KV);
- Dalprop 5045 / Gemfan 5152 3-leaf propellers;
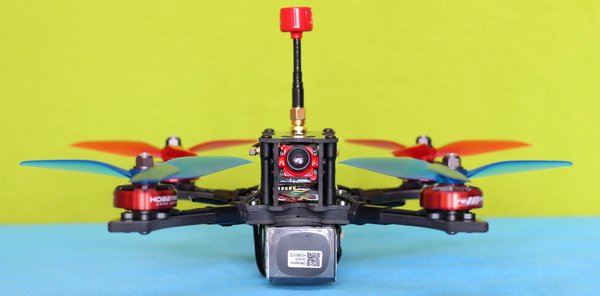
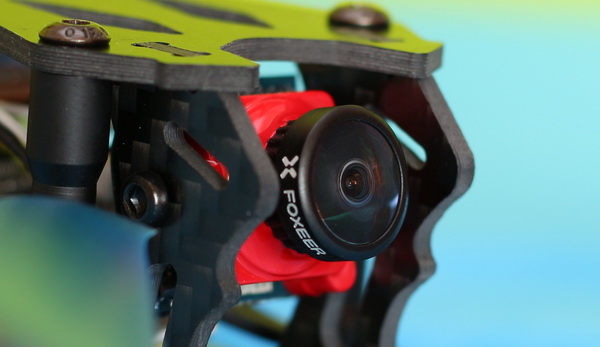
- Foxeer Arrow Micro Pro 600TVL FPV Camera;
- Switchable 0~600 mW 5.8G Video transmitter (VTx);
- Optional Frsky XM+, R-XSR, DSM or FlySky radio receiver.
HOBBYMATE VX220 Comet review
Disclosure: I received this drone from HobbyCool, in order to test it and make an in-depth review. Although the quadcopter was offered for free, all opinions in this review remain my own and I was in no way influenced by my partner.
While the drone was on its way to me, I got three e-mails from the manufacturer. They provided some additional instruction regarding the pre-flight settings. Hopefully they have same professional attitude with customers as well. IMHO, a great customer support is more important than the lowest market price.
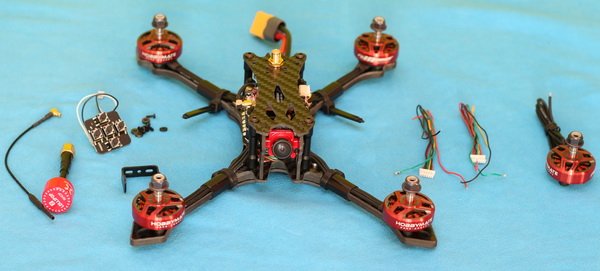

The package arrived in about two weeks. As I requested, I received BNF version with FrSky receiver and 2500Kv motors. Inside the bulk cardboard box, besides the drone, I found the following: bunch of documentations (for FC, ESC, VTX, Receiver & Camera), Foxeer OSD keyboard, two servo cables, two 5.8G Antennas (Foxeer Lollipop 2 and Whip linear). No propellers nor battery velcro, but one spare motor.
Let’s have a closer look on the best FPV drone under 200
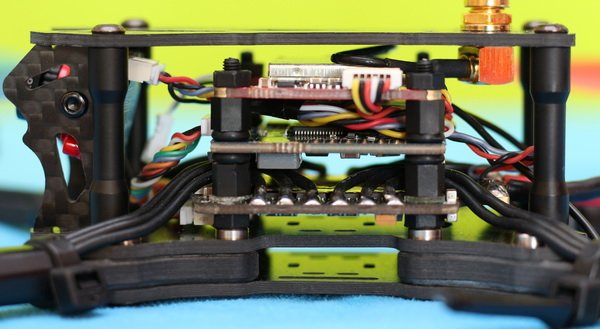
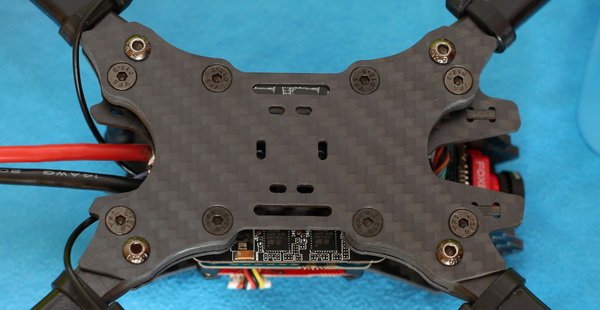
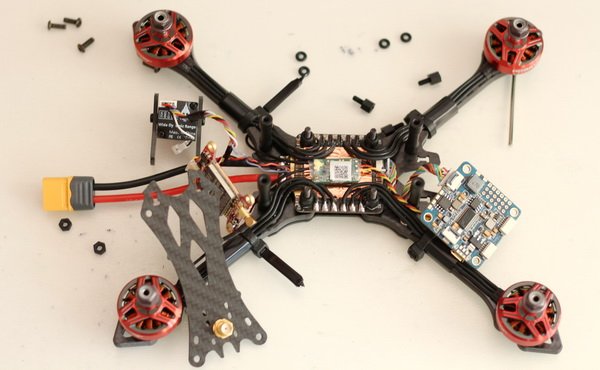
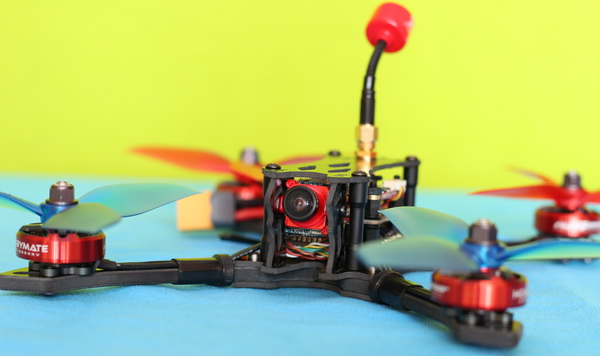
The 5mm arms are between a 2mm sandwich. The top plate is also 2mm. No complains regarding the build quality, everything is nicely done. The frame feels very solid, unable to bent up/down nor side to side. Wires between motors, ESC and Flight controller are nicely organized. It weights about 304 grams ready to fly without battery.

It has 3 hole configuration to hold the motors. The manufacturer suggest to pair the HOBBYMATE 2305 motors with Dalprop 5045 3-blade or Gemfan 5152 3-blade propellers.
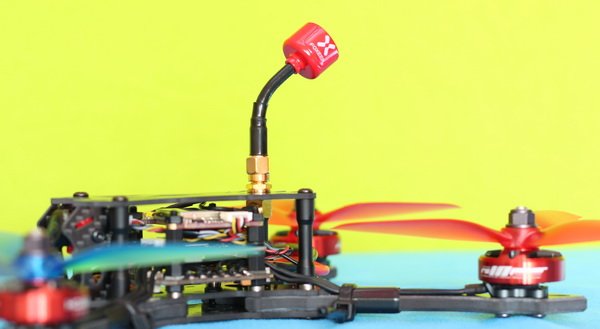
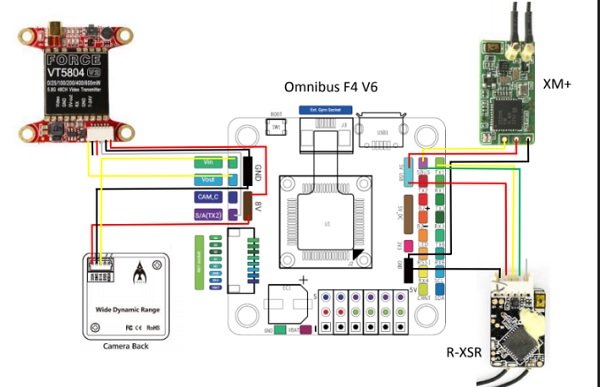
The Foxeer Lollipop 2 antenna is linked to the iFlight Force VT5804 VTX through a short pigtail. The only thing I would change on the VX220 frame design is the antenna position. During crashes it is too vulnerable having it straight up.
Designed for FPV, it has no head lights nor rear navigation lights. Powering it ON, I found that it doesn’t even has a buzzer. Anyway, I planned to replace the stock beeper with a self-powered drone finder buzzer.
Although I read in some YouTube reviews that it has foam padding which protects the battery from the screw heads, I found only bare bottom plate. I strongly suggest to use proper battery strap in order to prevent losing the LiPo when you perform acrobatic flight movements.

Parts need to be complete
In order to get it in the air, BNF version requires propellers, battery and transmitter. PNP version will also need a radio receiver. If you are a completely newbie in the field a suggest you to go for the BNF package. For FPV flights you will also need a FPV monitor or headset.

HOBBYMATE COMET review: Camera, FPV and OSD
Currently, there are two big players on the FPV camera market, RunCam and Foxeer. HOBBYMATE voted for Foxeer’s Arrow Pro Micro 600 TVL camera with 1/3″ Sony Super HAD II CCD image sensor. The angle of the camera can be easily adjusted, matching it with your flight style. As lens type, you have two options: the 1.8 mm version that provides 160 degree field of view and the 2.1 mm lens which offers 135° FOV. Image quality can be fine tuned using the included OSD keyboard.

Due to the switchable broadcast power, the FPV range is not an issue. The 48 channels iFlight VT5804 VTX can be set to 600 mW transmission power if needed. Both, frequency and power can be adjusted through the on-board control button as well as remotely via your transmitter (IRC Tramp works after FC-VTX wiring is done properly).
Thanks to the on-board microphone, using a compatible FPV headset, you can hear the noise of the four powerful brushless motors. That’s what I call the ultimate immersive FPV flight experience.
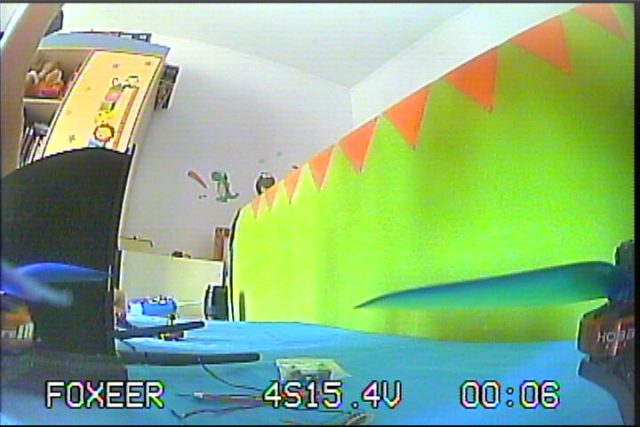
By default, you have only OSD provided by the camera, which shows craft name, battery type/voltage and elapsed flight time. Camera OSD settings can be accessed by long pressing the Up key of the OSD controller.

In order to enable BetaFligh OSD, I changed the wiring between camera, VTX and flight controller following the instructions received by email. After this, I could customize the OSD screen trough the BetaFlight configurator Chrome APP.
As the battery is attached under the belly of the drone, there is enough room on top for a second DVR camera (whether GoPro Session or Foxeer Legend alike).
HOBBYMATE VX220 Comet review: Initial setup
First off all: Do not power ON the Comet drone with installed propellers till everything is configured properly and double checked. Also, prior any setup process always read the product’s manual!
The main difference between PNP and BNF package, is that while BNF requires only binding process, PNP requires also radio receiver installation & wiring.

I forgot to mention at the beginning of my review that although the radio receiver was properly wired, it was installed on a totally wrong place (between the ESC and FC). I had to remove all the electronic parts in order to re-position the receiver in an easily accessible place.

Binding with Taranis Q X7 transmitter
Firstly, I created a new model on my transmitter and name it “Comet”. Secondly, under the “Model setup” screen, I set “Internal RF” and operation mode to “D16”. After these two steps you can selected the “Bind” option. When the Taranis Q X7 enters into “Bind” state it makes a high-pitched beeping.
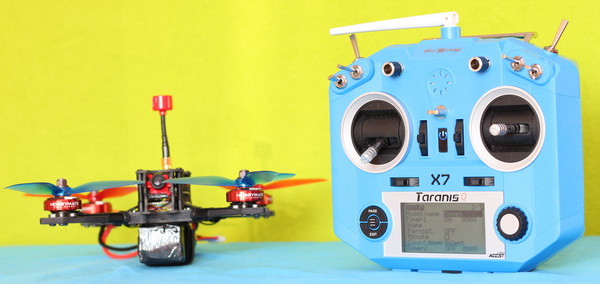

Now you can connect the drone’s battery while you hold down the receiver’s F/S button. Successful binding will be confirmed by solid green light.
BetaFligh configurator settings
I will talk only about the must have settings, without getting into details like PID tuning.
- Un-check “Don’t spin motors when armed“
- Channel mapping & switch assignment: I opted to use left shoulder switch to Arm/Disarm the motors, and the right 3 position switch to toggle between flight modes (poz1 – Stabilized, poz2 – Horizon and poz3 – Angle).
- Fail-safe setup: You need to set motor stop after signal loss in order to prevent flyaway. You can also assign one stick to the beeper (if you added one).
- OSD values: You can add more info to your OSD screen, but I recommend to activate only the ones that are truly important for your FPV flight. After all, the live image is the most important thing.
HOBBYMATE VX220 review: Flight performance
Generally, FPV racing drones are not for beginners, and the HobbyMate Comet is no exception. While on “Angle” mode it is pretty stable, it does not have GPS. This means that cannot be automatically return to you if you fly out of the controller’s range or manually by pressing the “RTH” button. If you are totally newbie in the field, I suggest getting used to flying it without FPV goggles first.
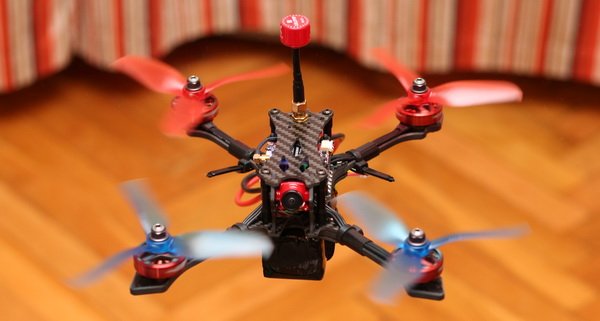

Even with a 4S LiPo it is super FAST and AGILE! It’s simply awesome! You need to test it by yourself in order to feel how much power provides at full throttle. With good quality propellers it is surprisingly quiet. Note: by default, motors are spinning even at zero throttle, so take care when you arm them!

FPV quality and range is pretty nice. It is comparable with the one provided by the recently reviewed Kopis 2.
Pricing and availability
If you are not a fan of any big drone brands or you just want to get the best value for your money, you can grab the HobbyMate Comet VX220 from HobbyMate. As I previously mentioned at the time you place your order you need to choose between KITs, PNP, BNF (XM+), or BNF (R-XSR) configuration.


Visitor Rating: 5 Stars
Visitor Rating: 5 Stars
Visitor Rating: 5 Stars
Visitor Rating: 4 Stars
Visitor Rating: 5 Stars
Visitor Rating: 4 Stars
Visitor Rating: 3 Stars
Visitor Rating: 4 Stars
Visitor Rating: 4 Stars
Visitor Rating: 4 Stars
Visitor Rating: 4 Stars
Visitor Rating: 4 Stars
Visitor Rating: 5 Stars