

The CaddxFPV Vista Nebula Nano is the most affordable and probably the lightest HD digital transmission system compatible with the DJI FPV goggles. With a total weight of just 24 grams, it can be installed on compact FPV drones. You can also find it in pre-build systems such as the BetaFPV Pavo30 CineWhoop.
Caddx is the only company licensed by DJI to manufacture digital FPV transmitters and compatible cameras using their technology. Caddx has 2 types of HD VTXs (Air Unit Micro and Vista) and 4 versions of the Nebula camera (V1, V2, Pro, and Micro).
The biggest concern of FPV systems is latency. Caddx promises 32ms end-to-end latency with the Vista VTX and Nebula Nano camera. This combo has only one working mode. By comparison, the Nebula Pro has two working modes, a High-Quality one with 30-40ms and a Low-Latency with 21-28ms.

Caddx Vista Nebula Nano hands-on review
Disclosure: I received this Caddx digital FPV kit as part of a product review collaboration with BetaFPV. Technical specs and quality may vary according to the manufacturer’s reliability, so I cannot guarantee that you will get an identical product, as seen in my article.
After I published my DJI FPV goggles V2 review, I started converting my drones from analogue to digital FPV. Iris from BFPV was kind and offered me a Vista Nebula Nano kit to install on my existing Pavo 30 drone. The process will be described in detail in the following article.
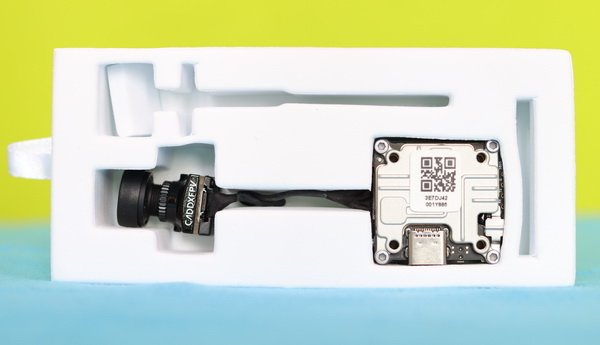
I received the ‘OEM’ aka ‘drone builder’ edition without antenna, FC cable, camera bracket and user manual. Initially, I thought that this will be a problem but, luckily, I found at home all the accessories I needed for the digital FPV conversion.
At a glance
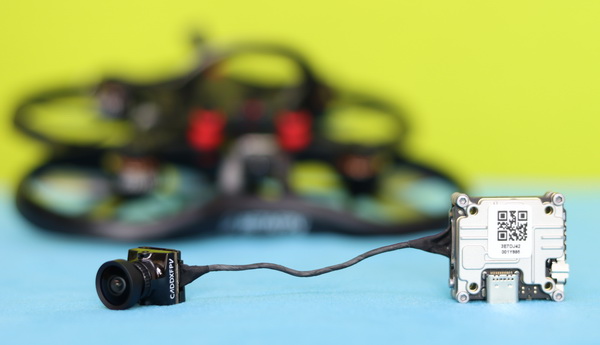
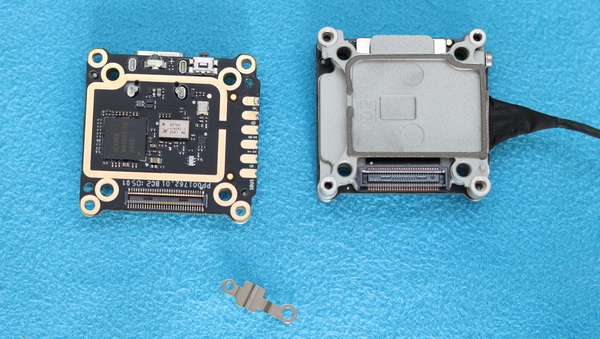
The Caddx Vista Nebula Nano weighs 24 grams (5g camera and 19g VTX). The two units are linked together with an 8cm coaxial cable (for larger drones there is available also a 12cm cable). Vista VTX measures just 30x29x13mm and has only one antenna socket instead of two, like the DJI Air Unit or the Caddx Air Unit Micro. The antenna port is positioned right above the battery soldering pads, which is not a great idea because during a crash short-circuit can occur easily. The Caddx Vista has two main parts (camera and transition modules) connected together via an internal socket.

The Nebula Nano camera has a form factor of 14x14mm, but there is included a 19x19mm extension bracket if needed (in the full package).
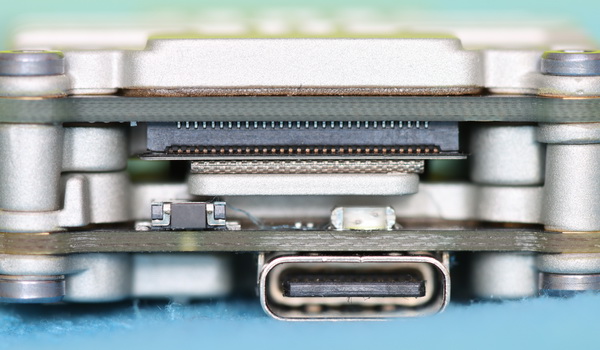
I forgot that the Caddx Vista does not have an onboard recording solution and looked desperately for the micro SD slot on all sides of the device. Right under the USB Type-C port, there is a bi-colour status LED and a tiny bind button.

Caddx Vista Nebula Nano kit specifications
- Vista VTX
- Input Power: 7.4-26.4V (2-6S);
- Operating Frquency: 5.725-5.850GHz;
- Power Output: 25mW / 200mW / 500mW / 700mW
- Transmitter Power: (EIRP) FCC/SRRC/MIC: <30dBm / CE: <14dBm;
- Max.Transmission Distance: FCC/SRRC: 4km / CE: 0.7km;
- Min.latency: (end-to-end) Low Latency Mode (720p 120fps): 21-28ms;
- High Quality Mode: (720p 60fps): 30-40ms;
- I/O Interface: USB Type-C, Ipex3, 3-in-1 port;
- Supported Flight Controller System: F3 / F4 / F7;
- Weight: 20.8g (unit only);
- Dimensions: 30x29x13mm (20×20 mounting pattern).
- Nebula Nano camera
- Image sensor: 1/3 inch CMOS sensor;
- Resolution: 720p/60fps;
- FPV/Recording FOV: 150°;
- Lens: 2.1mm;
- FPV Latency: 32ms;
- TV system: NTSC&PAL (switchable);
- Weight: 4.5g;
- Dimension: 14*14*21mm(can be extended into 19*19mm).
Wiring, Activation, Binding and First usage
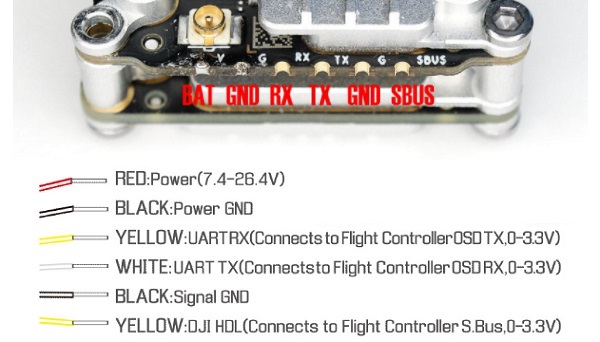
In order to install the antenna and solder the flight controller cable, you need to take apart the Vista unit. In the picture below you can find the pinout, respectively the colour coding of the FC cable.

For the activation, you need to download and install the DJI Assistant 2 APP (available for macOS and Windows computers). Additionally to the USB connection, you need to power the Caddx Vista module from a battery (2-6S) or from a working flight controller. The APP recognized the device as ‘DJI FPV Air Unit (Lite)’. After activation was completed, DJI Assistant prompted that a firmware upgrade is required. The v01.00.0600 promises 50Mbps bitrate mode, an optimized power algorithm, and solving some known bugs. During the process, the Vista VTX gets very hot and you should perform the process in spaces with good ventilation.
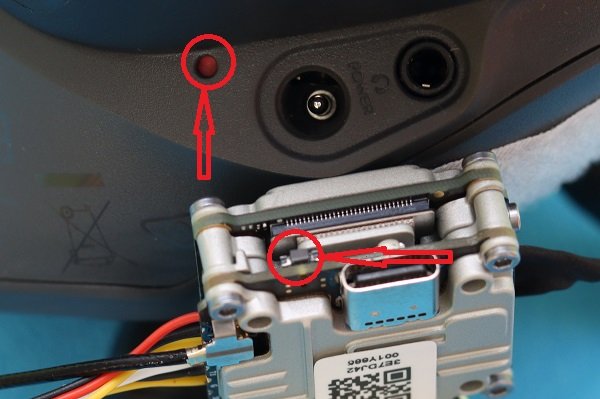

For pairing with the DJI FPV Goggles V2 you need to press both bind buttons (goggles and VTX).
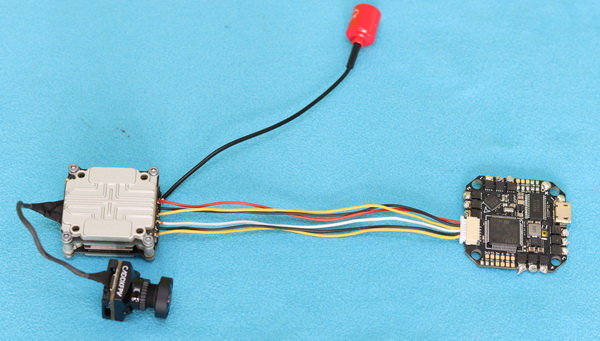
For the initial tests, I used a BetaFPV F722 flight controller. While the Caddx Vista is connected to an FC and motors are not armed, broadcast power is limited to 25mW. In this low-power mode, you can’t record videos with the goggles.

I have to admit that there is a huge difference between analogue and digital FPV. Looking for the first time into the DJI goggles I was impressed by the image quality. I watched some comparison videos between the Nano, Pro, and the original DJI FPV camera. The Nano is considerably worse than its competitors, but still a huge upgrade from analogue FPV. I can’t wait to finish rebuilding my Pavo30 and do the final test.
Price, availability and alternatives
Since I received the Nebula Nano kit, this version has been discontinued by Caddx and they released a second version named V2. They also have a ‘Pro’ version of the Nebula that features a higher frame rate (720P@120fps). While the Vista Nebula Nano kit was priced at $135.00, the more capable Nebula Nano Pro kit is listed at $165. BetaFPV has three FPV drones built on this HD digital system, the Pavo30, Beta95X V3 and the X-Knight 360.
If you are looking for a digital FPV system with superior low-light performance, you should also check the newly released Caddx Polar.
Caddx Vista Nebula Nanon & Pavo30 footage


There is any way to use the Caddx Vista Nebula kit with the DJI Goggles 3??
Caddx Vista Nebula and Goggles V2 are still the best for low-budget digital FPV
caddx vista is still the best budget option for digital fpv. you can find new kits under $100 or used ones for %50
Visitor Rating: 3 Stars
does anybody know where I could buy the little red antenna? I broke it on my pavo30.
many thanx and sunny day
bruno
I needs some soldering to do prior activation and FW update. Linked to V2 googles with not problem!
Anyone know if the Vista Kit will work with the DJI FPV Drone Goggles and Remote? The new gamepad style controller.
The Caddx Vista is compatible only with the old v1 DJI FPV controller!
Hey Guys, I shorted my Caddx Vista :( Its there any authorized service in the US to send it to be repaired?
yea there is people using naked vistas and videos showing how to strip them down to naked but it only saves about 10 grams and definitely adds some risk.
Anyone taken an Vista VTX out of the case to save weight or is that just a bad idea?
Visitor Rating: 4 Stars
I went digital because it has amazing quality. 3 of my fpv kwads has caddx vista nebula kit
Does anyone know where I can get some metal antenna clips for caddx vista?
Visitor Rating: 3 Stars
Visitor Rating: 4 Stars