
The ACMER S1 6W, a compact yet powerful laser engraver, is rapidly becoming one of my favorite go-to small-scale lasers. Despite its friendly price tag, it has decent build quality and provides impressive engraving quality. Available in 2.5, 3.5, and 6-watt power ratings, the S1 offers affordability without compromising on capabilities. In this review, I will explore the 6-watt version and test it by engraving and cutting on various materials. In conclusion, I will share my final thoughts and list of pros and cons.
When I bought my first laser engraver, I went big. I thought, ‘Why not get the biggest, most powerful beast I can find?’ Seemed like a great idea at the time. But as a hobbyist who only fires it up occasionally, it didn’t take long to realize I’d made my life harder. I couldn’t leave it on my workbench, so every project turned into a one-hour setup for a 30-minute job. And the ‘funny’ part? Most of my engravings barely used a fraction of the work area, and I usually ran it at just 25% power. I bought a race car to drive to the grocery store.
I don’t want to jump to conclusions, but after two weeks with the ACMER S1 6W, it’s proving to be a much better fit for me than a machine five times the price. Sure, it’s not perfect, but size does matter, and sometimes, smaller is the smarter choice.
ACMER S1 review
From the packaging, I could tell that the ACMER S1 is not a premium product. It comes in a simple recycled cardboard box, which had slight deformation during transportation. For extra protection, it includes CNC-cut foam padding inside. Along with the machine, a bag of maintenance tools, a 12V/4A power adapter, and a user manual are provided.
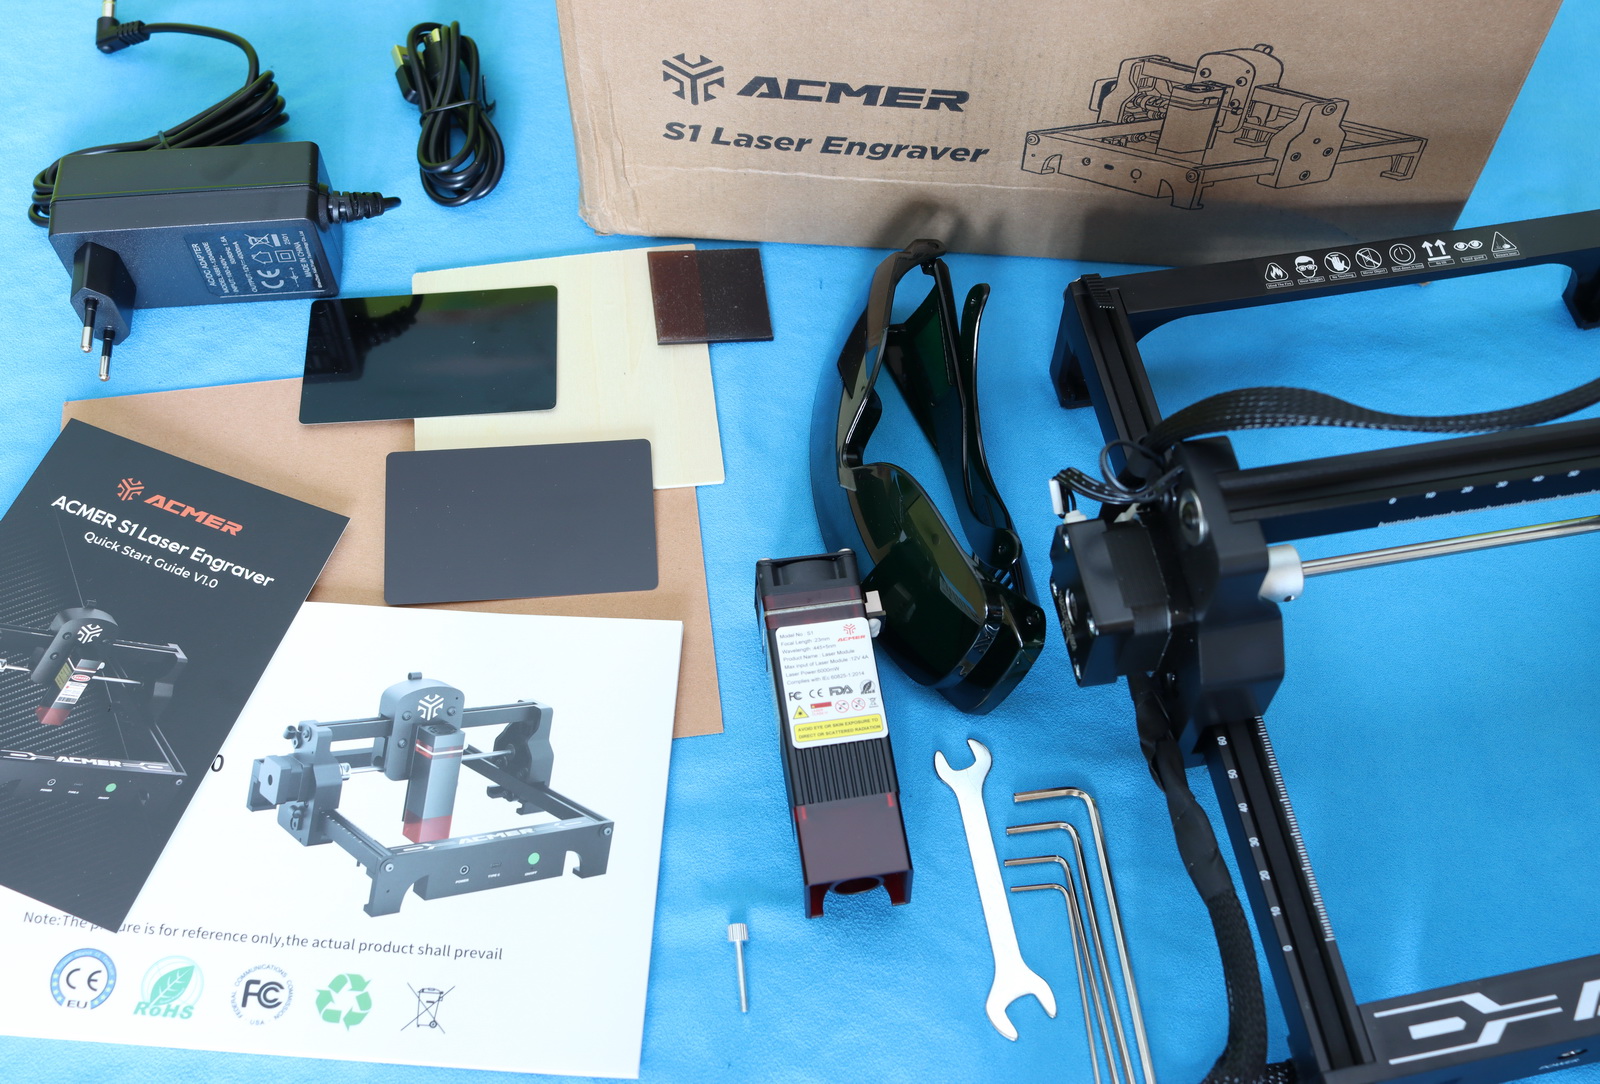
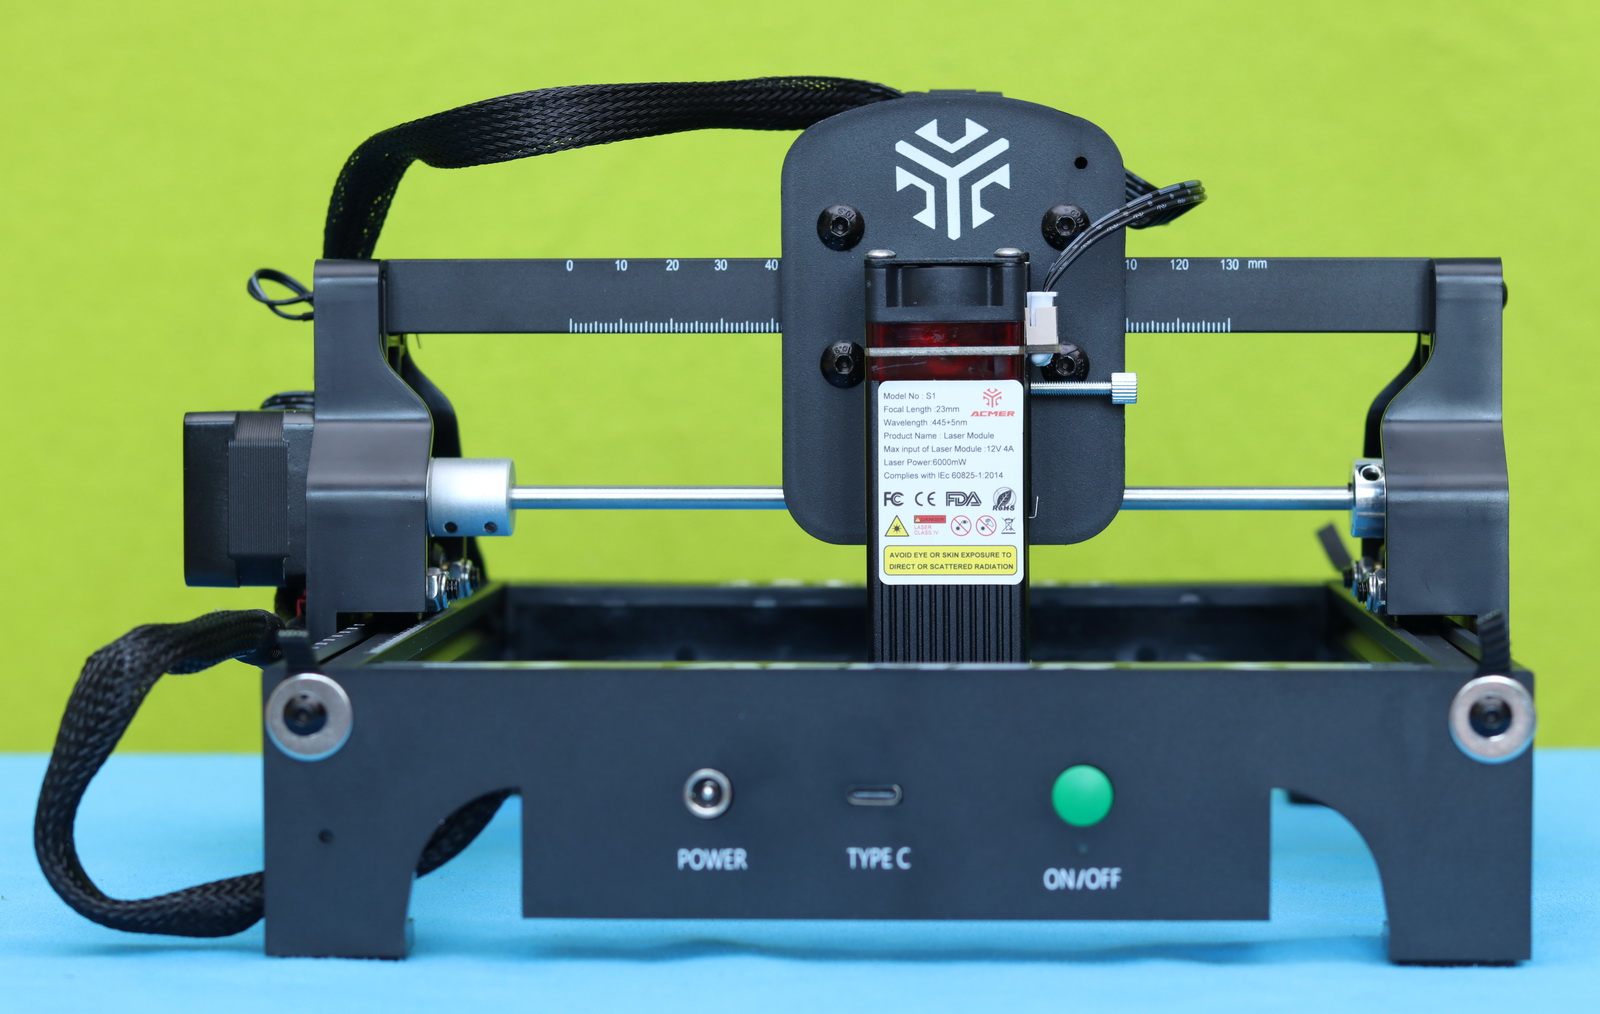
Mechanically, the ACMER S1 is quite similar to a 3D printer. However, instead of three axes (X, Y, and Z), it operates on just two: X and Y. The rectangular frame has a footprint of approximately 25×25 cm and consists of two metal bars and two plastic bars. It weighs only 1.5 kg, making it super portable. By comparison, my 20W Elegoo Phecda has a size of 673 × 660 × 190 mm and a weight of 7kg, requiring a relatively large workbench.
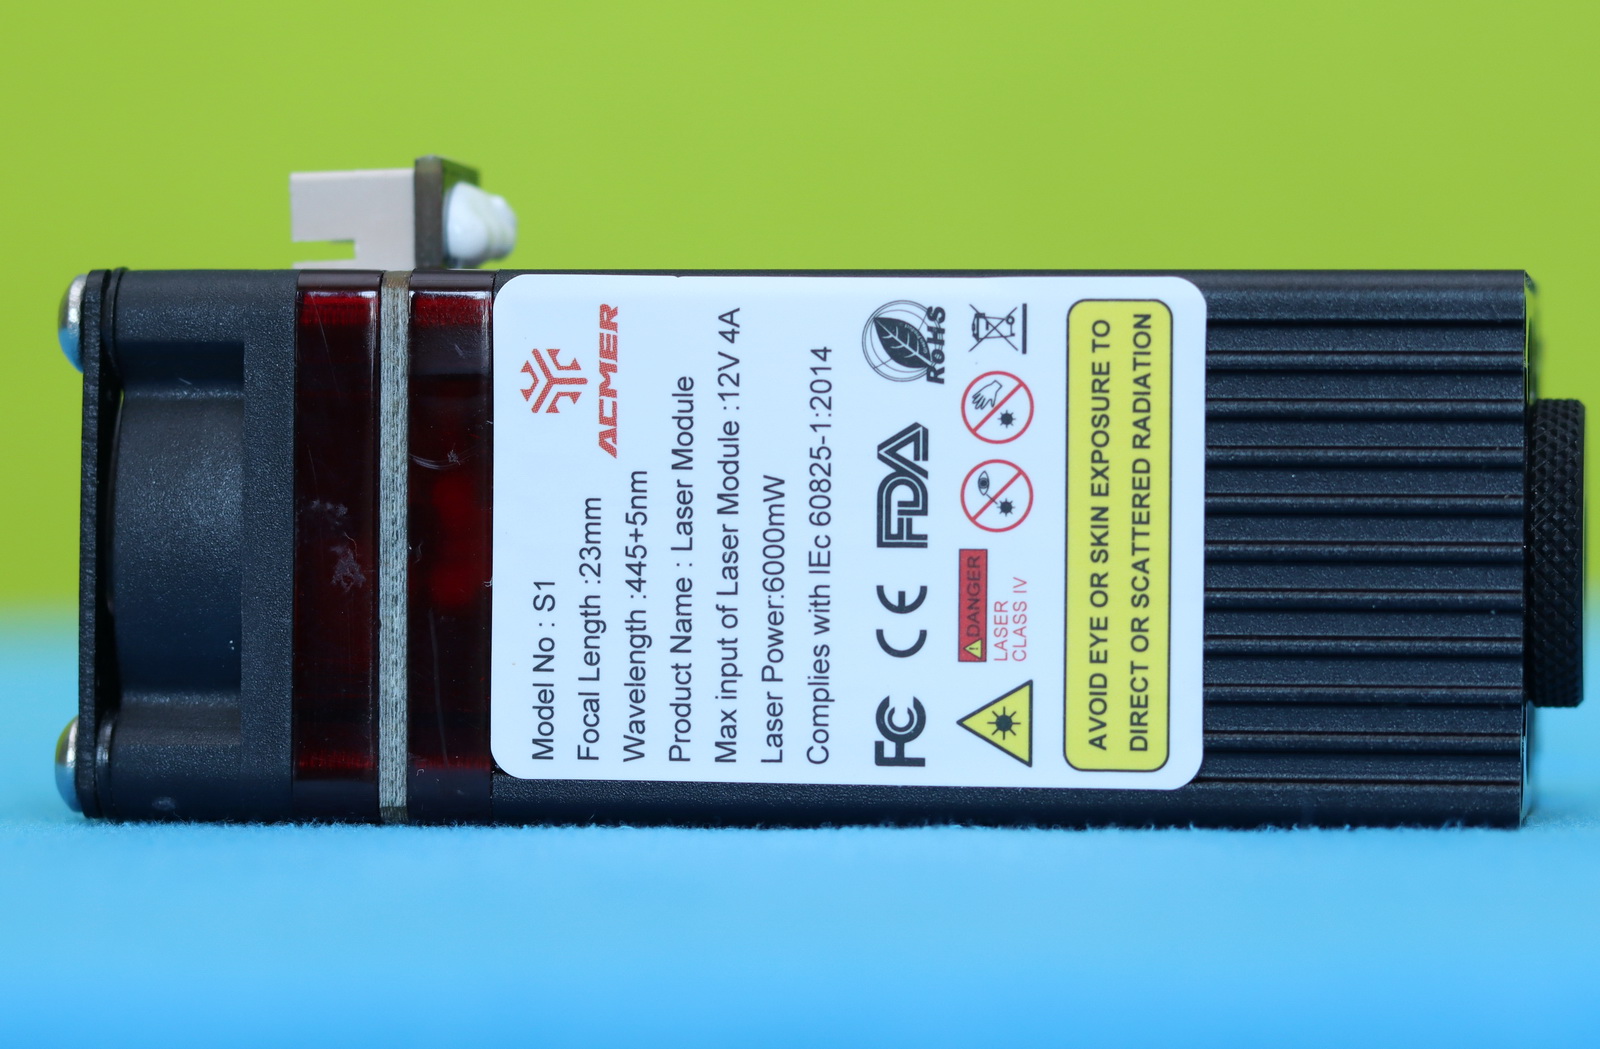
The machine is delivered fully assembled. Installation requires mounting the laser module onto the carriage and securing it with a thumbscrew. The laser unit features an integrated cooling fan on the top side and a removable, magnetically attached orange acrylic protective shield.
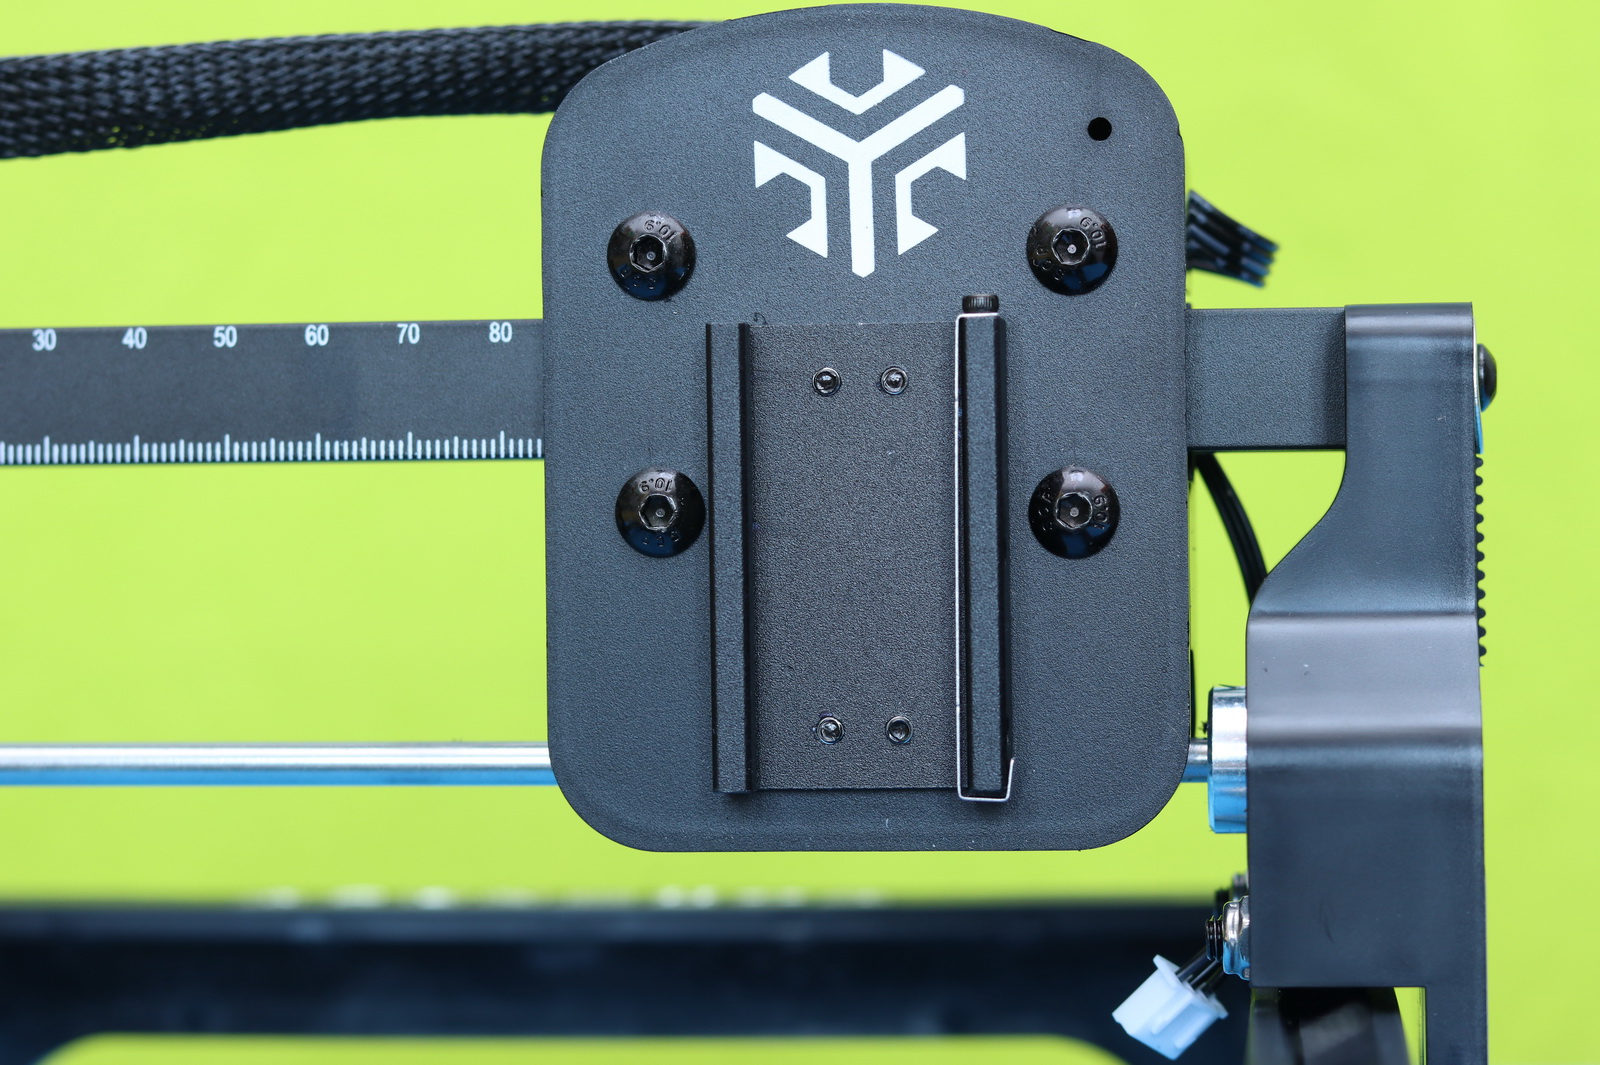
The ACMER S1 has two stepper motors and three timing belts, ensuring the 2.5/3.5/6W laser head’s precise, smooth, and accurate movement. It has limit switches on both axes (X and Y) for safety reasons. The front panel includes a 12V power input, a Type-C communication interface, and a power switch. It does not feature a status display or a memory card slot for standalone operation.
Pricing, availability, and power options
The ACMER S1 has three power options that suit various needs and budgets: 2.5W, 3.5W, and 6W. These models are priced at $119, $139, and $179, respectively. Whether you’re a hobbyist or a professional looking for higher cutting and engraving performance, a version of the ACMER S1 is designed for you. In this moment, you can get it at an even better price on Amazon. With a 36% discount, it’s available for just $89.49, making it an excellent deal for anyone looking to invest in an affordable and portable laser engraver.
ACMER S1: Technical specifications and model comparison
As you can see in the table below, the lowest power version has the finest quality. So if you favor accuracy and the best possible results, you should opt for the 2.5W. On the other hand, if you’re experimenting with cutting various materials, the 6W is a good start.
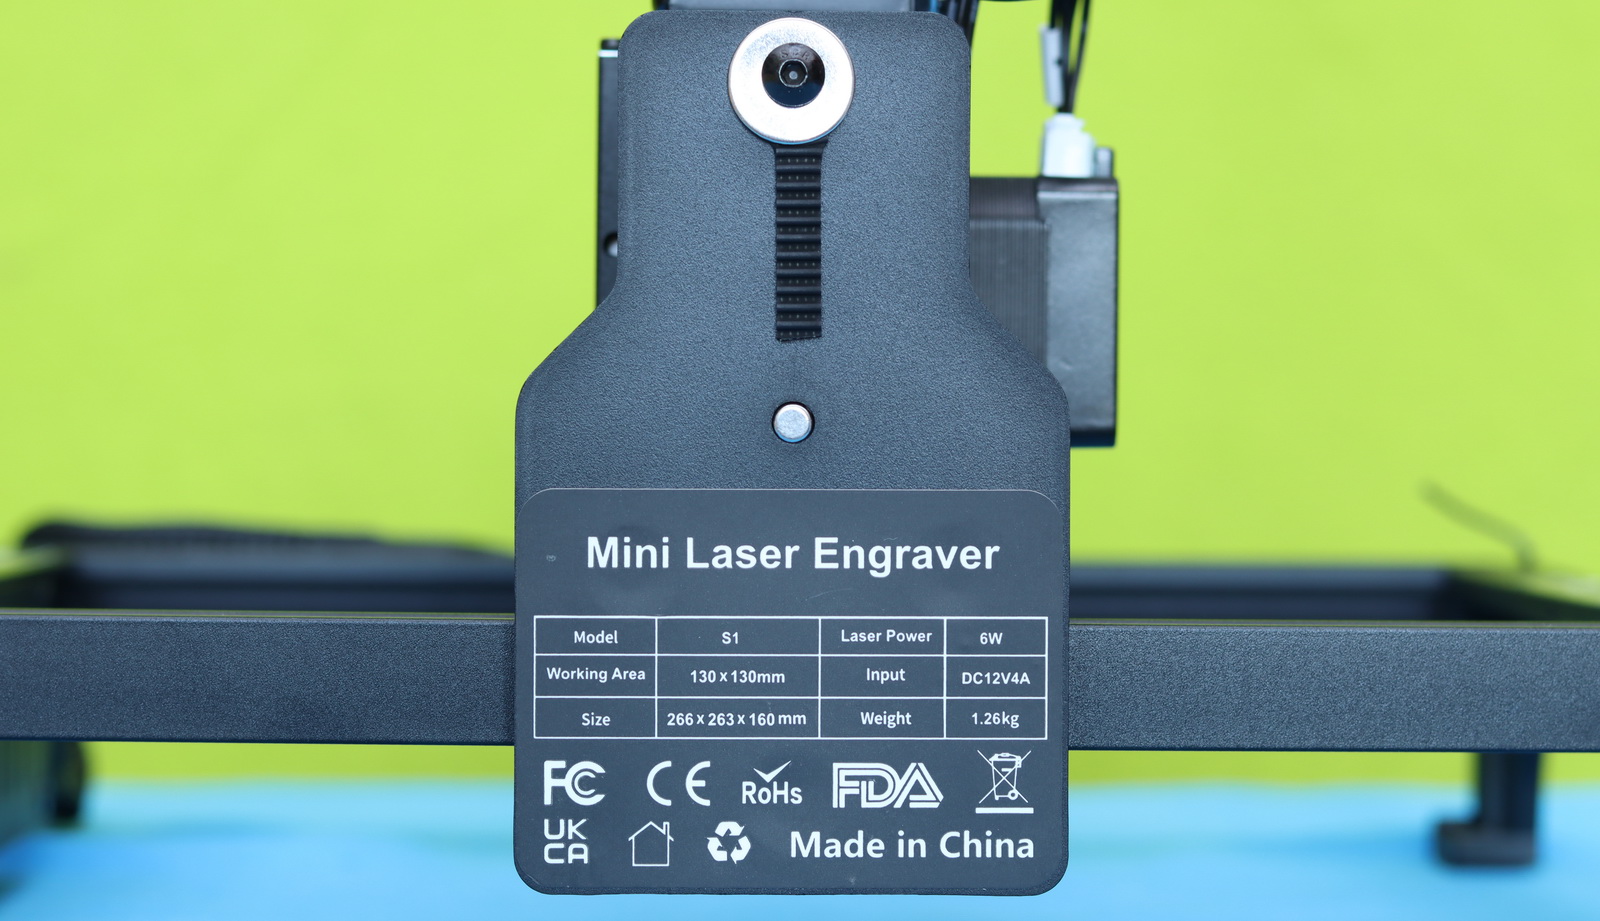
As you can see in the table below, the lowest-power version has the finest quality. So, if you favor accuracy and the best possible results, you should opt for the 2.5W. On the other hand, if you’re experimenting with cutting various materials, the 6W is a good start.
| Laser Power | 2.5W | 3.5W | 6W |
| Laser wavelength | 445±5nm |
| Engraving accuracy Spot size | 0.04mm | 0.05mm | 0.06mm |
| Max engraving size | 130*130mm(5.1*5.1 inch) |
| Working speed | 10000mm/min |
| Engraving Materials | Wood, Plastic, Paper, Leather, Acrylic, Glass, etc |
| Software compatibility | LightBurn/LaserGRBL |
| Power supply | DC12V/2A | DC 12V/3A | DC 12V/4A |
| Dimensions | 250*250*162mm |
| Weight | 1.5Kg |
Safety disclaimer: Laser engraving and cutting can be hazardous if improperly operated. Please follow all safety guidelines, such as wearing eye protection goggles and avoiding interference with the machine while it is in operation. Also, do not leave the machine unattended, as the processed material can catch fire. It is recommended to operate the machine in a well-ventilated area, as toxic gases and fumes may be released during the laser engraving or cutting process
Acmer S1: Operation methods
As previously noted, the ACMER S1 lacks an integrated controller for standalone operation and does not support wireless connectivity for mobile apps. The machine requires a direct connection to a laptop or desktop computer via a USB interface for control. ACMER officially recommends using the open-source LaserGRBL application for basic operations and the more advanced, licensed LightBurn software, which offers a free trial period. After downloading and installing the engraving software, you must install the CH340 USB-to-serial driver.
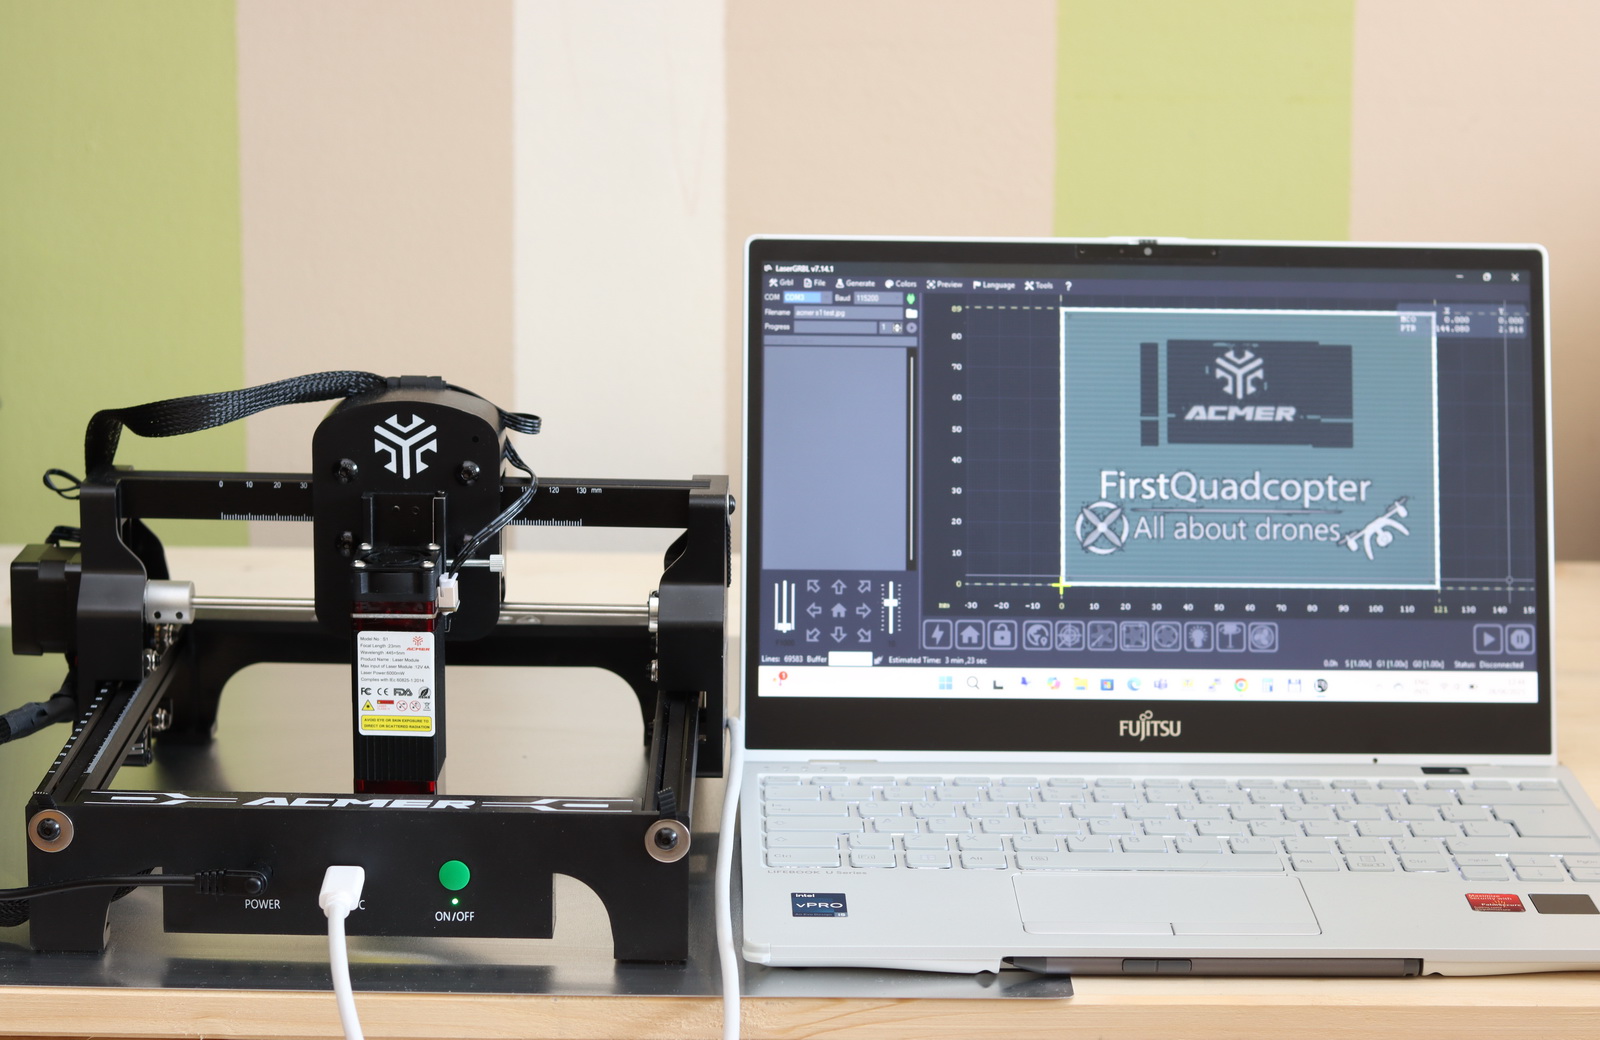
I tested it with LaserGRBL. Despite using this software for the first time, it quickly became familiar. I liked that it includes built-in test patterns, which make it easy to quickly determine the best power and speed ratio for the material you plan to use. When you start an engraving or cutting job, the app prompts you to wear your safety glasses. During the process, on the left panel, you have the command sent to the machine, and on the right side, the process of the job.
During one of my test engravings, my laptop lost connectivity with the ACMER S1 at around 30% progress. A warning message popped up in LaserGRBL, and the engraving stopped. When you restart a job, you can start from zero or resume from the last position, which is a nice feature.
With its open-frame design, the machine produces a noticeable burnt odor during operation. Despite this, it remains surprisingly quiet while in use. It’s important to note that ACMER does not supply a metal sheet or honeycomb bed with the S1, which is essential to support the material safely during engraving and cutting operations.
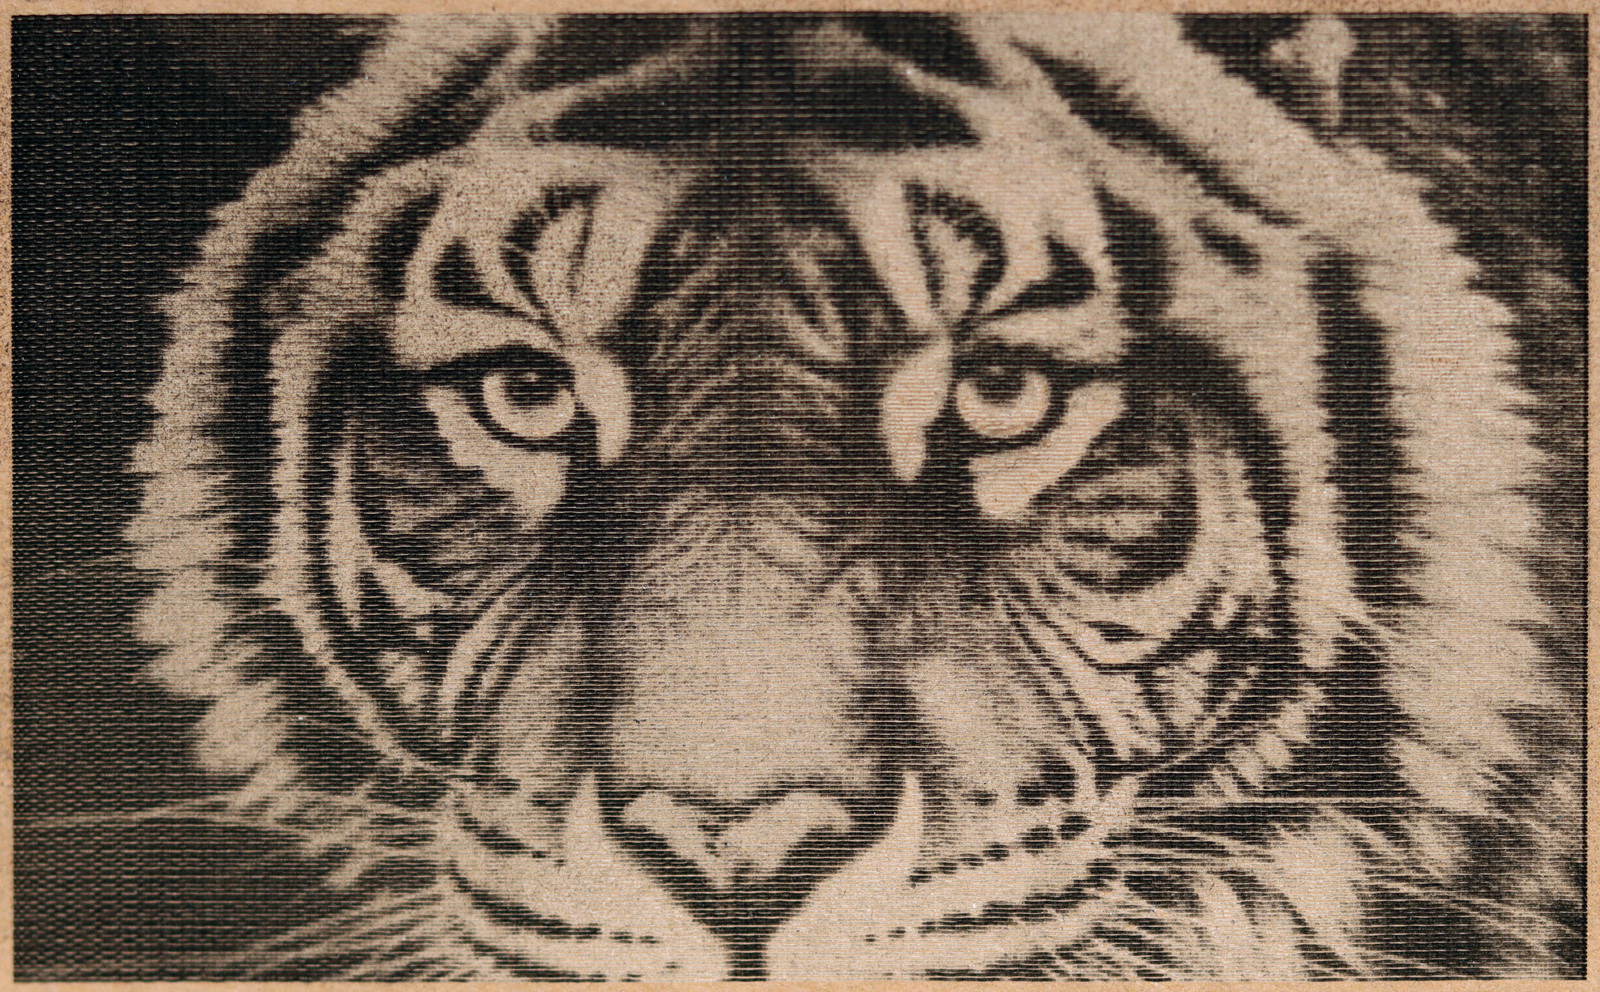
When the first engraving was finished, I was surprised by the quality produced by this small machine. As you can see in the picture below, the tiger’s face is highly detailed and features beautiful black transitions.
Performance Across Materials
The S1 machine handles more than 100 materials despite its compact size, according to ACMER. Here’s a quick rundown of its engraving and cutting performance across different materials:
| Recommended Engraving Parameters for Acmer S1 6W (Compressed Spot) | |||
| Material | Power | Speed (mm/min) | Times/Pass count |
| Kraft paper | 50% | 7000 | 1 |
| Plywood | 50% | 6000 | 1 |
| Solid wood | 60% | 4000 | 1 |
| Bamboo | 60% | 3500 | 1 |
| Transparent Acrylic | 60% | 3000 | 1 |
| Glass (painted) | 80% | 1500 | 1 |
| Leather | 50% | 6000 | 1 |
| Silica gel | 60% | 5000 | 1 |
| Ceramics | 90% | 2000 | 1 |
| Tin-plate | 80% | 3000 | 1 |
| Stainless steel | 90% | 300 | 2 |
| Recommended Cutting Parameters for Acmer S1 6W (Compressed Spot) | |||
| Kraft Paper (0.5mm) | 90% | 600 | 1 |
| Kraft Paper (1mm) | 90% | 400 | 1 |
| Kraft Paper (2mm) | 90% | 250 | 1 |
| Plywood (2.0mm) | 90% | 200 | 1 |
| Solid Wood (2.0mm) | 95% | 150 | 1 |
| Bamboo (2.0mm) | 95% | 150 | 1 |
| Red Acrylic (1.0mm) | 95% | 300 | 1 |
| Red Acrylic (2.0mm) | 95% | 200 | 1 |
| Black Acrylic (1.0mm) | 95% | 250 | 1 |
| Black Acrylic (2.0mm) | 95% | 150 | 1 |
Just a tip: since the laser passes through clear acrylic and glass, you should paint them with a thin layer of black tempera before engraving.
Fine-Tuning Your Engravings: Balancing Between Light and Dark
To achieve the desired visual results, experiment with different speed and power settings for each type of material you plan to engrave.
- Lighter engravings: try lowering the laser power and increasing the speed. This helps reduce heat buildup and keeps the engraving shallow. These settings work well for creating subtle, embossed effects.
- Darker or prominent engravings: slow the speed down and raise the power. You can also get clean, consistent results by making multiple passes at a moderate power level instead of going full power in a single pass. This also helps prevent the processed material from catching fire.
Disclaimer: We were sent this product at no cost for review purposes. No additional payment, sponsorship, or incentive was provided. All opinions expressed in this review reflect our honest and unbiased experience with the product.
![]()
You Can Trust Our Reviews!
Since 2014, FirstQuadcopter has reviewed, thoroughly tested, and rated hundreds of products, including drones, gimbals, power stations, action cameras, 3D printers, video lights, and other high-tech gear to help you make better buying decisions.
We don’t do paid reviews or agree to affiliate links. All products are tested fairly and equally, and if anything changes over time, I will update the written reviews.
As always, if you found this review helpful, don’t forget to like, share, comment, and bookmark for more content like this!
can be upgraded with a 10W laser module. i have the 3.5w version but I need more power for my works.
It does well.
You need to have ventilation when carving or cutting paper.
I bought the 2.5W version, it was the only one available in the local store. I can’t wait to test it. Basically, I only want wood engraving.