
Everyone who read my Eachine EV900 review, could find out that I had the bad luck to receive a faulty headset. Because it is very complicated to send back to China a product, I opted to try to repair my FPV goggles.
The FPV goggles worked perfectly with wireless 5.8G input, but on HDMI, I got only a black image. I tried several HDMI cables, as well as multiple video inputs (Play Station 4, DJI Mavic Pro, and Phantom 4).
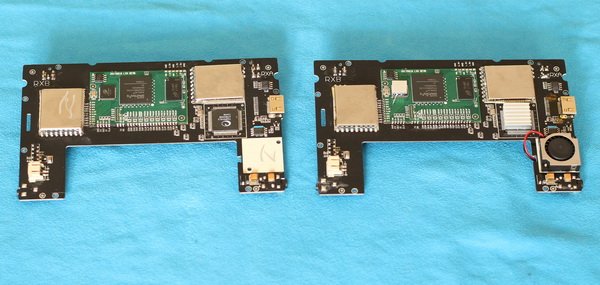
At first, I thought that it was only about bad soldering, so I removed the cover and analyzed the motherboard with a magnifier. No sign of un-soldered or short-circuited pins. Just to be sure, I re-soldered the HDMI connector, but the same thing happened, only a black screen via HDMI :(
Eachine EV900 FPV goggles repair
I contacted Cherise from Banggood to request a replacement motherboard. She kindly offered me one free of charge, and after two months, I finally received it. To thank Banggood’s support and help others with similar issues, I decided to make this step-by-step guide about repairing my FPV goggles.
Tools and materials that you need to repair your FPV goggles
- Soldering iron (just in case);
- Screwdriver;
- Magnifier;
- Spare parts to replace the faulty components (in my case a new motherboard and Heat-sink);
- Some dexterity :)
As you can see in the video below, the entire process took only 10 minutes. You will need to pay special attention when you remove and connect the display cable. Polyimide-film cables are very sensitive and hard to replace if you damage them. Before you unplug the battery cable, try not to touch any electronic component with metal parts (like a screwdriver).
If your new mobo comes without a system cooler and/or main CPU heat sink you will need to apply them by yourself. While the cooler can be reused from the faulty motherboard, the heat sink needs to be a new one with self-adhesive.
FPV goggles repair: Steps need to be done
- Remove case screws, there are 6 pieces on the bottom of the goggles;
- Remove the bottom cover;
- Remove top cover;
- Unplug the battery cable;
- Disconnect the display cable (this cable is very sensitive!!!);
- Remove motherboard screws;
- Remove defective motherboard;
- Remove cooler from old mobo;
- Install cooler on new mainboard;
- Mount new motherboard;
- Connect display and battery cable;
- Attach top cover;
- Put back the headband;
- Attach bottom cover;
- Screw everything back;
- Final inspection.
Before putting everything back, double check the display and battery connector, also the headband orientation.
If you want to repair your EV900 FPV goggles, proceed at your own risk only! I’m not responsible for any damages.
Good luck!
I need spare LCD for my FatShark goggles. Do you know where to find?