Getting smooth and cinematic shots haven’t been easier on a drone. Today we’re gonna test all the active tracks and quick shots of the DJI Mavic Air 2 drone. These creative modes allow taking incredible videos even by totally newbie pilots.
These automated flight modes were firstly introduced by DJI with the first generation of Mavic drones.
Mavic Air 2 ActiveTrack explained
To enable ActiveTrack mode you need to press on the screen, literally, and draw a rectangular shape around your subject. You’ll see four green corners around the subject and we’ll now be able to choose between the “spotlight”, “trace” and “parallel” modes.
If we only choose the “spotlight” mode, without any active track, and then we press the recording button, the drone will stay at its original position but the camera will start tracking your movements.
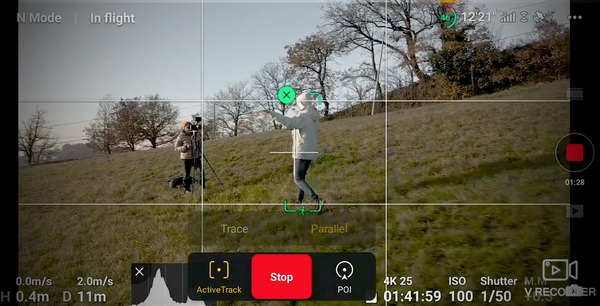
In “trace” mode the drone will start following your subject, keeping it at the center of the frame. If the subject moves forward, or backward, the drone will follow it in a perpendicular line.
The “parallel” active track, instead, the drone will follow the subject on a parallel line and follow it from that side.
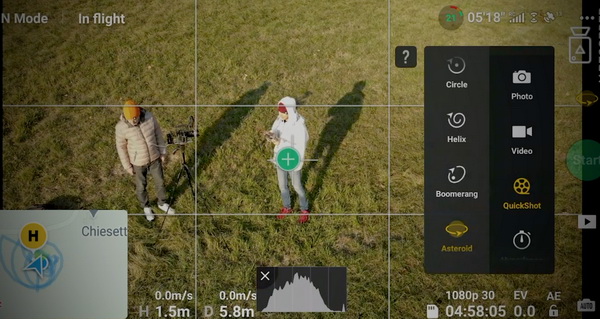
Mavic Air 2 QuickShot modes explained
Now, about the DJI Quickshot modes, we have many more options on the list. These are preset movements already saved in your Mavic Air 2. They’re a lot of fun and very easy to use.
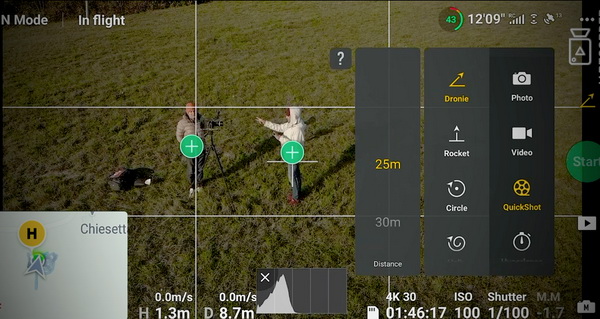
Let’s start with the “Dronie”. In this mode, the camera centers the subject as the aircraft ascends backward at an incline position. With the “Dronie” you can set up a distance from 25 meters to 120 meters away from the subject. When the drone reaches the set distance it will stop and it will return automatically home.
The second QuickShot mode is called “Rocket”. With this mode, the camera focuses downward on the subject as the aircraft ascends at a rapid speed so it will just fly up in the sky above your subject.
Then we go to the “Circle” quickshot. In this way, the aircraft centers the camera on the subject and circle around it at a constant altitude. When the drone ends a complete circle around the subject, it will stop and go back home.
The fourth mode is the “Helix” with the helix mode the aircraft ascends while flying in a spiral that expands gradually with the camera centered on the subject. In this way, the drone is moving in a circular way around the subject but it’s also increasing its height.
We’re now going to test the “Boomerang” mode. Here the aircraft will fly around the subject in an oval shape at an upward diagonal line as well. The drone will move once closer to the subject to, then, move further away. With this option, the drone also increases the speed as it goes further away from the subject, and then it slows down when it gets closer.
The last quickshot mode is the “Asteroid”. When it is selected, the aircraft will fly at a maximum altitude, and then it will create a 360 image as well.
And that is all about the quick shots. Much more info is covered in the video below. If you are a newbie in using drones that’s definitely a good way to understand how the drone works and also it’s a good way to create good shots even if you’re not a master yet.
My advice, anyway, is always to practice and know how to use your tools manually to have full control of the mage.
For now, I salute you and I will see you in the next video.
Thanks for reading.
Mamo Air
Get your DJI Mavic Air 2 drone here: https://amzn.to/2LrIPsM
The ActiveTrack capabilities seem like a game changer for capturing dynamic footage. I’m especially excited to try out the QUICKSHOT modes for some creative shots.
I’m really impressed by the ActiveTrack feature on the Mavic Air 2. As a beginner pilot, it’s amazing to have a drone that can automatically follow me and track my movements. Can’t wait to try it out and see how it performs in real-world scenarios. Thanks for the detailed explanation!
Cannot get Active Track to work at all. There is no green box when screen pressed. There is no active track button. No way to start it.