
I heard about Feiyu Tech for the first time a few months ago when they announced this MiNi3D Pro 3-axis gimbal. Frankly, at least in photos, it seemed to be a product of high quality. I started to search for more information about it by looking for Feiyu Tech FY MiNi3D reviews and YouTube test videos. I rarely purchase a product without reading about it.
I received this 3-axis gimbal last week, but I had to postpone my review because I went on a 3-day “team building” with a few friends fooling around with our quadcopters. I must admit that I had some risky flights among the walls of a medieval fortress, and I almost lost my favorite quadcopter when the flight direction suddenly changed. It was still worth it because, finally, I had enough time to play with my X380 till I became bored and thirsty for a couple of beers :)
The camera gimbals can be categorized into 1, 2, or 3-axis gimbals according to the number of motors. The two axis gimbals are the most commonly used because they have the best functionality/price ratio. For high-demand aerial filming is recommended to use 3-axis gimbals like this MiNi 3D Pro.
A 3 axis brushless gimbal has four parts:
- Acceleration and gyro sensors;
- Mainboard (logical unit, power unit, and connectors);
- Three pieces of brushless motors;
- Metal, carbon fiber of plastic frame.
A “Brushless Gimbal” has roughly two main functions: to keep the camera as stable as possible, to achieve motionless steady videos, and to allow remote control of the position of the camera in order to get the best point of view (POV).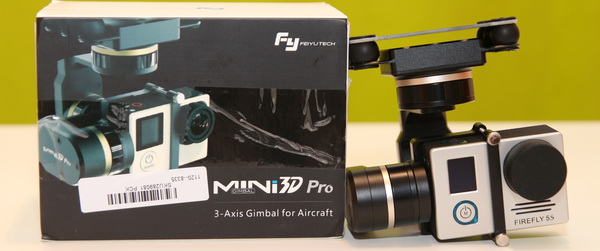
FeiYu Tech FY MiNi3D Pro review. Best 3-axis gimbal?
Towns from Banggood offered this product for a fair review; thanks again for their professional attitude. In our preliminary discussions regarding the possibility of reviewing a 3-axis gimbal, we talked about the previous non-Pro” version of the MiNi3D gimbal. There are only a few minor differences between these two models. The most visible differences are the smaller base mount and larger panning motor.
Feiyu Tech MiNi3D Pro: First impressions
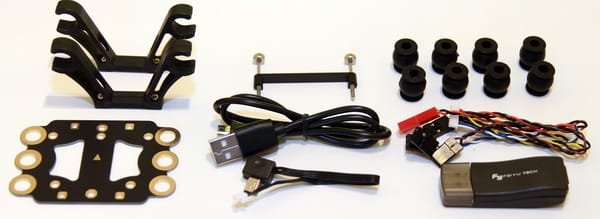
Inside the box, I found the gimbal well protected by the sandwich of two smaller accessory boxes, which contain the following:
- Metal strap for camera installation;
- Mounting base and eight pieces of damping balls (6+2 extra);
- Micro USB cable and USB adapter for firmware upgrade;
- Main connector cable (Power, Video out, Mode switch, Tilt and Pan control)
- Female JST power cable;
- Two pieces of 58-60 mm rail hooks (V hangar);
Holding it in my hand, it feels extremely well-built and lightweight. The designers from Feiyu Tech definitely did a good job because the neat wireless design and black finish offer a very professional look for this gimbal.
To obtain the best vibration reduction, instead of 4 rubber damping balls, the FY MiNi 3D Pro gimbal comes with 6. BTW, the package includes 2 extra of them, in case you lose one.
The MiNi3D Pro allows two different methods of installation. It can be installed using screws or two 58-60 mm rail hooks when the aircraft is equipped for this purpose with fiber carbon tubes.
Regarding the orientation of the gimbal, it can be installed in regular mode (hanging), vertical (inverted on the top of the aircraft), and frontal (forwarder). I just saw a video where this gimbal and a GoPro 4 camera were installed reversely on a small racing quadcopter, allowing it to capture some truly amazing footage.
The camera frame is designed for GoPro 4, GoPro 3+, and GoPro3 cams but will accept any other action cameras with similar size and weight.
When is installed directly under the belly of the aircraft, the minimum ground clearance is about 95 mm. If you plan to use the included rail hooks, you will need some taller landing skids because the required ground clearance will be approximately 130mm.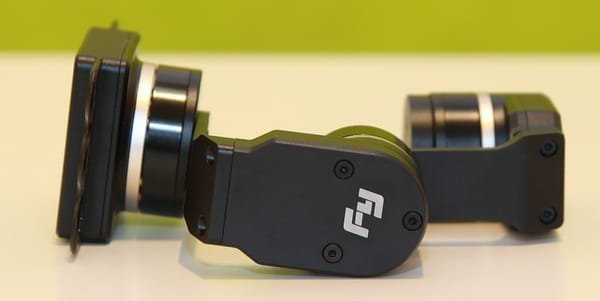
Although the package includes a USB cable and USB adapter, which allows upgrading the firmware of the gimbal’s controller board, I didn’t find any updated file on the manufacturer’s website.
MiNi3D Pro 3 gimbal: Operation modes
When the gimbal is connected through the “Mode Switch” cable to the aircraft receiver board, it can be remotely switched between the following working modes:
- Panning follow mode (Heading mode) – This is the default working mode when the gimbal is powered ON and probably the most used one. The camera can pan left or right, but vertical tilts and rolls are restricted. If you have compatible hardware (free channel on TX/RX), the camera’s tilt angle can be adjusted remotely.
- Panning and tilting mode – The gimbal keeps the roll angle fixed while following the pitch and yaw angles of the aircraft. Again, the tilt angle is remotely controllable.
- Lock mode – All panning (heading), tilting, and rolls are restricted. The pan and tilt angle can be remotely adjusted. If your quadcopter has retractable landing skids, this is the best working mode to take some fantastic 360-degree aerial panoramas.
MiNi3D Pro 3 review – Testing
The MiNi3D Pro gimbal accepts a wide range of input voltage (7-17V) and can be powered with 2s, 3s, or 4s Li-Po batteries. To test it, I installed my BlackView Hero 1 camera on the gimbal, and I powered it up with a 2-cell Li-Po battery. After a short initialization, the camera leveled perfectly and was surprisingly quiet. To test the tilt and panning angle adjustments, I used a cheap servo tester, which did a perfect job. Next time, I’ll install the gimbal on one of my quadcopters to check how it performs in the air.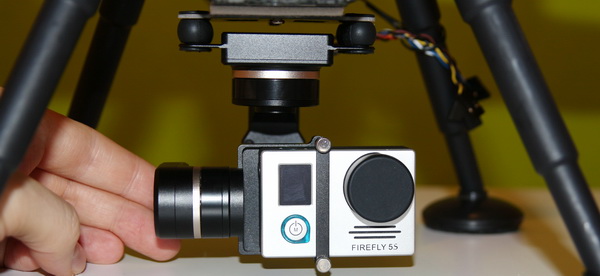
Because tomorrow is Christmas evening I should finish my review (for now) and help my son to decorate the Christmas tree. I promise to update this post next week with some test videos and more impressions regarding this gimbal.
Pricing and availability
Those interested in investing $176 in a high-quality 3-axis gimbal can order it from the Banggood website here. In my opinion, if the price drops a bit more, it will be a well-sold model.
I think the EVO GP-PRO GoPro gimbal is a much better choice. Check out the specs and let me know your thoughts once you’ve tried it.
Br,
Joseph
I have purchased a Feiyu Mini 3d Pro gimbal and watch the video on BGs website where you were testing the gimbal. I have also purchased the servo tester you used to do your test.
Would you mind telling me how you wired up the tester to test the tilt on the gimbal? The video is not clear enough to see and everything I have tried is not working. If you have pic’s showing setup that would also be helpful.
I’m new to this hobby and your help with this will be greatly appreciated.
Thanks,
Bill
Just a quick addition to your review…
The firmware, firmware installation tool, USB driver and calibration & setup tool are located on the Feiyu Tech web site (Download with Internet Explorer as Firefox would not work).
This does look like an excellent true 3 axis gimbal for the GoPro, I’m very excited about it. I’m pretty much ready to purchase one through Banggood (I use them all the time) but interested to know a couple of details if you can help please.
1 – I’ve heard that gyro gimbals use a lot of power, any idea on what the current draw is? I’d like to know in advance how this is going to affect my battery and therefore flight time.
2 – I want to install it under my Tali H500 so that I can have another camera operator use it (with another Rx installed) and have full pan and tilt ability, will this work?
Thanks in advance.
Jas
Hi Jason,
1. if you want, I can make an test for you, about how much current (ampere) drains from the battery, but frankly the length of the flight time is decreased by the extra weight not by the extra power consumption of the gimbal.
2. yes, the gimbal has tilt and pan control wires, but in default mode cam be controlled only the tilt angle. You will need to switch between the working modes to achieve the pan control. You will need 3 free channel to connect the gimbal to the receiver boar.
Ahhhh, the weight causes more of an issue than the current draw. Thanks I hadn’t thought of that. :)
Will work with the tools from the previous non “Pro” gimbal?