
Our FlyFish-RC Volador VD5 review covers building instructions, user experience, and flight performance. With the release of the new DJI Air Unit O3, FPV hobbyists started to look for compatible frames. FlyFish-RC has four suitable frames, two 5″ (True-X and Dead Cat) and two 6″ (True-X and Dead Cat). I opted for the deadcat-style configuration because there are no props in the view, which is a must-have for a cinematic FPV drone.
Building your drone is not about saving money. A drone made with your hand using quality parts will probably cost you more than a BNF drone from any trusted brand. In the beginning, everything looks easy, but after you add parts, piece by piece, you will realize that room inside the frame is limited, and you must make compromises. For newbies, I recommend starting with generous 5″ frames such as the FlyFish-RC Volador series. Stuffing all the things inside of a 2″ CineWhoop can cause headaches. Don’t mention the challenge of soldering those tiny AIO boards.
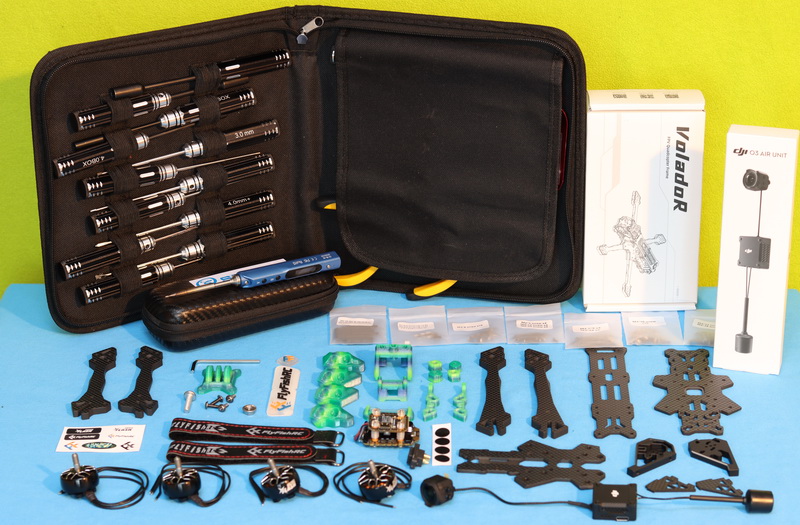
For this DIY cinematic FPV drone project, I opted for the following parts with a total cost of $750 (this price excludes the controller and FPV goggles):
- Volador VD5 frame kit – $64.90
- Flash 2306 1750KV brushless motors – $83.60 ($20.90×4)
- SKYSTARS F722HD Pro + KM55A ESC FlyStack – $99.00
- DJI O3 Air Unit digital FPV system -$229
- RadioMaster ELRS EP1 radio receiver -$18.99
- VIFLY Finder Drone Buzzer -$19.99
- Beitian BN-180 Mini Dual GLONASS+GPS -$19.59
- ManiaX Power 4S 1500mAh 4S or Ovonic 6S 1300mAh – $26.00/$28.45
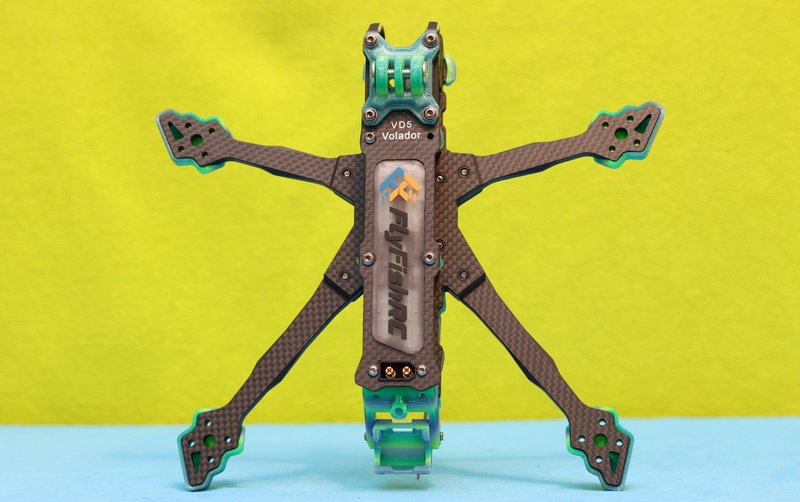
DIY Cinematic FPV drone with FlyFish-RC Volador VD5 frame
Disclosure: I received this fame kit as part of a product review collaboration with FlyFish-RC. Although the product was offered for free, all opinions in this article remain my own, and the sponsor in no way influenced me. The company has been on the FPV market for more than five years and is committed to continuous innovation to help FPV pilots to make their flying dream come true!
FlyFish-RC provided excellent support during the customs clearance and building process. Pierce Lin, my contact with the company, was friendly and very responsive to my questions. These aspects are at least as important as a competitive market price, in my opinion.
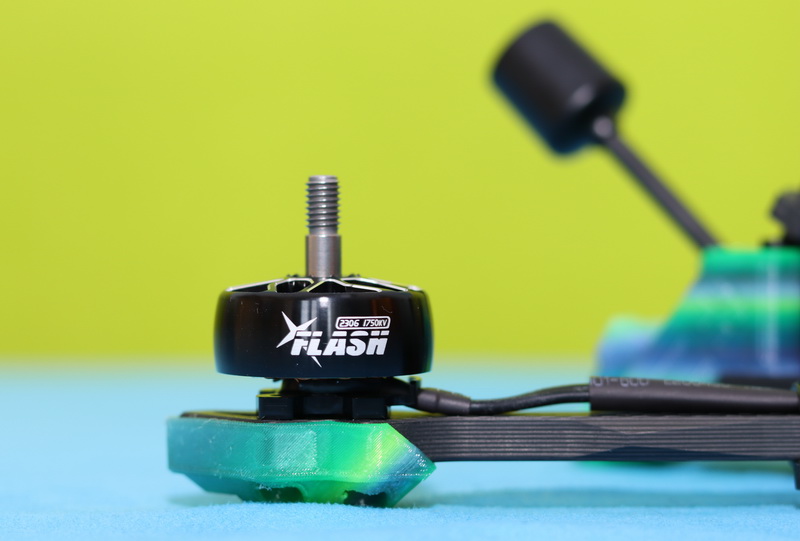
Together with the Volador VD5 frame, they also sent me a set of Flash 2306 1750KV brushless motors. With the low KV, they are more for 6S batteries than 4S LIPOs.
FlyFish-RC Volador 5″ frame kit
The Volador series is specifically designed for FPV freestyle and cinematic. The availability is in two configurations: VX5 and VD5. The main difference between the VX5 (true-X) and the VD5 is the size and position of the front arms. While the true-x design is appreciated for the best yaw performance, agility, and high-speed stability, the Dead Cat approach is for those who like clean propless views in their FPV footage. Since the release of the Air Unit O3, which is capable of providing GoPro-like quality, the 2nd camera for DVR footage is just for unnecessary battery consumption.
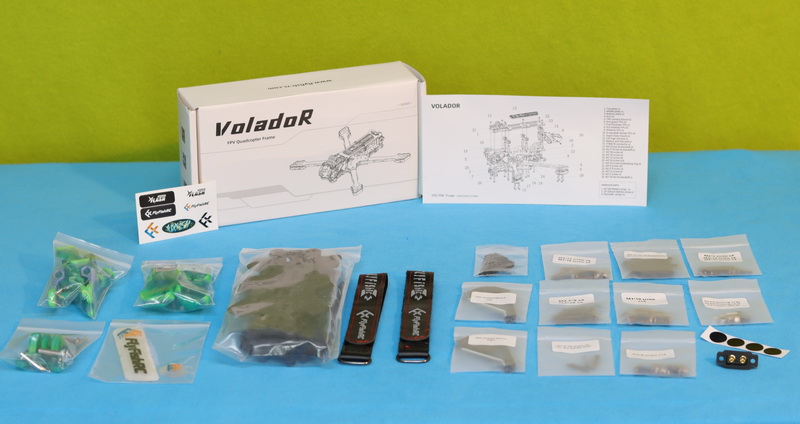
FlyFish-RC Volador VD5 frame kit comes in a compact box with many screw bags, two battery velcros, 3D printed TPU parts, and bonus FF stickers. No user manual is included, just an exploded view of the frame. Each screw bag is labeled with its content (size x pieces), making the building part easier. Screws have already applied thread-locking glue, which is nice.
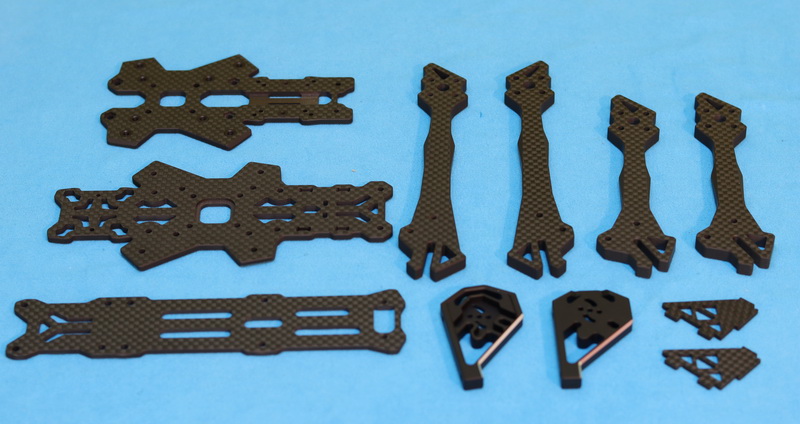
Excepting the CNC aluminum camera mount/guards, everything is made from high-quality T700 carbon. Arms have 6mm, the bottom sandwich is 3mm, and the top plate is 2.55mm thick. For the flight stack, you have a 20x20mm or 30.5×30.5mm mounting pattern, respectively, 20x20mm or 25x25mm on the back for VTX. The kit includes TPU motor protectors, a front bumper, antenna mounts (GPS, VTX & RX), and a GoPro camera mount.
Flash 2306 1750KV brushless motors
The Flash motor product name is probably new to you, and it should not be confused with Flash Hobby, as I did. They have 2207, 2306, and 1404 size motors. The Flash 2306 has 1750KV and 2550KV variants in black and pink color options. It adopts a Uni-Bell structure design providing high crash resistance while not adding extra weight.
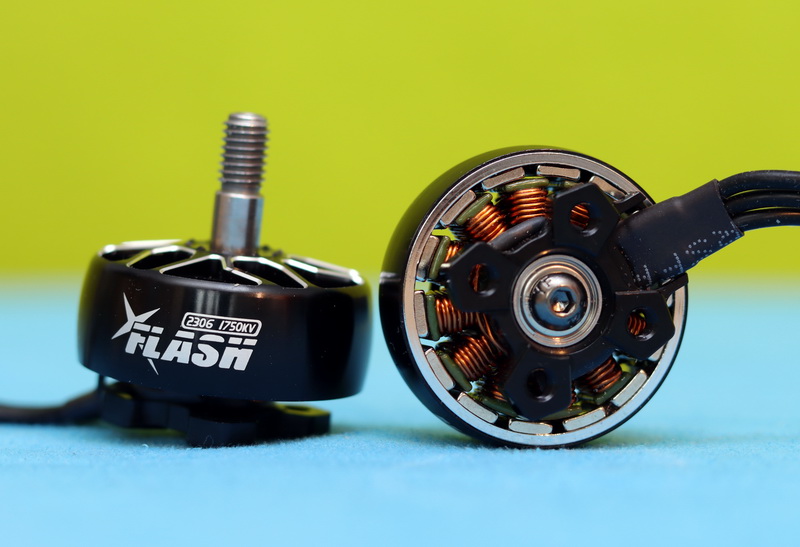
The FlyFishRC Flash 2306 1750KV motors are intended for 5″ propellers and have a 16*16mm mounting pattern. Each motor weighs about 32 grams and is made from a high-strength titanium alloy shaft and 7075 aluminum.
FlyFish-RC Volador VD5: Let’s build it!
Many experienced DIYers say that if a frame can’t be assembled using an exploded view, it’s too complicated and should be re-designed. I think following FlyFish-RC’s build tutorial, even total newbies can assemble it in less than one hour. I found the video straight to the point, and even some good jokes are made, so it’s not dull at all. Required tools and accessories:
- 1.5mm, 2mm, and 2.5mm hex keys
- A mini Phillips head screwdriver
- Cutting pliers
- Digital Multimeter
- Decent soldering iron with flux and tin
- Some heat shrink, Zip tie, and Cloth tape
Firstly you need to make the bottom part using the four arms and two plates. At this point, you need to decide whether you will use 20x20mm or 30.5×30.5mm flight stacks. Next is to install the M3x23mm standoffs, CNC camera mount, and TPU parts. There is included a FlyFishRC self-adhesive rubber band that is not just a cool design element but also serves as an anti-slip surface for the battery. When you install the motors, make sure that the screws are not too long and touch the motor winding. If you use ordinary or already used screws, make sure you apply some thread locker (blue Loctite is the best).
Before starting the soldering part, I suggest seeing if all the components fit inside the frame. This also allows you to see how long the wires need to be, where to place the components, and spot any potential issues with spacing.
Preparing the flight stack
For this project, I used the recently reviewed SKYSTARS F722HD Pro flight controller and KM55A 4in1 ESC. Before installing the flight stack in the center of the Valador frame, I soldered the battery wires and LOW ESR capacitor -check its height to fit between the two plates. This is possibly the hardest soldering because it takes a lot of heat to melt the tin on those large copper pads.
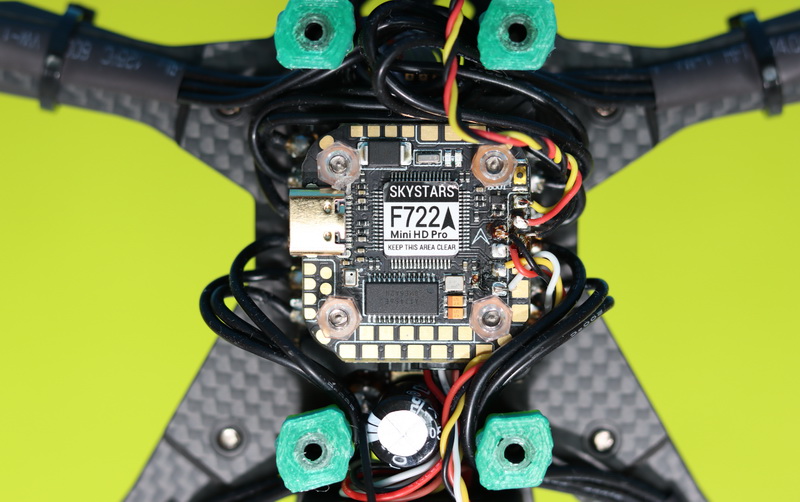
Next, I soldered the motors to the ESC board. After I mount the FC on top of the ESC using a soft mount (rubber rings/grommets). User nylon nuts on top of the flight stack and don’t over-tighten them. Compressed grommets reduce vibration damping and defeat the purpose of soft mounting. Finally, you can solder the wires for accessories such as the radio receiver, drone buzzer, and GPS module.
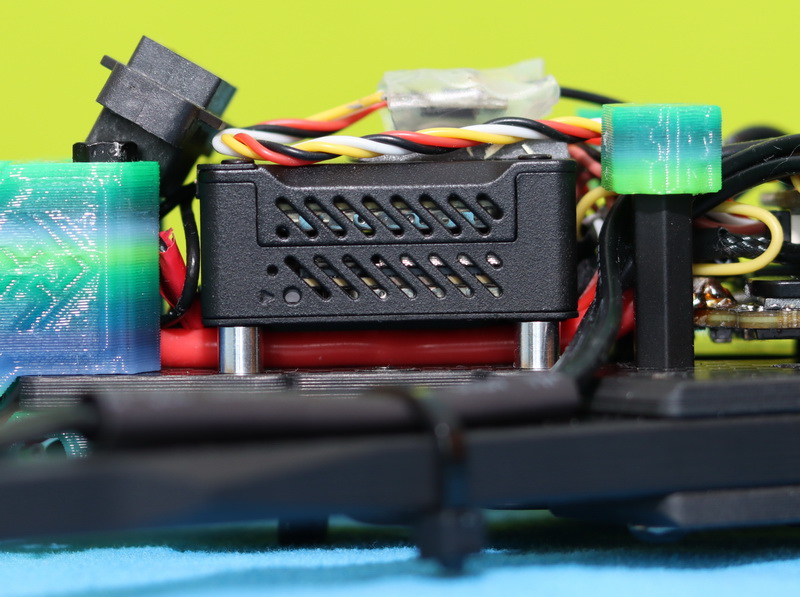
Installing the O3 Air Unit
FlyFish-RC includes a pack of dedicated screws and spacers to install the DJI Air Unit O3 in the back of the frame. You need to remove the antenna connector to insert it in the antenna holder. It remains enough space on both sides of the O3 AU to be well-ventilated.
Before power ON
Double-check all the connections and soldering before connecting the battery for the first time. Many recommend using a smoke stopper that detects short circuits to avoid damaging expensive electronics if something is wrongly wired. It won’t protect against all possible problems, but it’s still way better than nothing. I also suggest connecting the accessories one by one. Power ON, No smoke, Power OFF, connect next accessory, Power On, and so on.

Setup and configuration
Assuming that you did everything well and all electronics are connected, you can move to the next step. Using the BetaFlight configurator, you need to set in the Configuration tab on Mixer (frame type) ‘Quad X’, then check and adjust in the Motors (ESC channel) tab the position and spinning of each motor (Without Propellers installed!). The last must-done step in BFC is to configure in the Mode tab the stick layout, flight modes, and failsafe.
When mounting the battery, make sure the COG (center of gravity) is as close to the center of the frames as possible. This will give you the best stability and flight performance.
Now, it’s time to install the propellers and give them some throttle. If the drone flips over or won’t take off, you need to swap the propellers. There are two types of props, CW (clockwise) and CCW (counterclockwise).

Bottom line
It was fun to build and I’m happy with the results. FlyFish-RC did a great job with this frame kit. It is clean and solid. Inside the frame was enough space to install comfortably all the parts I wanted. Fully assembled without a battery and GoPro, it weighs 477 grams.
Pricing and availaiblity
The frame kit can be ordered from the manufacturer’s website at $64.90. The Flash 2306 FPV Motor motors can cost $20.90/piece. You can opt for 1750KV or 2550KV according to whether you want to run on 6s or 4s LIPOs. You can get the 722HD Pro + KM55A ESC FlyStack from SkyStars-RC for $99.00. If you want to print your TPU parts, STL files are available here.
If you have any questions, drop a comment below, I would be happy to assist you!
How the Volador VD5 compares to the SpeedyBee Mario 5? I want to build my first racing quad, and I do not know which frame I should choose.
Thanks!
Is it possible to put 6″ arms on this 5″ frame?
Probably, Yes
Just had these Flash 2306 motors for a little bit so far but they are so smooth and quiet compared to other motors I’ve used. They are perfect for long-range and freestyling. Just use the appropriate KV
Clean build what GPS is that buddy? How fast tot 3d fix?
I used a GN-180 GPS module. It found 6-8 satellites in 2-3 minutes.
I have the new v2 frame, and I has lots less of jello.
Cool! What’s the set up? 4S or 6S? LIPO Capacity? Flight time?.
I love this frame. Super easy to assemble!
This frame looks decent!
Nothing new in this frame kit. It is just another iFlight Nazgul5 clone. I even read that it is not made from genuine carbon fiber!
Oh my, that’s lies from a real mentally ill guy called Picasso FPV. He was saying that that carbon is plastic (LMAO) which later was proven wrong to him by several guys, because plastic is not conductive, and this frame as conductive as you can get.
Truth is, pretty much 99% of frames made in China, are made of… Chinese carbon, ta-daaaah. While this carbon is high grade Japanese T700 toray carbon, which nobody uses, because of it’s high price. It’s so smooth and stiff that the dude couldn’t believe his eyes, having only seen crap carbon frames before.
Having experience in carbon cutting, I can tell you without a doubt, the 60-70 ish dollars they sell that frame for including a whole bunch of parts and prints in the box – they don’t make ANY money. Probably the only way to make people interested in yet ANOTHER frame company is to make real high quality shit and slap a ridiculously low price tag on it (i mean relative to the quality).
And another thing, these guys used to design frames and make other products for iFlight. That is why there is such resemblance.
Wow
I want one!
This looks like a fun hobby. I think it’s time to build my own FPV drone!
I just ordered a Volador VX5 frame kit. I prefer True-X over Dead cat.
I want to build a long-range using the Volador VD5 frame. What GPS module do you recommend? What size can be installed?
Hi friend,
The VD5 comes with a GPS mount size is L(20mm)x W(20mm). You can check this size GPS what you want.
Thanks!
Order it last week. This frame is such a smart frame. Perfect for analog and digital O3 Air Unit.
Great Knowledge was shared in the review. Thanks for writing.
Beautiful rig!