
About four months ago, I purchased a Caddx Air Unit Micro kit with the intention to review it. Usually, when I get a new product on my test bench it takes no more than two weeks to publish my evaluation. In the case of this HD digital system, the time was much longer because first I had to build a drone on which I could install it.
DJI’s HD digital FPV system was announced in 2020 and consists of four main parts: Camera, digital VTX, FPV Goggles, and the optional DJI FPV radio controller. While DJI is the only brand that has the right of producing compatible FPV Goggles and Transmitters, compatible VTXs and cameras are from various brands. The Air Unit digital VTX is sold under DJI and Caddx brand names as well. CaddxFPV has another more compact digital FPV transmitter, the Caddx Vista which was reviewed last year here on FirstQuadcopter.com. In addition to DJI, there are other three brands that are licensed to manufacture compatible digital FPV cameras. Caddx has the greatest variety, followed by RunCam and Foxeer.
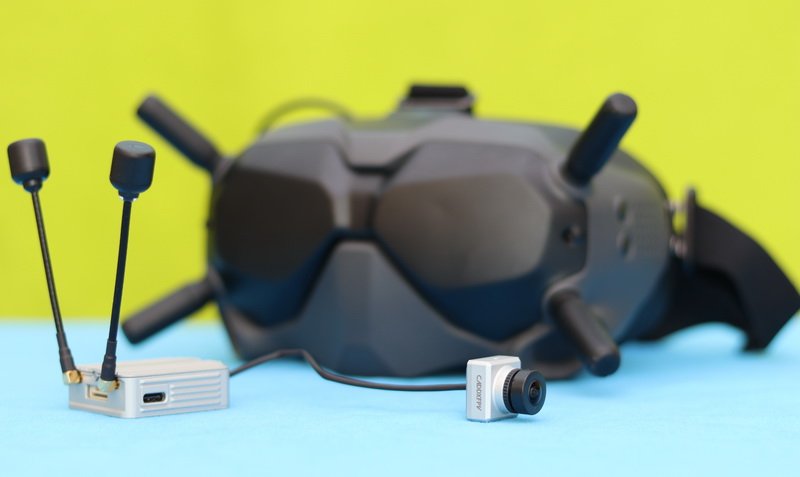
Apparently, the only difference between the original DJI Air Unit kit and the Caddx Air Unit Micro kit is the smaller camera. Both systems promise a range of up to 4KM and onboard recording.
Main features and technical specs
- VTX module is identical to DJI Air Unit;
- Embedded remote controller receiver (compatible with DJI FPV transmitter);
- Low latency (28ms) video transmission and max transmission range (4km);
- 720p@120fps video transmission;
- Onboard 1080p@60fps video recording;
- Multi-antenna anti-interference digital transmission;
- Allow up to 8 drones to fly simultaneously in the same airspace (8 channels);
- Smaller camera size (19×19 vs 21×21);
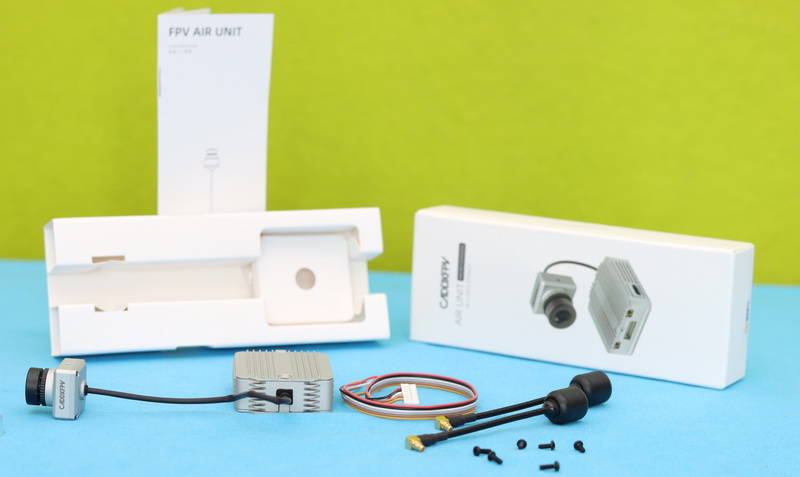
First look at the Caddx Air Unit Micro kit
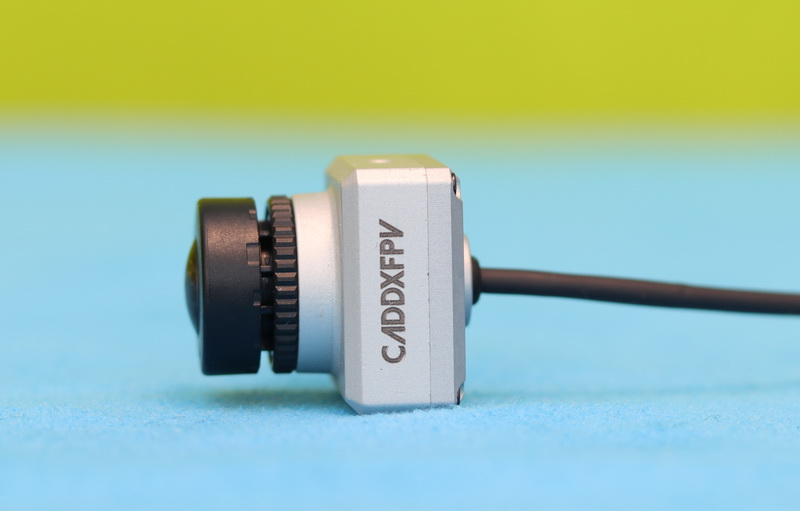
Caddx’s new micro camera has a standard 19×19 form factor. By comparison, the DJI camera has a 20x20mm form factor, which is a bit bigger than typical micro FPV cameras.
Measuring 44×37.8×14.4mm, the video transmitter module is considerably bulkier than analog VTXs, making it a challenge to be used in smaller builds. These days, an 800mW 5.8G VTX measures only 27.3×27.3×4.5mm. Weighing 45.8 grams, it is also considerably heavier than its analog counterpart. The cable between the Air Unit and camera is about 10cm, which should be long enough for most 5inch drones, even when you are mounting the Caddx Air Unit in the back.
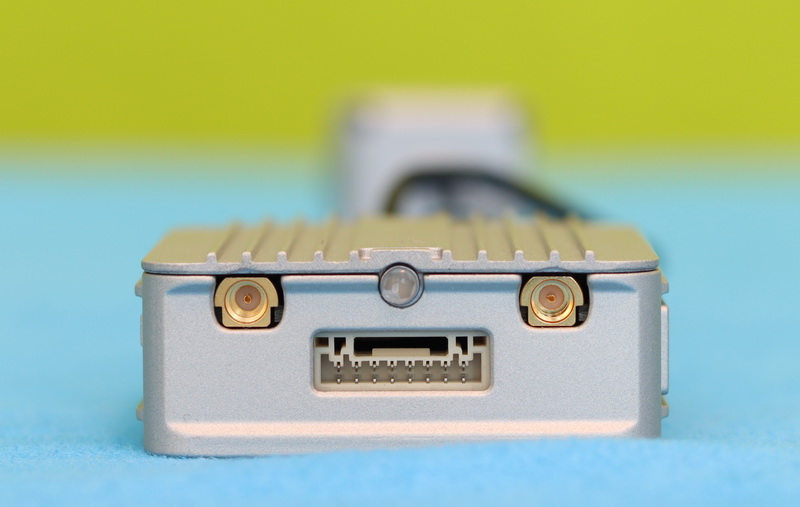
For good heat dissipation, the Air Unit is entirely made from some kind of aluminum alloy. On the back of the HD VTX, there are two MMCX antenna connectors, a data/power plug, and a status LED.
The power consumption of the Air Unit is about 4W to 9W, according to Caddx, and it can be powered from 7.4V to 17.6V. For example, if you plan to power it with a 4S LiPo battery, that would be somewhere between 250 and 550mA.
Price and availability
If you have kids, you probably know that a t-shirt with a Disney or Marvel superhero is priced two times more than a similar non-licensed polo. This is why the Caddx Air Unit Micro costs that much, they probably need to pay DJI for using their technology. Currently, you can order it from Banggood for US$189.00. This price includes the VTX module, Camera, FC cable, and two 5.8G antennas.
Activation and linking (pairing/ binding)
Like most DJI products, the Air Unit also needs to be activated prior to the first usage. After you download and install the DJI Assistant 2 APP, you need to power the unit from a 3/4S LIPO battery, then connect it via a USB Type-C cable to your computer. After completing the activation, DJI Assistant prompts that a firmware upgrade is required for best performance.
There are two methods of linking the Air Unit with your FPV goggles. Follow the steps below:
- Power on the AU and the DJI FPV goggles
- Press the link button on both devices
- The linking status indicator of the Air Unit turns solid green. The goggles stop beeping when successfully linked and the video display is normal
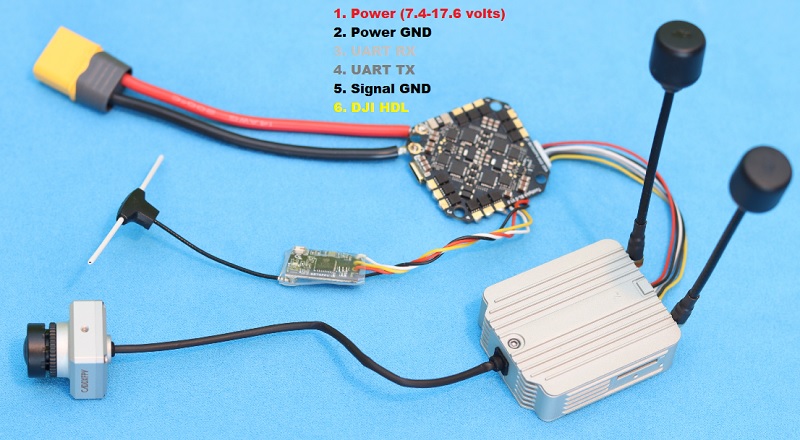
Pinout and wiring diagram
The AU has a single 8-pin header for both powering and FC control signal and it has the following pinout:
- Power input (7.4-17.6V)
- Power GND
- UART RX
- UART TX
- Signal GND
- DJI HDL
According to which type of flight controller you own, you will need to solder or just plug in the Air Unit’s cable. Caddx includes in the box a unit cable that requires soldering, so if your FC has a dedicated digital VTX plug, you will need to additionally purchase a compatible cable.
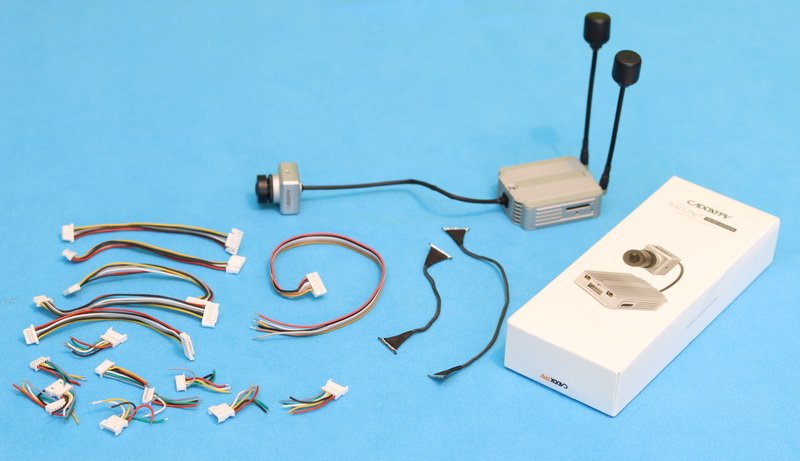
Image quality
The biggest difference between the Caddx Vista and Air Unit is the 1080P onboard video recording. Maybe you don’t get 4K or even 5.3K resolutions with the recorded footage like with the GoPro10, but it’s good enough for social sharing. On the right side of the unit, there is a micro SD slot that can accept cards up to 128GB. Besides the lower resolution, the Caddx Micro camera does not feature image stabilization such as GoPro’s unbelievable HyperSmooth.
According to your needs, you can opt for Low latency mode (<28m) 720P@120fps or Quality mode (<40ms) 720P@60fps. Any digital system’s downside is that, as the video signal gets weaker, you risk losing the image altogether. In analog FPV systems, you’ll gradually get a worse image and more interference, but will still be able to discern roughly where you are and able to fly you back.
From the FPV goggles configuration menu, under the ‘Transmission’ tab you can toggle between the following dynamic modes:
- Standard Mode is suitable for most environments. It is ideal for capturing content by reducing color loss and preserving original details;
- Racing Mode is ideal for most racing situations and delivers images at a higher saturation rate to distinguish brightly-colored objects such as course obstacles in daylight;
- LED Mode enables racers to operate their FPV drones easily in low light settings by increasing the color saturation and reducing image noise to help pilots efficiently keep track of their unit’s location.
Enabling the Focus mode optimizes the center of the view, making it smoother and clearer when the transmission signal becomes weak. If you are not sure about this feature, just set it to AUTO.

Caddx Air Unit hacks and tricks
Out of the box, the Air Unit provides excellent range but, when it comes to long-range FPV flights, you need probably more. The Air Unit’s range can be extended eighter via firmware hack or by replacing the stock antennas with higher gain ones. Both methods require modding the Air Unit as well as the FPV goggles. However, remember to follow your local regulations regarding radio transmission power and frequency!
-
Antenna upgrade
The Air Unit comes with some decent antennas in the box, but they are not of the highest quality or performance. The Lumenier AXII 2 MMCX 5.8GHz promise better coverage, bandwidth, and overall better performance in a similar size. They are also available with built-in LED lights which will make your night flight more spectacular.
As you could read in my DJI V2 Goggles review, this FPV headset uses dual-band antennas (2.4+5.8GHz). Many pro pilots consider that Lumenier Duality HD Stubby (rebranded from TrueRC ) antennas provide the best possible range. They have 1.7dBic @2.4GHz and 2.8dBic @5.8GHz, allowing improved signal reception in a compact form factor.
2. Firmware power hack
Out of the box, the maximum output power in FCC mode is limited to 700mW. This easy hack enables the 1200mW mode that will gain roughly 30% extra range.
- Create a ‘naco_pwr.txt‘ file on your micro SD card;
- Add this line: ‘pwr_2‘ inside the file;
- Save the file;
- Power on DJI Goggles and Air Unit, WAIT until you see a live image from the camera;
- Load the micro SD card into the DJI FPV Goggles;
- Restart the DJI Goggles.
The above trick works only if your DJI FPV system is in FCC mode. If not, first you need to follow these steps:
- Create a ‘naco.txt‘ file on your micro SD card;
- Write ‘1‘ inside the file (for rolling back write ‘3’ for CE mode);
- Save the file;
- Insert SD card in the Air Unit;
- Power up goggles, and then Air Unit.
Best camera for very lowlight/ night flying with Dji / Caddx AIR Unit?
Visitor Rating: 5 Stars
Best 7″ frame for DJI AIR Unit VTX is?
What’s the best micro sd card to use for the DJI Air Unit?
The new O3 Air Unit will have inbuilt stabilization and 4K recording. It’s a game changer!
There is any difference between the original DJI and the Caddx Air Unit?
Thank you
Joel
Apparently, there is no difference! They look the same, they have the same specification. Actually, I think that DJI stopped manufacturing the AIR UNIT.
NO difference!
Visitor Rating: 5 Stars
Visitor Rating: 5 Stars
Visitor Rating: 3 Stars
Visitor Rating: 4 Stars