Frankly, I was a bit reticent to review this Eachine MC01 FPV camera because on first impression it looked very cheap compared to the RunCam cameras I tested in the past.
Eachine’s idea to integrate the camera, 5.8G TX, and the antenna into a single FPV gear is probably the most appreciated feature by those who want to build their own micro racing quadcopter. With minor investment, they can get a lightweight AIO FPV camera which only need to be mounted on the front of the quad-copter and connected it to the main Li-Po battery.
Not late after the MC01 AIO camera was announced, Eachine came up with another similar concept (3 in 1), the MC02. This new upgraded model has better video resolution (900 TVL) and dual power TX (switchable between 25 mW and 200 mW).
Before this camera, I reviewed many other Eachine products and can say they have an excellent price/value ratio. Over time Eachine earned great popularity with their cheap beginner drones but also thanks to their nice FPV racing quadcopters (Racer 250 and Assassin 180).
Eachine MC01 quadcopter camera review
Although the camera arrived last week, my Eachine MC01 review was delayed by a Vienna city break from which I just returned. I heard in Vienna, that there is a very big FPV racing community but unfortunately, this weekend, they didn’t organize any event.
Before I get into details, I should mention that this camera was offered by the courtesy of Banggood in order to make an honest review. Thanks again for your continuous support.
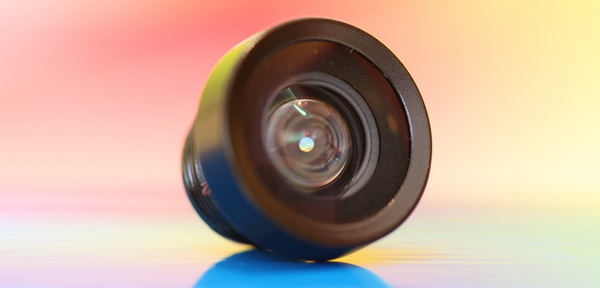
Inside the small cardboard box, there is a piece of foam that protects very well the camera and its antenna. The tiny lens comes with a lens cap in order to protect it from scratches. The focus point of the MC01 camera can be adjusted by rotating the lens.
Besides the camera, the box contains two servo cables and 3 pieces of balance connectors (for 2, 3, and 4s Li-Po batteries). While one cable is ready to use, the second one must be soldered with the desired balance connector. Unfortunately, there aren’t included any mounting accessories, and you have to improvise something by yourself.
The Eachine MC01 camera weighs about 7 grams and measures 25 x 18 x 19.7mm without antenna. The nickel-plated 4-leaf antenna is directly soldered on the top of the camera’s main board.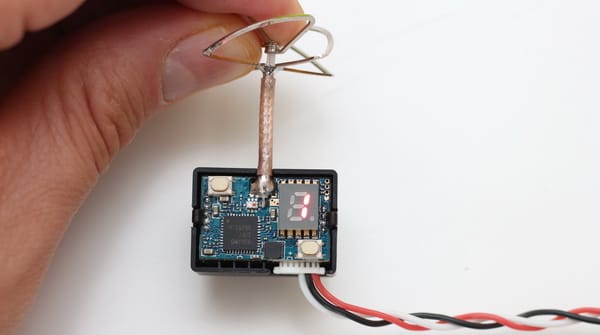
Eachine MC01 camera highlights
- All-in-one concept (camera, 5.8TX and antenna);
- Lightweight;
- 120-degree FOV horizontal viewing angle;
- 150-degree diagonal perspective;
- Integrated 25mw TX (5 bands, 40 channels with raceband);
- Compatible with PAL and NTSC video standards;
- Nickel-plated 4-leaf antenna (RHCP circular polarization);
- Can be switched between horizontal and vertical viewing (the camera can be installed on any direction);
- Wide input voltage range, DC 5V to 17V (suitable for 2s – 4s LI-POs);
- Low power consumption (about 100mW).
Compared to my first 5.8G TX module, which had 600 mW transmission power (btw, probably it is illegal in most countries) the 25 mw TX this MC01 has sounds tiny. Due to its limited TX power, this camera is suitable for “park-flyers” and cannot be used for long-range flights. Of course, using some extreme antennas on the receiver part, the range can be extended but I don’t think that it is worth the effort.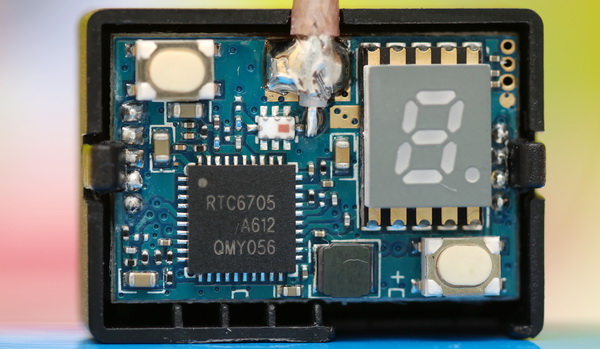
On the rear part of the camera, there are two micro push-buttons and a seven-segment LED display. The upper button allows you to toggle between NTSC/PAL video systems (press for 10 seconds) and rotate the image depending on the installed orientation (press for 2 seconds to rotate upside down and for 5 seconds to rotate left/right). The 2nd button allows to select both frequency and band (push 1 second to change frequency and 2 seconds to select band).
Eachine MC01 frequency table
- Band A: 5865, 5845, 5825, 5805, 5785, 5765, 5745, 5725
- Band B: 5733, 5752, 5771, 5790, 5809, 5828, 5847, 5866
- Band E: 5705, 5685, 5665, 5645, 5885, 5905, 5925, 5945
- Band F: 5740, 5760, 5780, 5800, 5820, 5840, 5860, 5880
- Band R: 5658, 5695, 5732, 5769, 5806, 5843, 5880, 5917 (RaceBand)
As you can see on the table above, this camera is compatible with almost any 5.8G FPV display, including FPV goggles.
Eachine MC01 camera test
The servo cable has 3 wires (red – supply input, black – GND and white – PWM).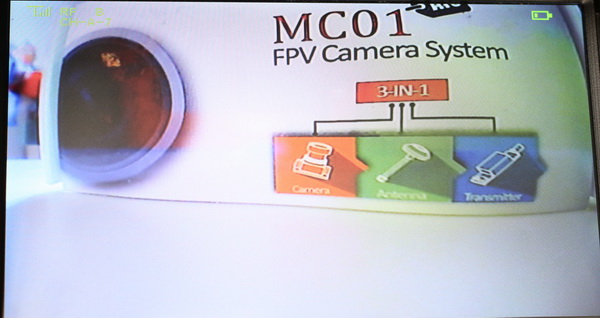
Firstly, I opted to test the camera using a 2s Li-Po and my Eachine LCD5802D FPV display. As I previously mentioned, the wiring is very simple, you need just to connect the camera to a power supply (drone’s main battery). The newer Eachine MC02, together with the included voltage booster, can be used even with 1s Li-Po batteries.
Overall, the image quality is good but it doesn’t have a fast response to light changes as my RunCam Swift camera. Anyway, for its price, I think you can’t find a better camera with 5.8G TX.
The field of view is wide enough for FPV proximity flights. I managed to fly about 250 meters far from me till the TX reached its limits. Not bad for a 25 mW one.
The Eachine MC01 camera paired with the GTeng T909 FPV watch can be successfully used like any other baby monitoring system.
Pricing and availability
For those who are interested in this nice AIO FPV camera, it can be ordered from here. If you need more TX power or just want to use the FPV camera on a low-voltage aircraft (1s Li-Po), you should opt for the Eachine MC02.