
I think there is no drone pilot that at least once didn’t need urgently a 3D printed part or accessory. No one can contest how convenient (fast and cost-effective) is to make your own camera mount in the comfort of your own garage instead of ordering on eBay. The ELEGOO MARS 2 PRO is the first-ever 3D printer I tested and hope to be followed by other models too. Choosing the right printer, it’s not as easy as you may think. At the end of my review, I compared the two most used consumer 3D printer technologies (resin vs filament).
Elegoo has three 3D printer product lines. While the Mars and Saturn series are using LCD/MSLA technology, the Neptune family are FDM printers. In addition to the 3D printers, they also offer a wide range of electronics including UNO\MEGA Arduino kits and STEM educational robots.
Elegoo Mars 2 Pro uses 405nm UV light and a 2K monochrome LCD for precise resin curing, allowing impressive output. Build volume is 130 x 82 x 160 mm with 1620*2560 XY resolution and 30-50mm/hour printing speed (Z-axis).
ELEGOO MARS 2 PRO 3D printer in the world of drones
Disclosure: I received this resin printer as part of a product review collaboration with Elegoo. Although the product was offered for free, all the opinions in this article remain my own!
In addition to the Mars 2 Pro 3D printer, Elegoo included a bottle of grey resin in the package for the tests. Elegoo did an excellent job with the packing -the fragile content was perfectly protected on all sides. The ‘Tool kit’ box includes all the accessories you need to print your first model. They also include gloves and masks for your safety. I received all the parts shown in the picture below, except the measuring cup.

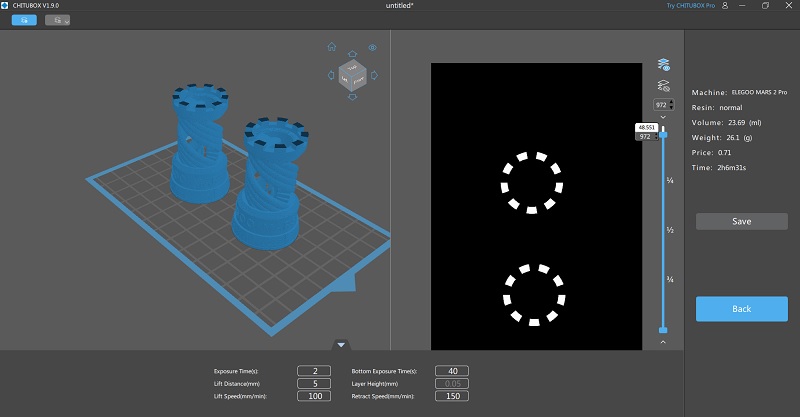
The 2GB USB sticks come with the PDF instruction manual, Chitubox slicing software (Linux, Mac OS and Windows 32/64 versions), and the well-known rook.ctb test file.
At a glance
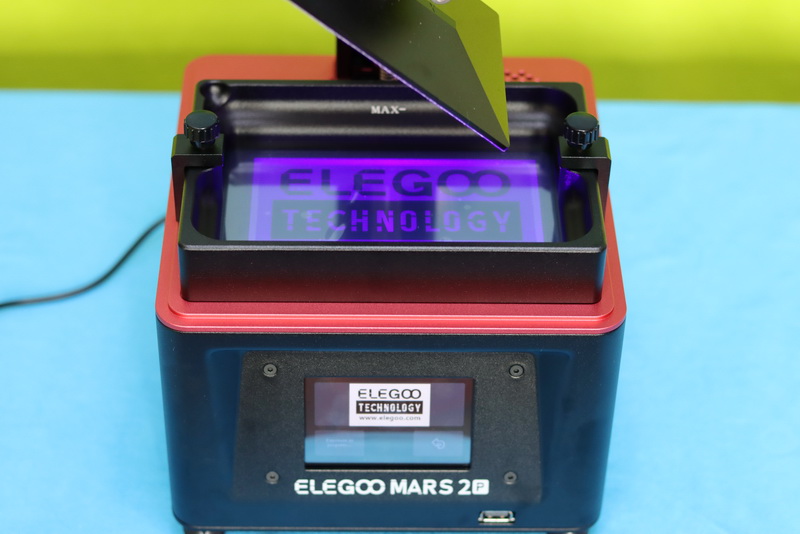
The Elegoo Mars 2 Pro looks very similar to its predecessors, the Mars and the Mars Pro, at least from the outside. The second-generation Pro offers active air filtering, a rubber cover seal, aluminium resin vat (instead of plastic), and a 0.4” taller print area for a higher price tag.
It comes fully assembled, you just need to remove some protective films, install the building platform and load the tank with resin. The base unit is made from lightweight aluminium. The resin container is secured on top of the 2K mono LCD using two screws. Remember to check the tank for leaks before usage. Also, pay attention to load the vat with resin only till the ‘MAX’ indicator.
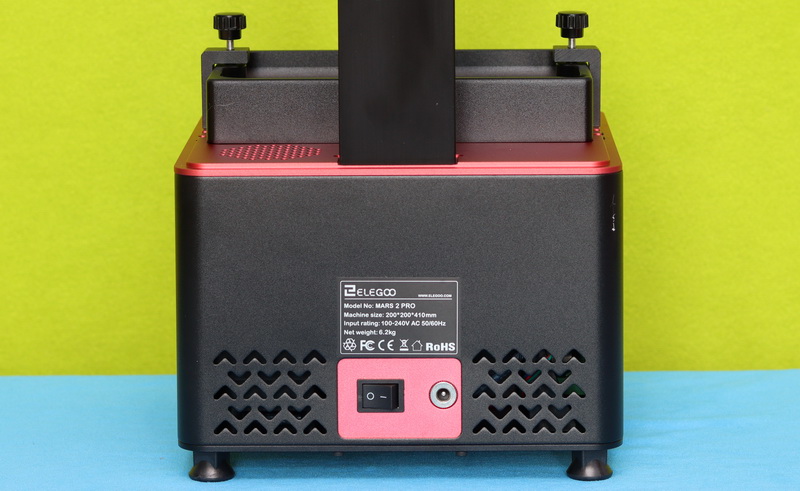
The printer is powered by a 12V/4A AC/DC power adapter. It has a power switch on the back which instantly stops the print process. Also on the back, there are lots of vent holes for the COB UV light cooling air. In addition to the cover’s rubber sealing, Elegoo puts inside the Mars 2 Pro a carbon filter to make the exhaust air cleaner.
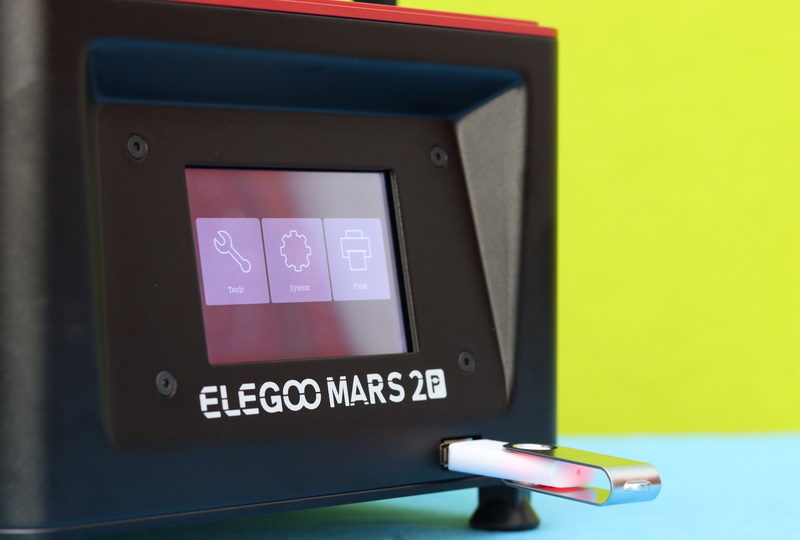
There is a 3.5″ touchscreen on the front panel that allows easy and intuitive control over the device. The USB port for the flash drive with the print files is also on the front.
Key Features
- 2K Monochrome LCD
- COB UV LED Light Source
- Sandblasted building plate
- Built-in Active Carbon filter
- Easy to use Chitu Box Slicer APP
- Outstanding prints and ultra accuracy
- The printing speed of up to 50mm/h (regardless of x*y dimensions)
- 5.08*3.15*6.30″ (129*80*160mm) build volume
ELEGOO MARS 2 PRO: First usage
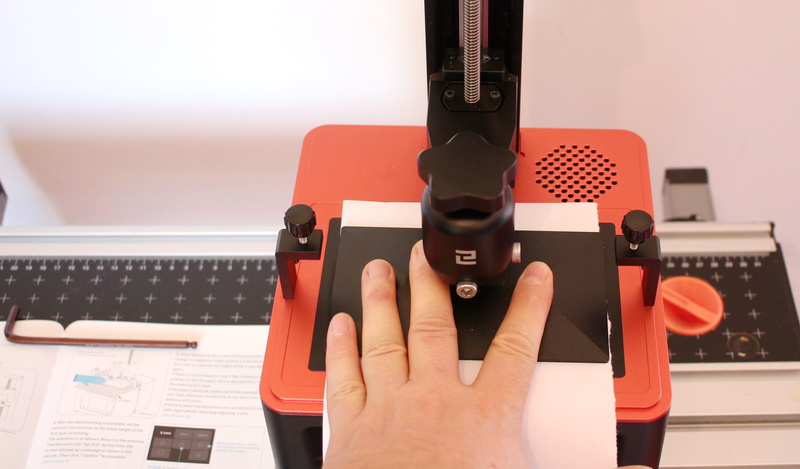
As I previously mentioned, the ELEGOO MARS 2 Pro comes fully assembled. You just need to install and level the building plate. This process is straightforward, it can be done in just a few minutes following the provided user manual. Firstly you need to lose the two screws of the build platform, which will allow similar movement to a tripod ball head. After this step, you need to put an A4 paper between the ‘printing’ platform and the 2K LCD screen and select ‘Move Z-axis to zero‘. When the building plate stops you need to press it with your hand to the paper sheet and tight the screws. If you can pull out the paper with minimal resistance, select ‘Z=0’ from the user interface and you are done.
I have spent the last two weeks playing with the Elegoo MARS 2 PRO and ChiTu Box (free edition), the slicing software with auto support creation, which is a must-have have for resin printers. The STL file format is the most commonly used format for 3D printing, but unfortunately, they need to be adapted/converted with Chitubox to be compatible with the Mars 2 Pro. Depending on your model’s geometry, you will also need to add supports to prop up overhangs, spans, and other unsupported minima in order to ensure a successful print. On websites like Yeggi, Cults3d, and Thingiverse, you can find tons of 3D model designs, so you don’t need to start from scratch.
After you copied the desired models to the USB stick, you can load the container with resin but not before you checked the below safety recommendations.
For safe operation of resin printers, be sure to:
- Use the 3D printer in well-ventilated spaces with limited occupancy;
- You have to protect your skin, eyes, and respiratory system. Always wear protective clothing (gloves, masks and glasses);
- Wash hands thoroughly after working with SLA printers;
- Never bring food and drinks or handle cosmetics and contact lenses in your designated 3D printing area.
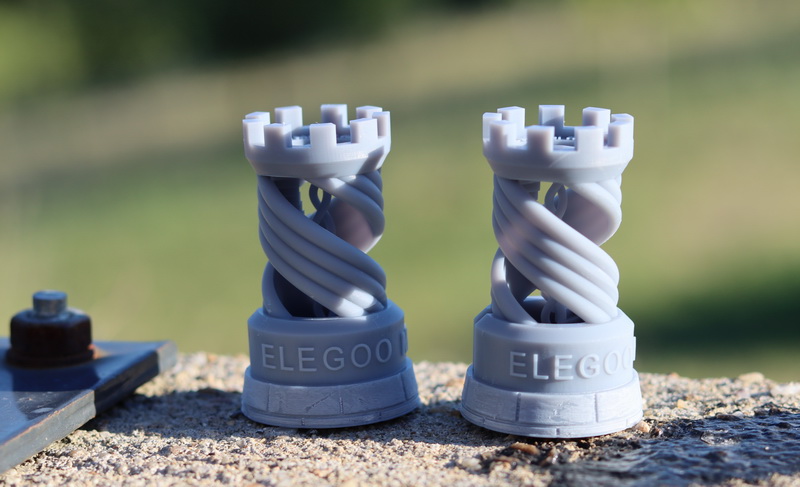
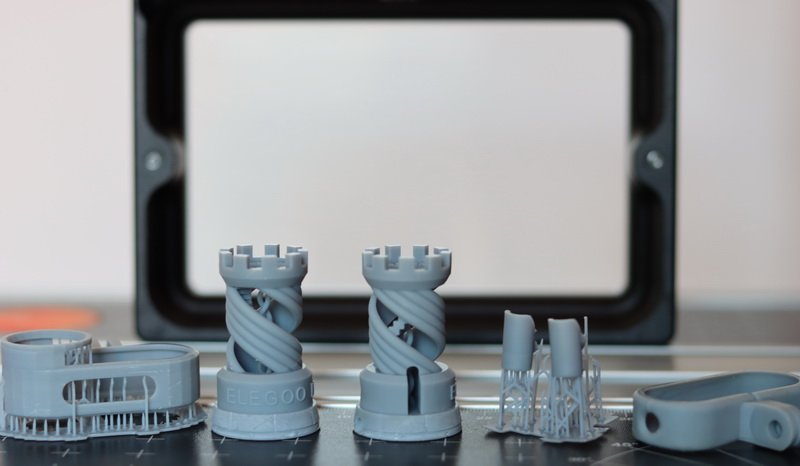
Firstly I printed the rook chess piece provided on the USB drive. The process took about two hours. According to the slicing software, the estimated consumption was about 23.69ml resin with a cost of just $0.71. Print quality is amazing! It can’t be compared with anything I saw before. The surface is very clean, with lots of details.
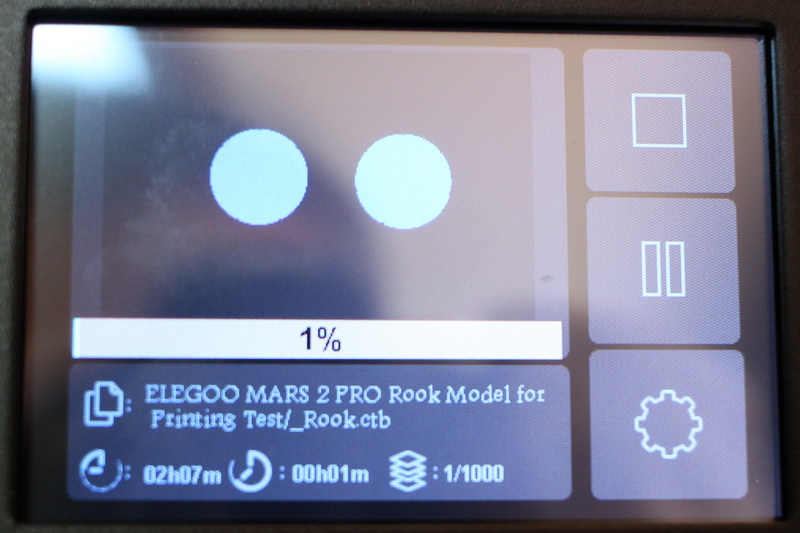
Printing takes a long time because the UV LED needs to shine on each layer for a few seconds in order to cure the resin and adhere it to the layer above. You can see a graphical reproduction of each layer on the touchscreen, with current/total layers and elapsed/remaining time. The printer work quietly, only the UV LEDs cooling fan can be heard.
Next, I printed a couple of Insta360 GO 2 camera mounts. Apparently, they looked good, but when I tried to load the camera, they broke easily. Maybe the resin settings were wrong or the post-curing process, but the mounts were too fragile. I plan to order ABS-like resin that promises to be less brittle. I will keep you updated with the results.
Finishing your print
When the print job is finished, the building plate will rise automatically to the highest position. Wearing a latex glow, you have to remove the build platform and hang it on the 45° dripping support. In a few minutes, the excess residue will drip back into the container. Use the metal scraper to remove the workpiece from the platform.

You can leave the remaining resin in the vat for up to 48 hours. If you don’t intend to print something in the following two days, you can filter the resin with the included funnel and pour it back into the bottle for further use.
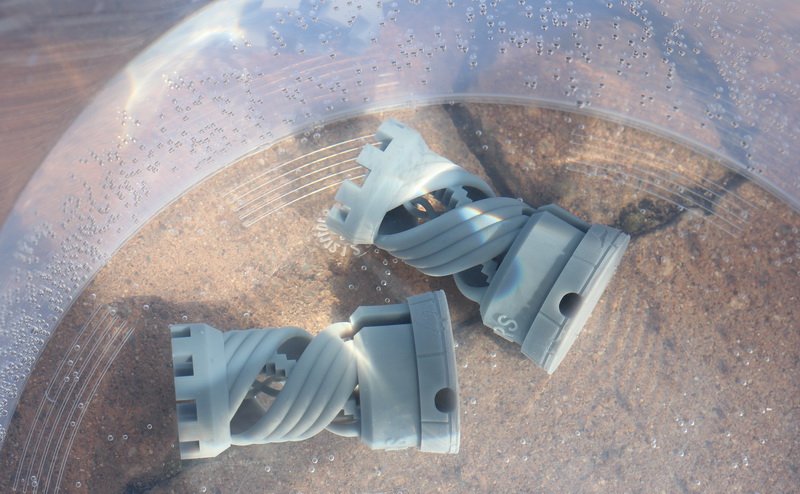
You need to immerse and clean the model in water or isopropyl alcohol (95% IPA) according to the resin type you used.
The last step is to post-cure the model for further strengthening with UV light. You can use the ELEGOO Mercury curing machine or just put it in direct sunlight for a few minutes.
Firmware update
Because the Mars 2 Pro was not delivered with the latest firmware, it couldn’t read and print the cbt files generated with the recently released ChituBox v1.9.0.
If you have a computer at your hand, the firmware update process is easy. You just need to download the latest Mars 2 Pro firmware from Elegoo (USER SUPPORT FOR MARS 2 PRO\Firmware) and unpack the content to the root of a USB stick. When the USB drive is loaded into the printer, the software update process will start automatically and finish in a few minutes.
Price and availability
Now you can get the Mars 2 Pro for $259.99 with $70 off from Elaggo’s website. You can opt for US or EU warehouses. Compatible resins are available with a starting price of $17.99 for a 500 grams bottle.
Useful resources:
- Mars 2 Pro user manual
- Build plate calibration tutorial
- Latest Mars 2 Pro firmware
- Resin printer maintenance guide
Resin vs Filament 3D Printer: The Differences
There are few major differences between SLA (Stereolithography Apparatus) aka ‘Resin’ printers and FDM (Fused Deposition Modeling) aka ‘Filament’ printers. Mechanically filament printers are more complicated because the extruder needs to move on 3 axis (or 2 axes + moving build platform). By comparison, resin printers have only one moving axis, which lifts the printing plate out of the resin tank.
When it comes to printing your models at home, the strong smell and toxicity of the resin can be a huge turnoff. ELEGOO’s MARS 2 PRO printer features a built-in active carbon filter that promises that you’ll barely smell any irritant odour. You may not know it, but the LCD screens used in resin printers are considered consumables. After a while, the display dims and needs to be replaced. On the other hand, MSLA resin printers provide outstanding quality for a reasonable price.
How do filament printers work?
During the printing process, the thermoplastic filament is fed through a hot extruder where the plastic gets soft enough to be precisely placed by the print head. The melted filament is then deposited layer by layer in the print area to build the desired workpiece. There are plenty of filament types with different mechanical (Strength and Flexibility) characteristics and colours to choose from.
How do resin printers work?
In the case of resin printed, models are also built layer by layer. Instead of a solid filament, they use a curable photopolymer (liquid resin) that is hardened by applying focused light or UV light. SLA printers usually build the models upside-down. The building platform lifts the model upwards, out of the resin bath. UV sensitive resins are available in less variety than filaments.
Visitor Rating: 3 Stars
Great compact 3D Printer!
My Mars 2 Pro came in yesterday and I just read your review. Helped a lot in the setting process. thank you!
I have my Mars 2 printer in my room is it safe to sleep with it ON? I read that resin can be dangerous…
Yes, resin printers should be used only in well-ventilated spaces.
Visitor Rating: 3 Stars
Best resin 3D printer! Simple to use and does not miss a print.
With the carbon air purifier will that mean it will be safe to use indoors without ventilation? Thanks.
3d printers are noisy (filament), smelly (resin), or both. I out them always in a separate room!
One of the best resin printer from Elegoo!
The Mars 2 Pro is a superb 3D printer but I recommend using lychee slicer instead of chitubox!
Visitor Rating: 5 Stars
Visitor Rating: 3 Stars
Visitor Rating: 4 Stars