
Last Monday, returning from a short holiday where I took only the DJI Phantom 3 with me, I realized that racing quadcopters is much fun. Next time I will squeeze this Floureon Racer 250 too in my luggage. My flights from this three-day holiday ended with about 10GB of aerial videos. Most of them are boring, useless scenes.
Racing quads are about living the moment and enjoying the adrenaline. Of course, firstly, you need several flight hours with a more “gentle” drone till you achieve pilot skills and unleash the devil from a speedy quad like the Floureon Racer 250.
In order to allow a more realistic sensation most of the actual racing drones like this Floureon Racer 250 are equipped with real-time image transmission. This means that you can see what the drone sees. For this purpose, you can use FPV screens (with different sizes 4″-10″) or FPV goggles. Till now I had only a few flights using FPV glasses, and I can say that it is very cool but in the same time pretty hard to control this way a drone.
 At the beginning, racing quadcopters were very simple in terms of design. The focus point was on the weight, aerodynamic shape, and robustness of the airframe. Lately, manufacturers are trying to add something “cool” to make their racer more interesting than competitors’ products. I’ve just read a quadcopter news about a drone that is capable of achieving speeds up to 250 km/h. This insane flight speed was possible by using 6s Li-Po batteries (22.8V).
Floureon Racer 250 quadcopter review
Damn DHL, I had to pay $ 87 taxes in order to receive the package after a ridiculously long delivery time. Unfortunately, because of some weight limitation and Li-Po regulations, GearBest always opt for their “express” services. Before I get into details, I should thank them for the continuous support of my website with new and exciting products.
Two CNC cut foams ensure that every component remains in its place, preventing scratches or other damages during overseas shipping. One “layer” contains the Floureon Racer 250 quadcopter, 2 sets of propellers, one 1500 mAh flight battery, a B3 AC balance charger (2s and 3s), a battery strap, and the 5.8G mushroom antenna. The second layer contains the FlySky FS-i6 transmitter, the 7″ FPV display, the 5.8G rubber ducky antenna, LCD mounting accessories, neck-strap, and JST-DC charging cable.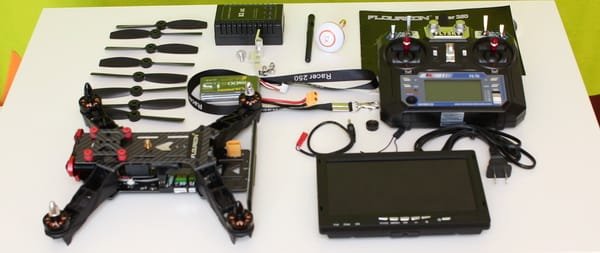
Except for the instructions on how to arm/disarm the motors, the Floureon Racer 250 user manual does not include too much information. Newbies will need to dig a bit in order to find out how to install the propellers correctly and also how to switch between flight modes.
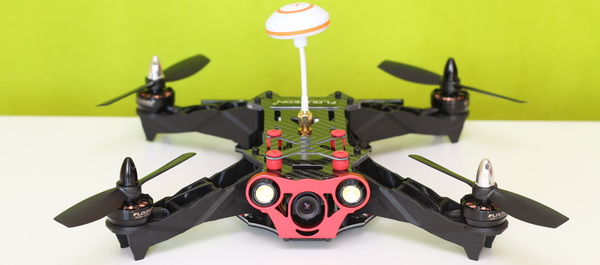
Holding the drone in my hand, I first noticed that it was not made integrally from 3K carbon fiber. The arms are made from nylon. Anyway, carbon fiber ones can break too, like it happened in the nasty crash during my first drone flyaway.
In the front part are two 3w LED lights, one on each side of the 1000 TVL camera. On the rear, there is located a generous LED bar whose color is adjustable, according to the specs (frankly, I doubt it because it has only two pins, + and -).
Both headlights and taillights can be switched ON/OFF through a micro-switch located on the left side of the drone.
The SMA connector of the 600 mW TX module is positioned on the upper carbon fiber plat, almost in the center of the drone. I recommend installing the 5.8G mushroom antenna before you power ON the quad, at least if you don’t want to burn out the FPV TX board.
Thanks to the anti-vibration plate, you can install a secondary camera on top of the Floureon quad-copter (like one of these quadcopter cameras), which allows you to record the journey of your flights.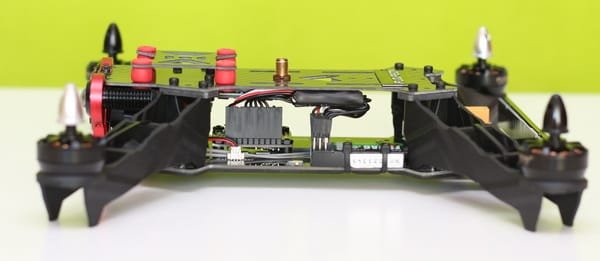
Although there is enough space to install the battery between the two plates, some badly placed capacitors will make it harder to load the 1500 mAh Li-Po. I saw some videos where the pilots installed the battery under the upper plate instead of the dedicated battery bay.
While both design and build qualities are good I had the feeling of a “half DIY” product. It doesn’t have the same well-engineered construction as my Walkera F210.
Floureon Racer 250 manufacturer’s specs and features
- NAZE32 6DOF flight controller;
- Built-in OSD (battery voltage, flight time, and FPV channel);
- 3W frontal LED lights;
- Powerful brushless motors (2204 2300KV);
- 20A BLHeli ESCs;
- 1000 TVL camera with angle adjustment;
- 32CH 600 mW 5.8G wireless image transmission module;
- 7″ FPV display (800 x 480 pixels);
- Up to 10 minutes flight-time;
- About 500-800 meters control range in open field.
Floureon Racer 250 review – Remote controller / Transmitter
Like many other quadcopter manufactures, Floureon opted to include in the package the FS-i6 entry-level remote controller from FlySky, which according to my knowledge, is a copy of the Turnigy TGY-i6 transmitter. My F450 DIY quadcopter uses the same RC, so I’m familiar with the controls.
Based on my good experience with this transmitter, it has an excellent control range even if it looks a bit cheap.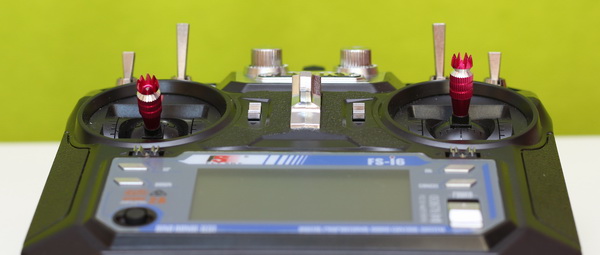
Besides the usual control sticks and trimming buttons, the transmitter has 4 switches and 2 dial knobs. Although all 6 channels of the FS-i6A receiver are wired to the NAZE32 flight controller, only one switch (SWC) seems to be designed for action.
Through the transmitter’s configuration menu, you can freely assign to the two auxiliary channels any of the switches or dial knobs.
The package includes a tiny jumper cable, which you will need in case you want to pair the Floureon Racer 250 quad with another FS-i6 transmitter.
Floureon Racer 250 review – Camera and FPV system
Compared to other cheap racer drones in which you supplementary need to invest for an FPV display, this Floureon Racer 250 comes with a complete FPV system, including a 7″ FPV screen.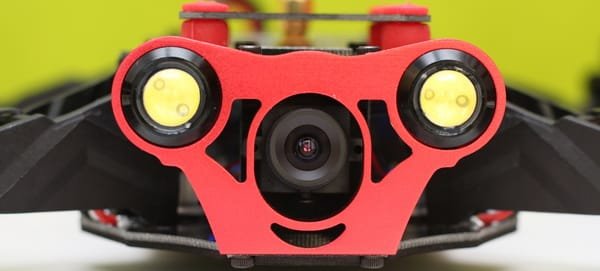
The extreme 600 mW TX module guarantees a great transmission range. According to the specs, the frontal 1000 TVL camera’s angle is adjustable, but unfortunately, this can not be done easily. The quality of the image is decent, but the camera responds slowly to light changes.
The 7″ FPV screen comes with an integrated buttery and rubber ducky antenna, but not with a sunshade.
Only a JST-DC cable is provided to charge the screen’s battery. I know it is not an elegant approach.
If you want to record the live-video feed, you can use a small DVR connected to the screen’s AV-out jack.
Installing the FPV display on the transmitter can be done using the included mounting accessories. Maybe newbies will find this process a bit complicated without any assembly instructions.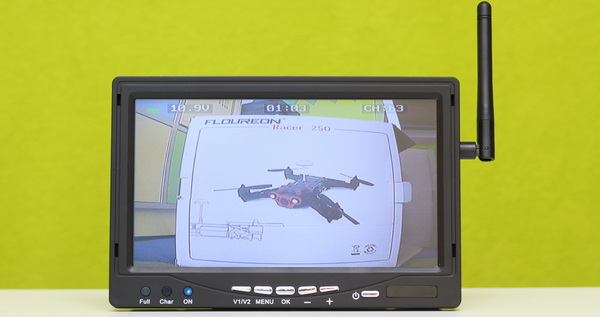
Floureon Racer 250 review – Maiden flight
The motors can be armed by pushing the throttle stick (mode 2) to the lowest right position. Disarming the motors can be done by pushing the same stick to the lowest left position. I recommend that first-time pilots to practice the arm/disarm sequence a few times before they put the props on.
Testing the drone indoors is not a great idea, especially for beginners. At least if you don’t want to re-decorate your living room :D because the Floureon Racer 250 is a mighty machine and needs space to fly safely.
For my outdoor test, I fully charged the original battery and a similar spare one. I got an average of 7 minutes of flight time. I loved the speed and the fast response of the quad.
Both ranges (control and FPV) are excellent, even longer than I have the confidence to fly.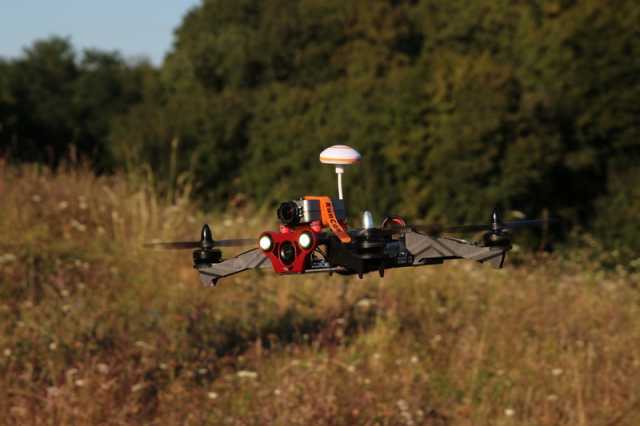
The FPV (real-time image transmission) worked vey well with the included FPV monitor and my Walkera Goggles 4. Thanks to the OSD (battery voltage and elapsed time) you can estimate the remaining flight time.
If the drone loses communication with the RC, it will lower the throttle to prevent the flyaway. Unfortunately, it doesn’t have a buzzer, so if you crash, you will be guided only by the bright LED lights to find it.
Unboxing and maiden flight video
Pricing and availability
This quad has 30% off and free shipping at $253, which is not bad for an RTF FPV racing package. Probably, like in my case, others can also own the same transmitter, the compatible battery, and a better FPV monitor, so it would be nice to be able to purchase a more affordable PNP package for this Floureon Racer 250 drone.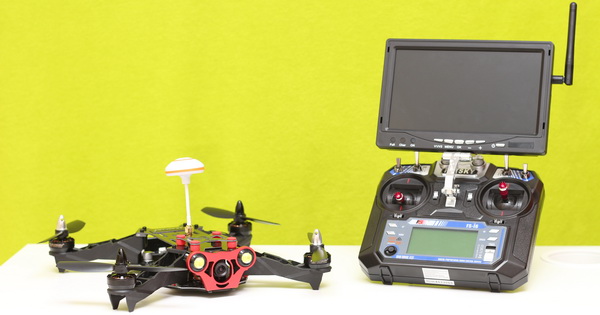
Floureon Racer 250 – better racing quad or just a clone of the popular Eachine Racer 250?
In terms of design, these two racing quadcopters are very similar without noticeable differences.
Both are delivered with the same FlySky i6S transmitter and a very similar FPV screen. Basically, the package content is almost identical.
In my opinion, the most relevant difference between the Floureon Racer 250 and Eachine Racer 250 is the flight controller. While the Floureon Racer 250 adopts the F3 Naze32 FC, the Eachine Racer 250 features a CC3D flight controller. These two flight controllers are very similar to each other: both are 3.6 x 3.6 cm in size and use a powerful 32-bit STM processor. The Naze32 FC uses an MPU6050 sensor chip (gyro + accelerometer), and CC3D FC uses the MPU6000. Anyway, the performance of the flight controller is determined not just by the hardware but also by the firmware.
I cannot get info the FC to run the setup wizard or to do any programming/tweeking at all.. They are selling a kit that comes without a transmitter or receiver now for $140.00. As such, it requires Cleanflight, BetaFlight, Openpilot or LibrePilot GCS… It seems I cannot get it to bootload or whatever. How do you get into this FC chip to get the setup completed? Does anyone have experience with this? I have a day and a half into this and i am ready to get this figured out already! No help from the ebay seller of course… Not sure how to get support for this thing!
Thank you!
Riley C
Sadly, my excitement about getting my first hobby level racer has been fractured by the fact that once it arrived, I found the charger cable was faulty, the battery provided only charges 2 or the 3 cells and it wont arm or bind to the controller.
All in all, a very disappointing experience for something claiming to be RTF.
I’ve spent over £100 on replacement parts so far, not including the FPV headset and battery that I hoped to be using with it…and obviously cannot.
Now awaiting a new receiver before I unpack it again and spend hours trying to get it to work.
I wish the manufacturers had invested in a full manual including the use of cleanflight etc, rather than the awful effort they did supply.
I expect RTF kits are for people like me that are new to stuff like this. Ready to fly? Ready to Fail!
Is it possible to fly it on 4s?
Love my floureon racer 250. Only issue I have is getting replacement parts, some are easy to find, some are not, like the camera surround (red aluminum) and the carbon fiber top plate. I assumed the eachine racer 250 was the same, considering they look exactly alike, but I was wrong. Please tell me where I can get all the parts.
Hello Chris!
I’m really happy with this floureon.
Simple question…
How do you charge the 7” monitor??
Have you found something?
Thanks!
JJ
I charged mine with power adaptor from a Eachine FPV monitor but after 5 charges the battery died…
I removed the internal battery and I attached another one with higher capacity using a Velcro tape. Now I charge the battery with a regular 2s li-po charger.
I just brought a universal adapter and it worked fine with that. though make sure you get one with changeable voltages…think this was 9v
Brilliant review.Wish I read it before flying :(
My Floureon 250 has just arrived today,I couldn’t wait to test it and went charge it up and fitted the props on to test in indoor(crashed it of course).Massive mistake…To cut the long story short,the front motor is not working now…What do I do?
Thanks
I have also crashed mine! …it was just a simple test indoors and end of story.
It was not working and I found the solution.
One of the ESC’s ha broken down. I have already replaced all by new ones (good ones by the way, EMAX) and it’s flying again finally. Outdoors of course!
Big question…
How do you charge the 7” monitor??
Thanks!!
JJ
Hello!
Great review!
I’m actually deliberating which of these two drones to purchase (Floureon Racer or the Walkera Runner Advance) so the comparison you did is spot on. Which one of these would you choose?
Thanks,
Dan
Thanks, great detailed review!
Do you know where I can find spare parts for the Floureon Racer 250????
I need a power board and TX+OSD.
BTW, the spare parts are 100% compatible with that the Eachine Racer 250 has????