
Unfortunately, there aren’t many DIY CineWhoop kits out there and, probably, most of you would opt for a prebuild version or to put together your own kit. BetaFPV fulfils both situations by offering the BNF version and all individual parts of the Pavo25. There are two major advantages of starting with the BetaFPV Pavo25. The first is that you’ll better understand how FPV drones work, what are the main parts, and how to maintain them. The second is that, unlike most builds, there is much less soldering to do as most of the drone parts are plug-and-play.
By definition, CineWhoops are intended to record FHD/4K aerial videos. In order to fulfil this, you will need a second camera. The ducted design makes it safer to fly around people or in tight spaces and also offers a little bit of extra stability. While 3″+ Whoops are capable to carry full-size action cameras, smaller 2-3″ drones can lift only lighter cameras that weights less than 50grams, such as the GoPro Bones, DJI Action 2, SMO 4K, Insta360 GO2 or the RunCam Thumb.
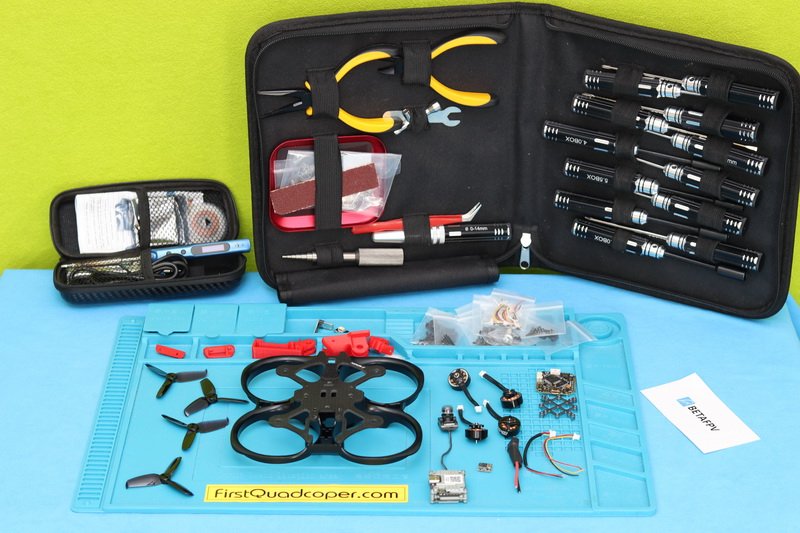
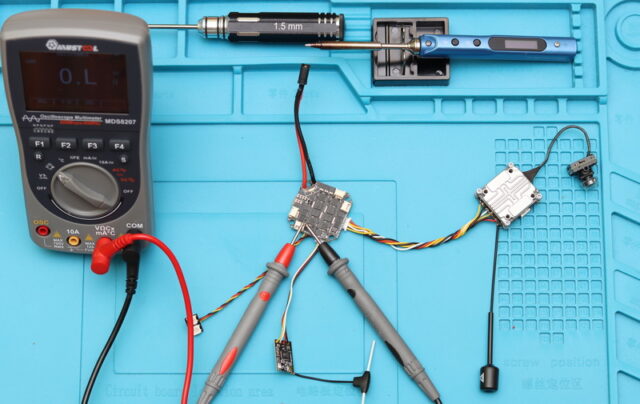
Made with simplicity in mind, the Pavo25 can be quickly built even by those who are new in the field. It also requires a minimal set of tools (soldering iron and a couple of screwdrivers). Unless you don’t want to fry the flight stack on the first power ON, a multi-meter is also welcomed to check for any short circuit.
BetaFPV Pavo25 CineWhoop main parts
Like any FPV drone, CineWhoops also have the following main parts: frame, flight controller, ESC, propulsion system (motors + propellers), FPV system (camera + VTX), and radio receiver. Additionally, you will also need a couple of compatible LIPO packs, a charger, a transmitter (remote controller) and FPV goggles. I opted to build the Pavo 25 drone with the original parts recommended by BetaFPV, which can be ordered from here.
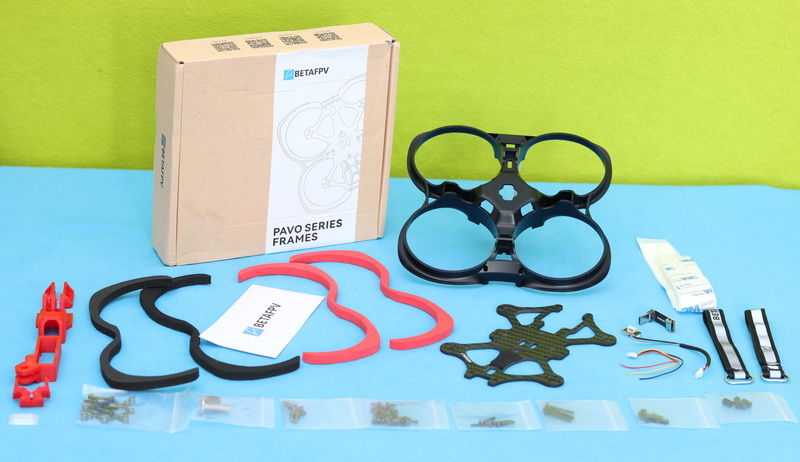
1. Pavo25 frame kit
The frame is one of the most essential parts that define and categorize your drone. The Pavo25 frame kit includes the following parts:
- Pavo25 frame assembling guide (diagram);
- 2.5mm thick top carbon fibre plate;
- 360-degree high-quality PA12 Whoop protection guard;
- Lots of bags of screws;
- 3D Printed camera mounts, battery and antenna holder;
- Rear RGB LED Light module + 3D printed holder;
- CNC Caddx Vista adapter;
- Black and Red EVA foams (two of each colour);
- 3M Double-Sided Tapes for protective foams;
- Two 180mm battery straps;
- SMO 4K power cable;
- Assembly instruction.
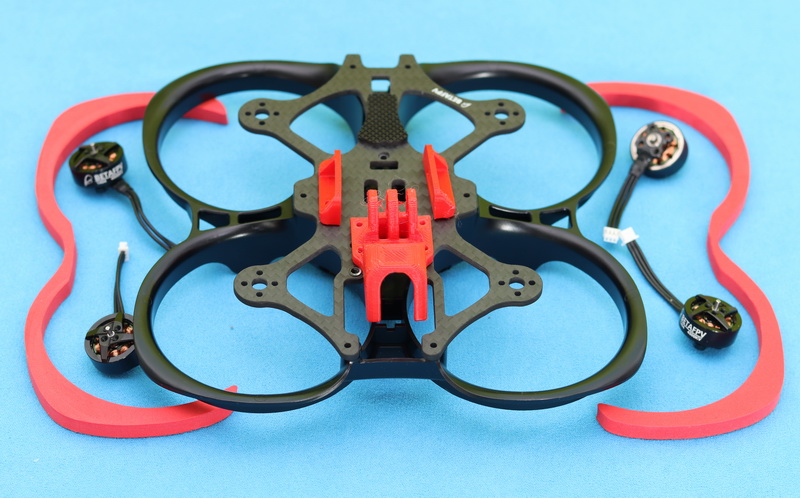
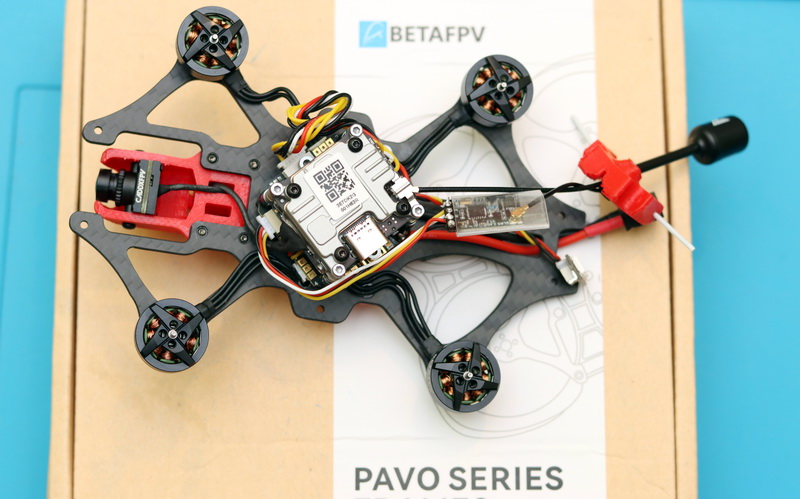
Essentially, the BetaFPV Pavo25 has two parts, a carbon fibre frame that holds together all the electronic components (motors, flight controller, camera, and VTX) and a lightweight but strong protection guard made of high-quality polyamide 12 (PA 12) material with moulded metal screw holes.
The Stretch-X type frame has a thickness of 2.5mm, metal bolts and a wheelbase of 108mm. The two parts are assembled together using only 6 screws, which is handy if you need to replace something inside. BetaFPV includes some protection foams that can be applied on the edges using the provided double-sided tape to improve crash resistance. The bare frame kit (without electronics) weighs 70 grams. HD digital version with Caddx Vista onboard weighs about 150 grams, so you can expect to stay under 250grams easily with a 4S/650mAh battery pack and Insta360 GO2 camera on top.

2. Flight controller: F405 AIO 20A Toothpick V4 with BMI270
BetaFPV’s 4th generation F405 flight controller has an integrated 20A ESC, a BMI270 IMU (Inertial Measurement Unit – Accelerometer & Gyroscope), and four UART ports. The FC has a 26 x 26mm mounting pattern and comes in the box with an XT30 cable with a low ESR capacitor, Digital VTX cable, RX cable, eight motor sockets (4 x vertical + 4 x horizontal), rubber grommets for soft installation, and a bag of screws.
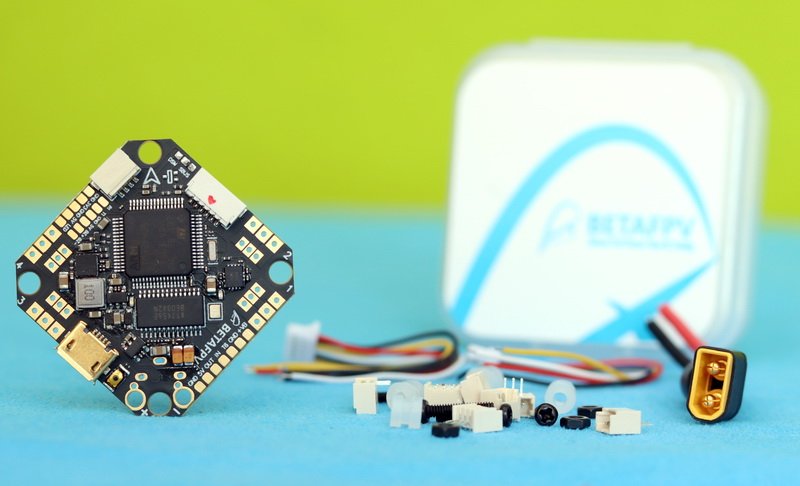
As the motors, radio receiver, and Caddx Vista have connectors, the flight controller is entirely plug&play. It can be replaced in no time if needed. Of course, if you don’t trust the reliability of the plug-in system, there are additional soldering tabs for the motors.
3. Propulsion system: 1404 4500KV motors + Gemfan D63-3B propellers
The 1404 4500KV brushless motors are intended for both Toothpick and Whoop-style drones. They are lightweight, durable and have plenty of power. The motors have a 3m shaft length and a diameter of 2mm. The Gemfan D63 3-leaf propellers are specially designed for Duct type drones.
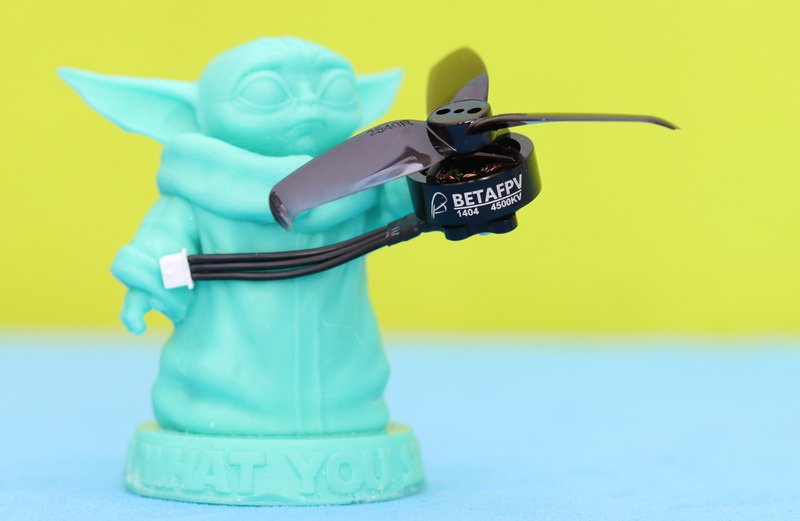
BetaFPV includes four motor carbon fibre clips in the package that pilots can use to increase the height of the props, which could effectively reduce the shaking of drones.
4. FPV system: Camera & VTX
The BetaFPV PAVO 25 frame supports both analogue and HD digital systems. You can opt for a Caddx Baby Ratel2 camera with BetaFPV A03 400mW 5.8G VTX or a Caddx Nebula Pro Nano camera with Caddx Vista digital VTX. When you choose the camera you should consider that the included 3D printed mount has a 14mm opening.
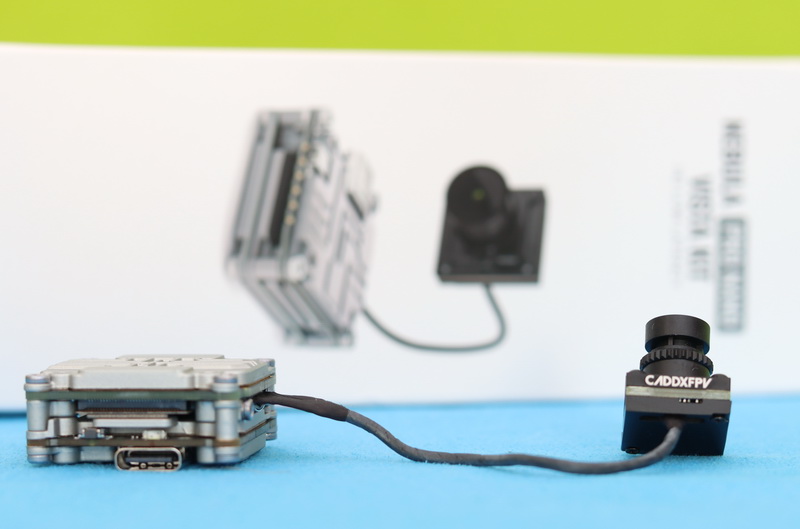
In this review, I opted for the new Caddx Nebula Pro Nano kit. It provides outstanding image quality in a small size. The Nebula Pro Nano camera measures just 14x16x16.5mm and weighs only 3.5 grams.
Complete guide to building the BetaFPV PAVO 25 CineWhoop in less than 1 hour without headaches!
As building this CineWhoop is extremely intuitive, I will focus more on the problems I encountered to avoid making the same mistakes and repeated attempts to solve the issues that do not even exist. While the assembly can be done in less than one hour, the troubleshooting part, in case something doesn’t work as it should, could take days.
When I analyzed the parts I received, I noticed that the flight controller power cable with the capacitor is thicker than the dedicated hole in the frame, so can’t be inserted there.
There are included two sets of motor connectors but is not mentioned which one you should solder it. If you use the vertical ones, you will not be able to plug the motors due to the stacked design.
No description on how to install the propellers (type CW/CCW and side up/down). Also, no mention of the rotation direction of the motors. If these are wrong, the drone will not take off, just flip on one side. I checked my Pavo 30 for these details and I replicated them on the Pavo 25 (check the photo below).

For the Caddx Vista, I used the original cable, which is too long to be comfortably folded inside the frame. Using the shorter one that comes with the flight controller is recommended.
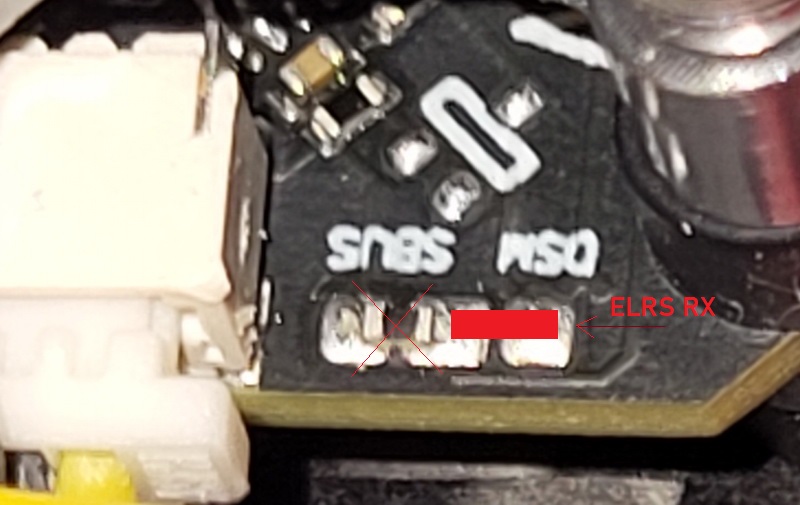
My biggest issue was with the radio receiver. I used a BetaFPV ELRS Nano module that I connected to the onboard connector (UART 3 port) using the included cable. Wiring was made correctly (TX to RX and RX to TX). Both devices (radio receiver and RadioMaster Zorro transmitter) had the same ExpressLRS version (2.5.0). They bonded instantly, but channels & sticks are not shown in the BetaFlight configurator. I tried different firmware versions and settings but with no luck. I read the FC’s online manual again and discovered that out of the factory, the RX configuration pads are set to SBUS instead of DSM/CRSF (see photo above).
Other recommendations for a successful build
- Double-check if all the necessary parts listed above are included in your basket before finalizing the order. It’s very frustrating to wait another few weeks for a missing part, and even pay again for shipping. Also, a couple of spare props, motors, and frame parts are handy to have at home;
- Prior to doing anything, read the product’s manual, wiring diagram, or any documentation that could give a clue about how to puts all things together. Every small detail is important in order to successfully finish your project;
- Before connecting the LIPO pack for the first time, triple-check the solderings for short circuits, also if all the wires are in their place;
- Connect external devices (such as VTX, LED board, motors, and RX) one by one;
- In order to avoid overheating, use a cooling fan during Caddx Vista activation and firmware upgrades;
- Never test and configure the ESC and Motors with propellers installed on!


Generally, FPV drones and their parts are not well-documented products so if you bump into any other problems, Oscar Liang and FirstQuadcopter are great knowledge bases for everyone looking to build their first drone.
Price comparison between Pavo25 BNFs and Pavo25 DIY kits
As shown in the table below, building versus purchasing a fully assembled Pavo25 saves you only a few bucks. I think that it is more important that you learn a lot during the process. I have to admit that my wife would prefer doing something else instead, like mowing the grass or going to a theatre stage with her.
| Pavo25 Analog (ELRS BNF) | |
| Price | $234.99 |
| Pavo25 HD digital (ELRS BNF) | |
| Price | $359.99 |
| Pavo25 Analog CineWhoop kit | |
| Frame kit | $31.99 |
| Toothpick F405 flight controller (V4) | $67.99 |
| Set of four 1404 4500KV motors | $52.99 |
| Two pairs of Gemfan D63 3-leaf props | $2.50 |
| Caddx Baby Ratel2 FPV camera | $25.90 |
| A03 400mW 5.8G | ~$20.00 |
| ELRS Nano Receiver | $16.99 |
| Total Price | ~$219 |
| Pavo25 Digital CineWhoop kit | |
| Frame kit | $31.99 |
| Toothpick F405 flight controller (V4) | $67.99 |
| Set of four 1404 4500KV motors | $52.99 |
| Two pairs of Gemfan D63 3-leaf props | $2.50 |
| Caddx Nebula Pro Nano Vista Kit | $165 |
| ELRS Nano Receiver | $16.99 |
| Total Price | ~$338 |
BetaFPV Pavo25 alternatives: Best CineWhoops for 2022
The Pavo25 is not a unique product in its market segment. There are many other CineWhoops that you could consider. Foxeer’s FoxWhoop 25 is advertised as the ‘Unbreakable CineWhoop‘, but if you read the small letters, you will find out that this stands only for normal usage. If you plan to use a full-size GoPro Hero 10, you will use a bigger 3.5″ Whoop such as the GepRC Cinelog 35 or iFlight Protek 35.

BetaFPV itself also has two alternatives, the Pavo30 which is a larger, more powerful CineWhoop. The Beta95X V3 is also an excellent alternative for less money.
As I’m new to FPV I ordered the RTF version. Charged it, bind it and tried a few line-of-sight Flys, put on the FPV headset, and all worked great. I become instant BetaFPV fun!
I just got the Pavo25 (analog with stock parts) for indoor flying. What upgrades do you all recommend? Motors, props, camera etc.
Very cool tiny little CineWhoop. Perfect for tight gaps!
I have this frame and I built it with an Iflight Beast FC. T-motor 4600kv. Nebula Nano Pro. It is the worst drone I’ve ever had. It has this wiggle when it flys. It is so bad that it will sometimes fall out of the sky. Oscar Liang has a video of this quad and his does the same thing. Mine is worse than Oscars. What a waste of $$.
Sorry to read about your issue but if you used your own electronics (FC, motors, and FPV kit) how can be the frame responsible that it ‘fall out of the sky’??
Pavo25 is the Best CineWhoop I ever had. Stock tune from factory is amazing!
Visitor Rating: 3 Stars
I like the Pavo25. It has a power plug and mount for SMO 4 camera. Great work BetaFPV!
Visitor Rating: 5 Stars
I have a Nebula Pro camera, the bigger one. It can be installed on the Pavo25 frame?
Thanks for the review!
Visitor Rating: 3 Stars
Visitor Rating: 5 Stars
that frame is too heavy for those tiny motors
Visitor Rating: 4 Stars